By: Team AY1920S1-CS2103T-W12-4 Since: Sep 2019 Licence: MIT
- 1. Introduction
- 2. Setting Up
- 3. Design
- 4. Implementation
- 5. Documentation
- 6. Testing
- 7. Dev Ops
- Appendix A: Product Scope
- Appendix B: User Stories
- Appendix C: Use Cases
- Appendix D: Non Functional Requirements
- Appendix E: Glossary
- Appendix F: Product Survey
- Appendix G: Instructions for Manual Testing
1. Introduction
IchiFund is a financial tracking application that manages transactions, loans, as well as budgets.
Shown below is the GUI of IchiFund:
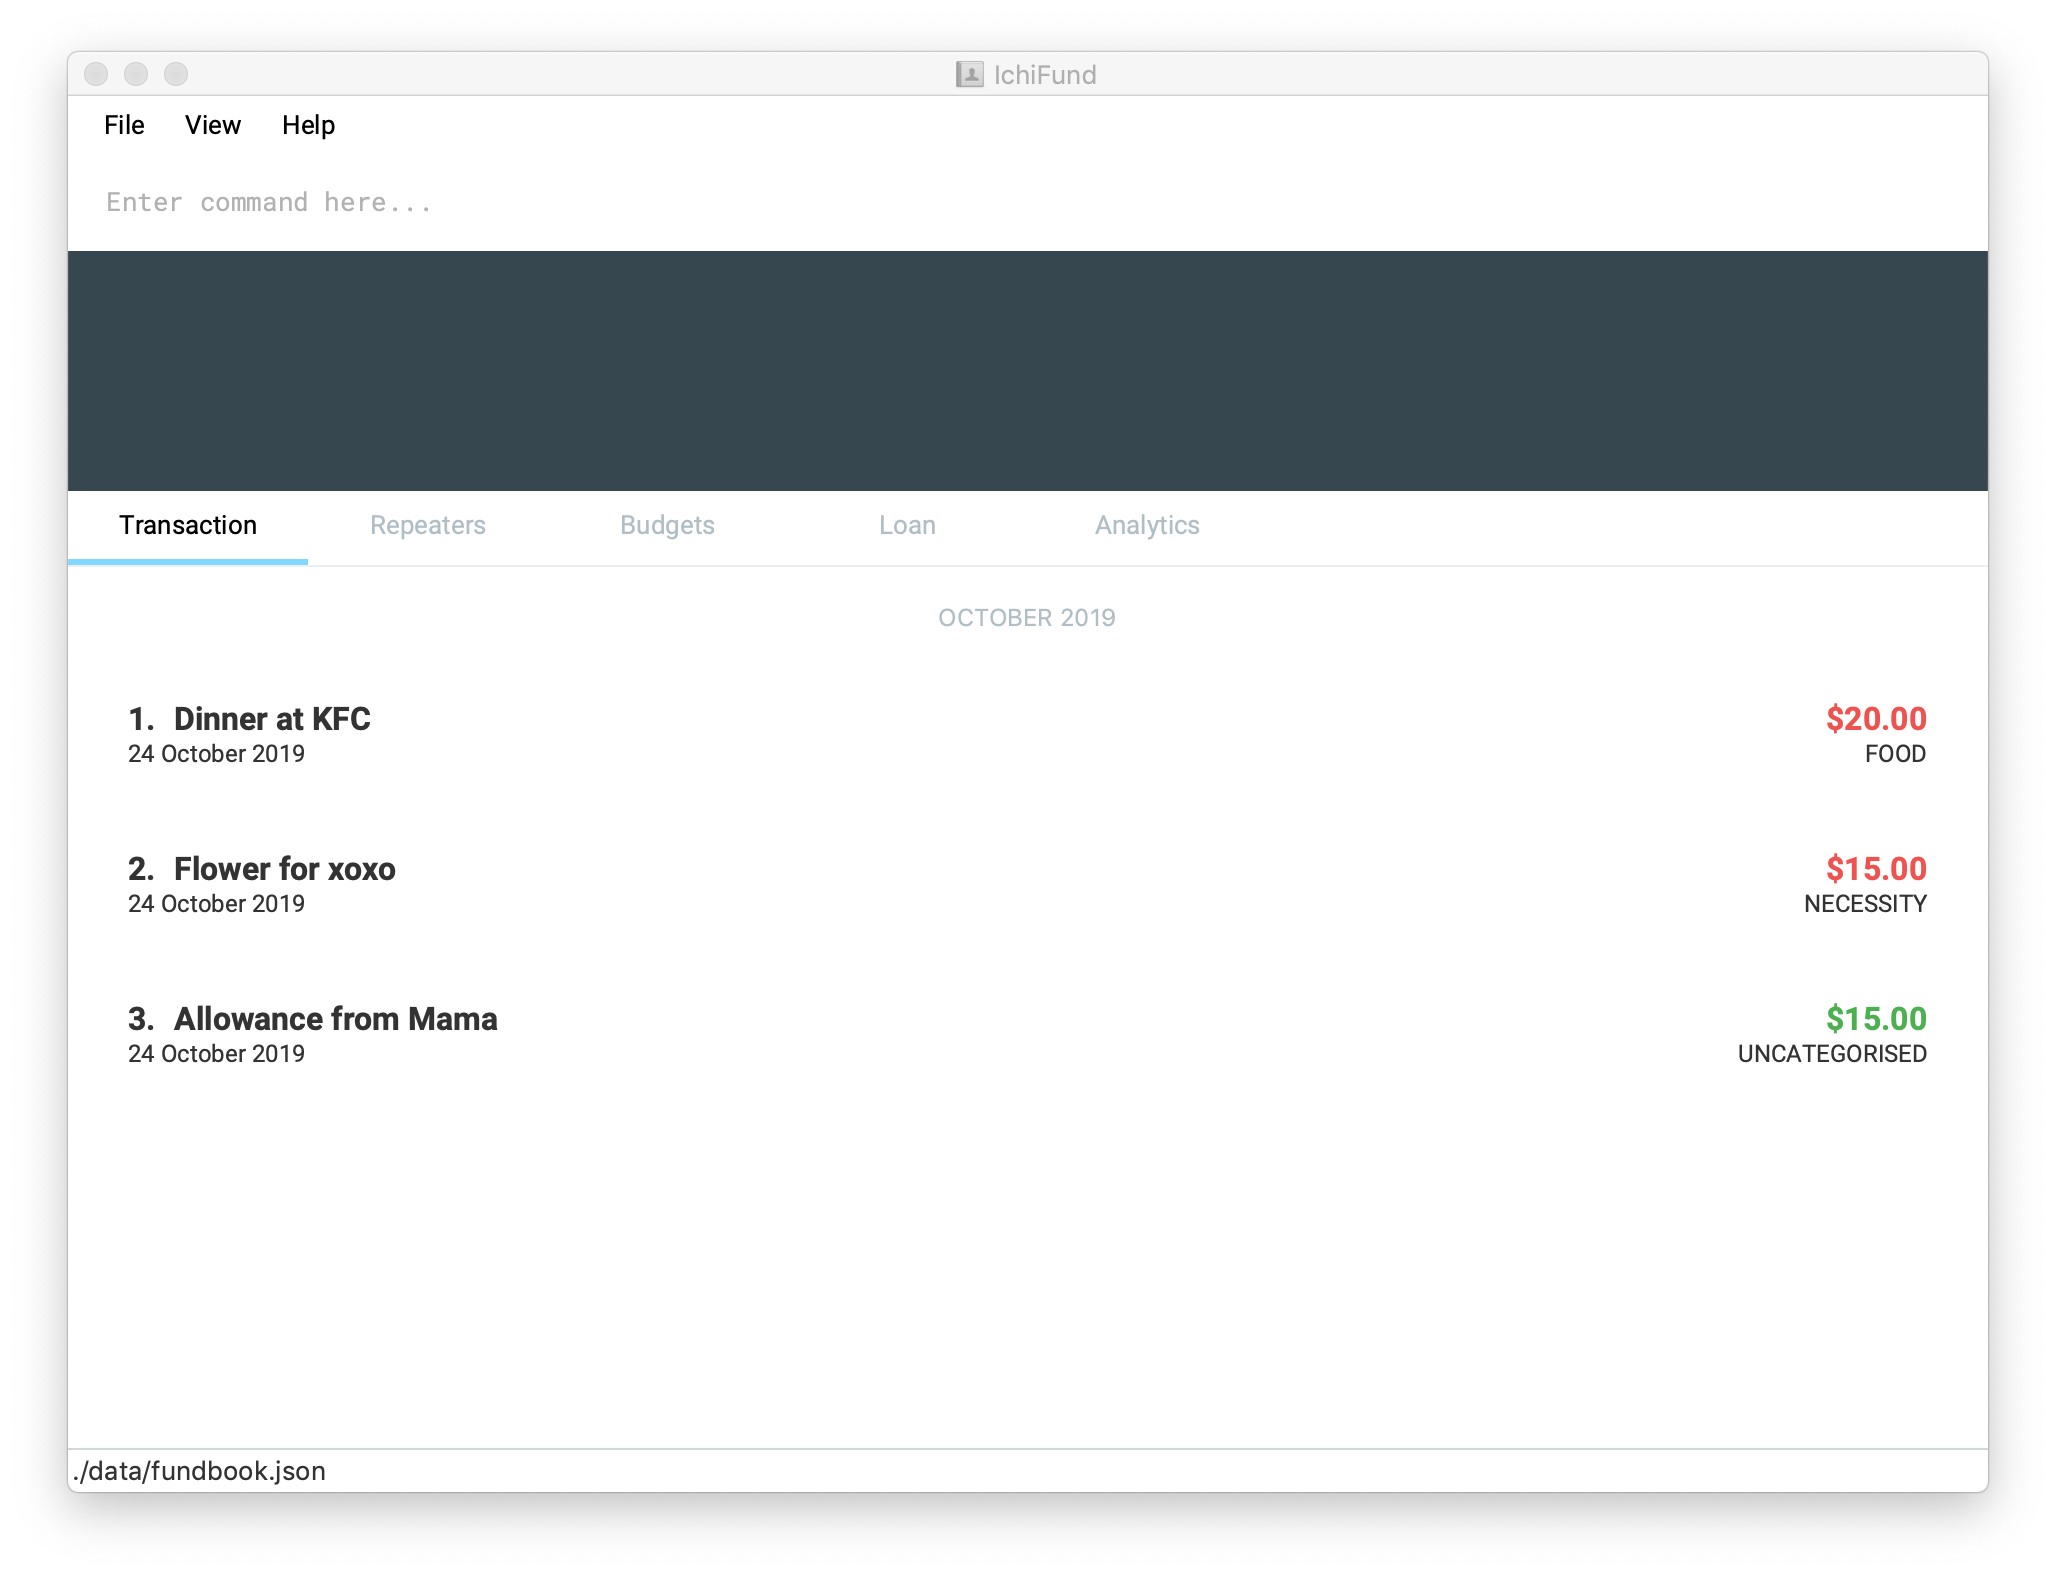
This document serves to give an introduction to the architecture of IchiFund for developers who wish to modify the software, or simply to understand how it works. We describe the high-level architecture, and also delve into important details of the implementation of each feature.
2. Setting Up
Refer to the guide here.
3. Design
3.1. Architecture
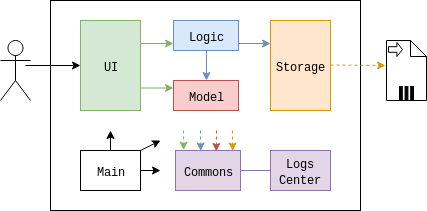
The Architecture Diagram given above explains the high-level design of the App. Given below is a quick overview of each component.
The .drawio files used to create diagrams in this document can be found in the diagrams folder.
To edit, go to and import the .drawio files in the repository.
|
-
At app launch: Initializes the components in the correct sequence, and connects them up with each other.
-
At shut down: Shuts down the components and invokes cleanup method where necessary.
Commons represents a collection of classes used by multiple other components.
The following class plays an important role at the architecture level:
-
LogsCenter: Used by many classes to write log messages to the App’s log file.
The rest of the App consists of four components.
Each of the four components
-
Defines its API in an
interfacewith the same name as the Component. -
Exposes its functionality using a
{Component Name}Managerclass.
For example, the Logic component (see the class diagram given below) defines it’s API in the Logic.java interface and exposes its functionality using the LogicManager.java class.
How the architecture components interact with each other
The Sequence Diagram below shows how the components interact with each other for the scenario where the user issues the command delete 1.
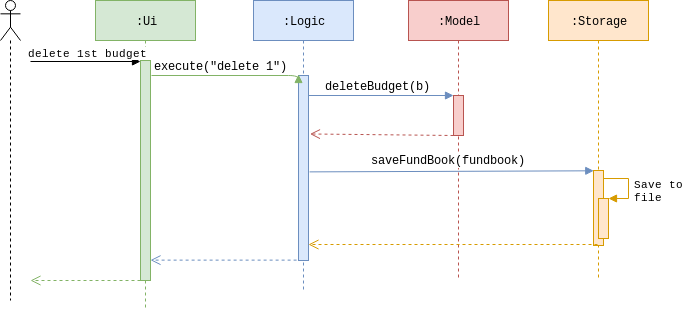
delete 1 commandThe sections below give more details of each component.
3.2. UI Component
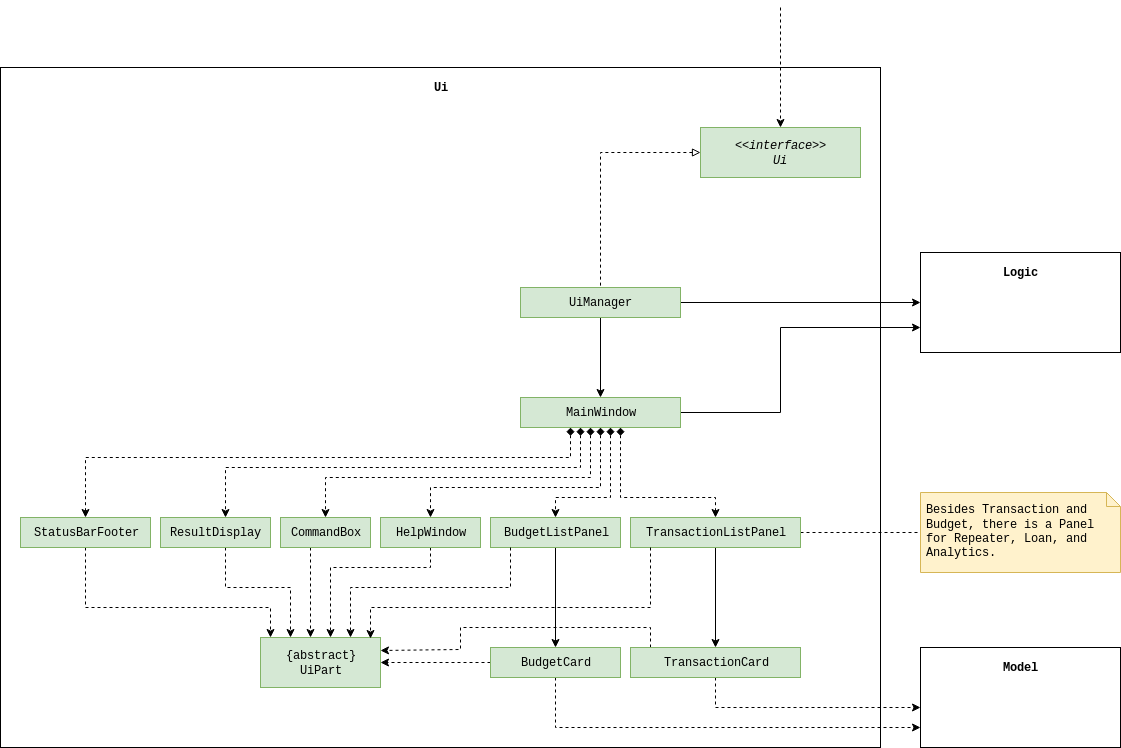
API : Ui.java
The UI consists of a MainWindow that is made up of parts e.g.CommandBox, ResultDisplay, TransactionListPanel, StatusBarFooter etc. All these, including the MainWindow, inherit from the abstract UiPart class.
The UI component uses JavaFx UI framework. The layout of these UI parts are defined in matching .fxml files that are in the src/main/resources/view folder. For example, the layout of the MainWindow is specified in MainWindow.fxml
The UI component,
-
Executes user commands using the
Logiccomponent. -
Listens for changes to
Modeldata so that the UI can be updated with the modified data. -
Listens for changes to the index of the
FeatureParserused by theLogiccomponent to change tabs. -
Sets the
FeatureParserused by theLogiccomponent when the user manually changes tabs.
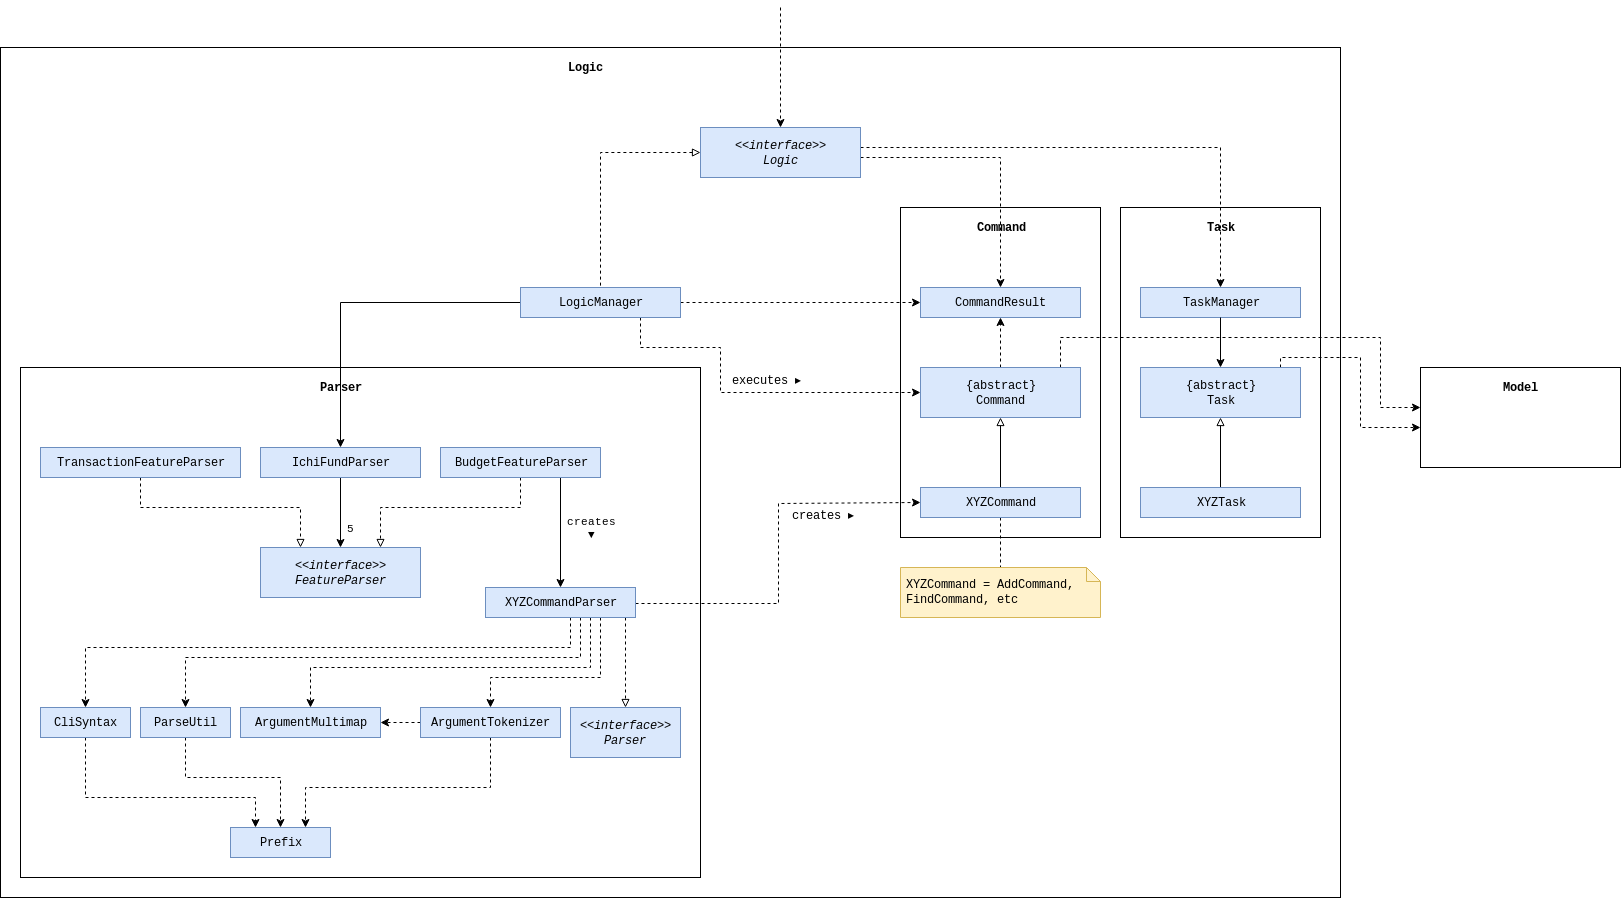
3.3. Logic Component
API :
Logic.java
-
Logicuses theIchiFundParserclass to parse the user command. -
This results in a
Commandobject which is executed by theLogicManager. -
The command execution can affect the
Model(e.g. adding a person). -
The result of the command execution is encapsulated as a
CommandResultobject which is passed back to theUi. -
In addition, the
CommandResultobject can also instruct theUito perform certain actions, such as displaying help to the user.
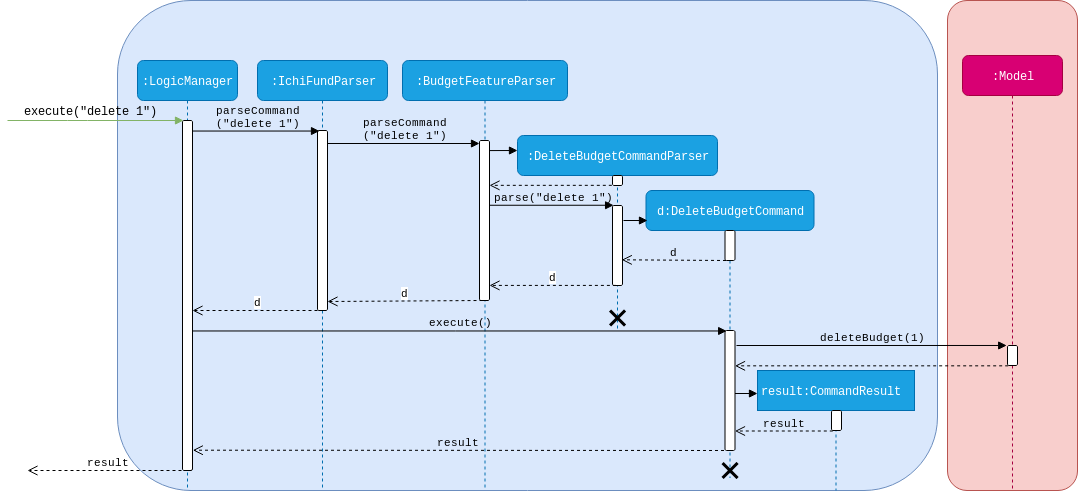
Given below is the Sequence Diagram for interactions within the Logic component for the execute("delete 1") API call.
delete 1 Command3.4. Model Component
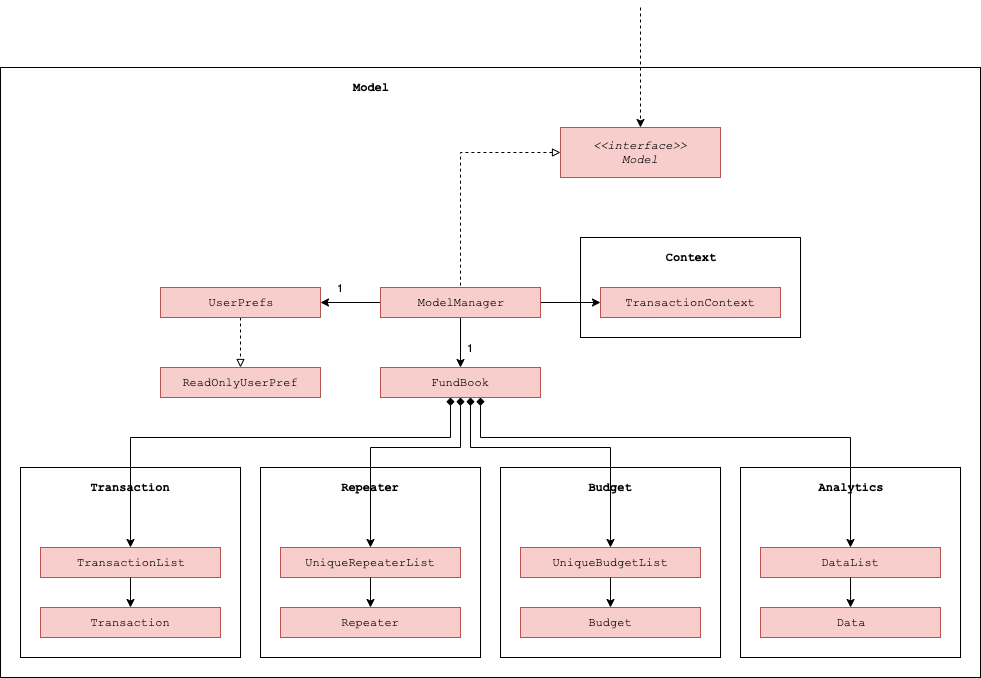
API : Model.java
The Model,
-
stores a
UserPrefobject that represents the user’s preferences. -
stores the IchiFund data (in e.g.
UniqueBudgetList) -
keeps track of a
TransactionContextobject that represents the current filter applied toTransactionList. -
exposes an unmodifiable version of the
TransactionContextobject (asObservableValue<TransactionContext>) that can be observed by the UI. -
exposes unmodifiable lists (e.g.
ObservableList<Transaction>) that can be 'observed' e.g. the UI can be bound to this list so that the UI automatically updates when the data in the list change. -
does not depend on any of the other three components.
3.5. Storage Component
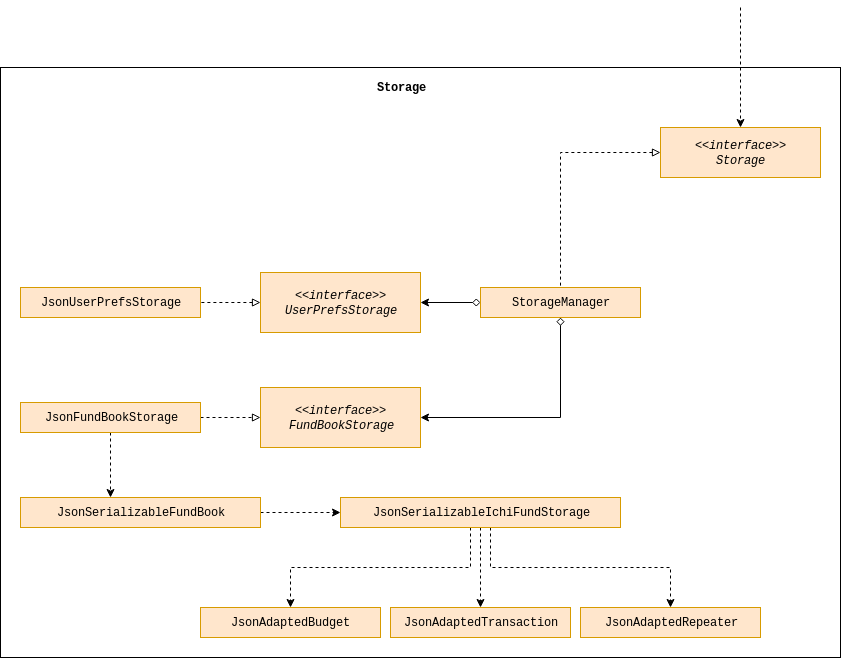
API : Storage.java
The Storage component,
-
can save
UserPrefobjects in json format and read it back. -
can save the IchiFund data in json format and read it back.
3.6. Common Classes
Classes used by multiple components are in the seedu.ichifund.commons package.
4. Implementation
This section describes some noteworthy details on how certain features are implemented.
4.1. Global Features
4.1.1. Separate Parsing and Tab Switching
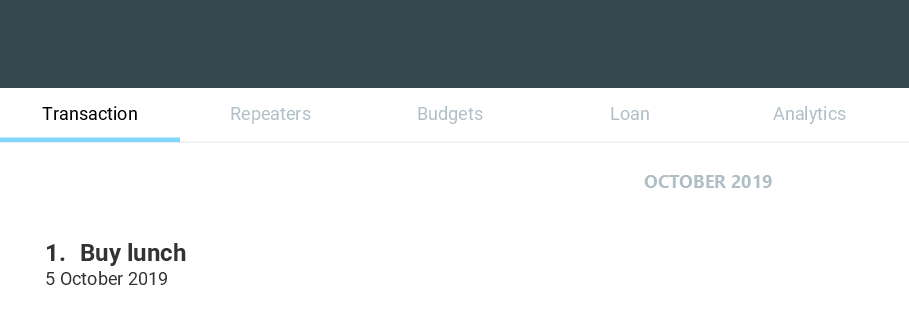
In IchiFund, we separate the features by tabs. This is illustrated in the image below, which displays the five tabs of IchiFund, with the "Transaction" tab selected:
The parsing of commands for each feature is done separately, tied to their respective tabs. In other words, the commands specific to each feature can only be recognised when the feature is selected as the current tab. This allows for the overloading of commands across different features, reducing the complexity of commands for users.
Implementation
There are two aspects to consider in implementing separate parsing:
-
Detecting when the user switches tabs and communicating this to the
Logiccomponent -
Determining how to parse commands on the end of
Logicgiven which tab is selected.
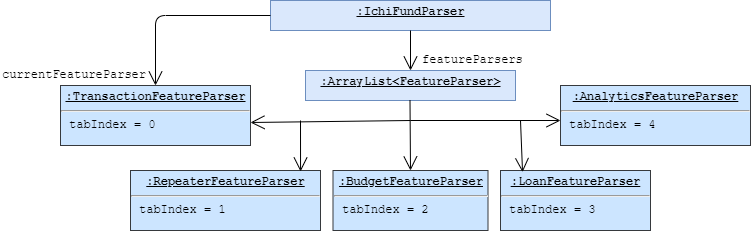
In our implementation, we first separate the parsing of commands for different features by delegating them to their
respective FeatureParser parsers. The main parser, IchiFundParser, keeps track of all FeatureParser objects, as
well as the FeatureParser that is currently in use.
This is illustrated in the object diagram below:
When IchiFundParser parses a command, it first checks whether it is a global command (e.g. help, exit).
Otherwise, it passes the command to currentParserManager, which checks if it is a valid command, and passes the
arguments to the appropriate Parser.
What remains is determining when to change currentParserManager. Here, we support 3 modes of tab switching:
-
Specific commands (CLI)
Users can switch between tabs using specific commands (tx, rep, budget, loan, analytics).
These commands are global commands that are directly recognised by IchiFundParser, which changes
currentFeatureParser and the index stored.
Much like the Model data, MainWindow listens to changes to the index through FeatureParserIndexListener.
Whenever the value of the index changes, the listener triggers an event to change the tab throw the invalidated()
method shown in the code snippet below:
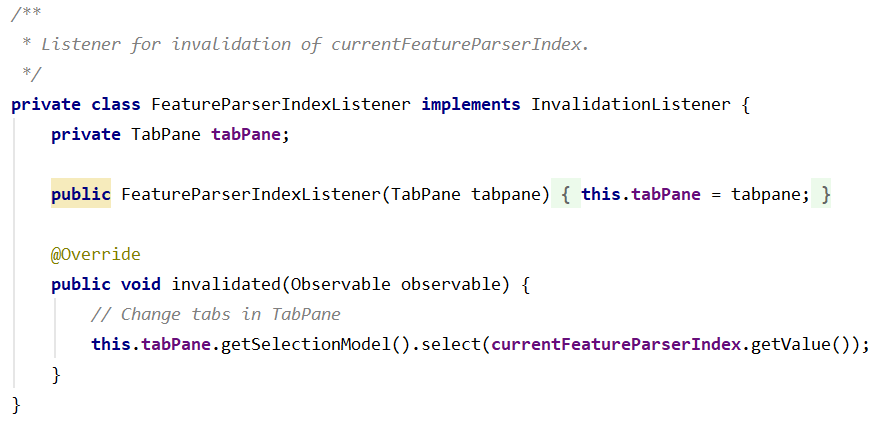
The InvalidationListener constructed from the above code is added to an ObservableValue in MainWindow
that tracks the index of the current FeatureParser used, and changes to the appropriate tab using
the value of the index stored.
-
Shortcut keys (GUI)
Users can also switch tabs using the shortcut keys Ctrl + 1 to Ctrl + 5. Upon using the shortcut keys,
the following handler is triggered:
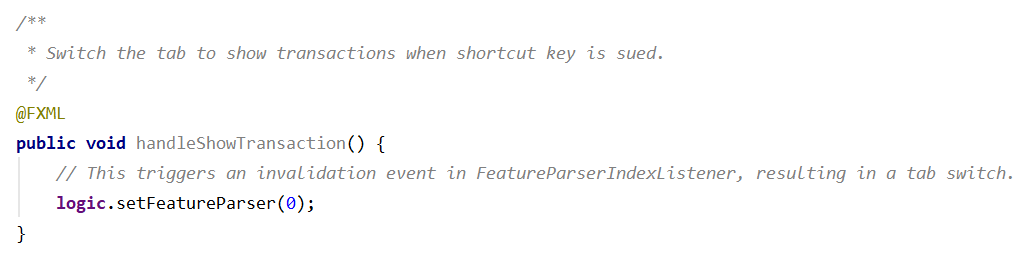
When handleShowTransaction() is called, currentFeatureParser in IchiFundParser, is set to
TransactionFeatureParser, which has a tabIndex of zero. Other handler methods are similar to
handleShowTransaction, with the only difference being the index passed to Logic.
The control flow of handleShowTransaction() is illustrated with more details in the sequence diagram below:
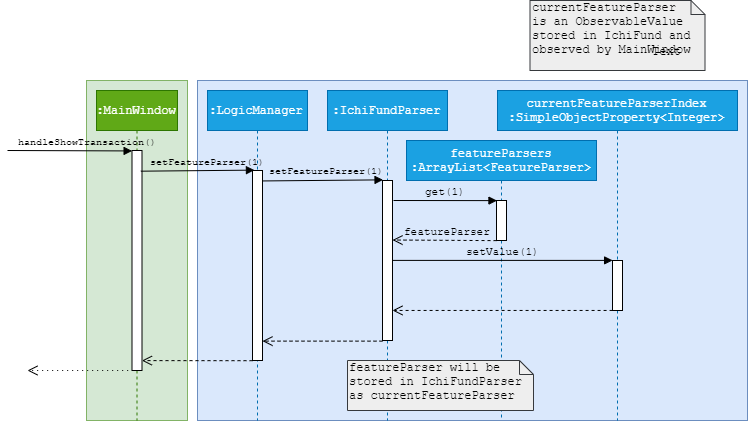
FeatureParserAs the different FeatureParser objects have different values for tabIndex, a different
index is passed, and a different FeatureParser is set as currentFeatureParser.
After the handler method is run, the change in IchiFundParser is also detected by
InvalidationListener, which results in a tab switch similar to how the specific commands would.
|
For developers who wish to add more features to IchiFund, care has to be taken in ensuring that the indices of the
FeatureParser objects matches that of the tabs, as well as its index in featureParsers.
In our current implementation, we do not use enum for the indices due to the small scale of usage.
|
-
Clicking of tabs (GUI)
Users can switch tabs by clicking on the tabs shown in Figure 9, “Feature Tabs in IchiFund”. This triggers a handler, shown in the following code snippet:

The control flow for this handler is similar to that of the shortcut keys.
Design Considerations
In designing the specific commands for tab switching, we considered an alternative implementation for
passing information about tab switching to Ui.
| Description of Implementation | Pros and Cons |
|---|---|
|
Pros: Cons: Requires greater understanding of JavaFX API to implement |
|
Pros: Easy to implement Cons: Creates a dependency from |
While Alternative 2 is much simpler to implement, we chose Alternative 1
as we prioritised preserving the independence of Logic from Ui.
4.1.2. Tasks
Some models in IchiFund must be refreshed after a command is executed.
For instance, when a new Transaction is added, all Budget must be recomputed.
Task can be used to facilitate such updates.
Implementation
This feature is managed by TaskManager.
The role of TaskManager is to maintain a list of all active Task.
The LogicManager holds an instance of the TaskManager.
When the LogicManager#execute() is called, the following chain of operations occurs:
-
After
Command#execute()is completed,TaskManager#executeAll()is called.

-
TaskManager#executeAll()will iterate through all activeTaskand call the respectiveTask#execute()method.
4.2. Transactions
4.2.1. Overview of the Transactions Model
Implementation
The transactions in IchiFund are represented using the Transaction class. While users are able to edit transactions,
objects of the Transaction class are immutable in the internal structure. The following class diagram summarizes
the details of the Transaction class:
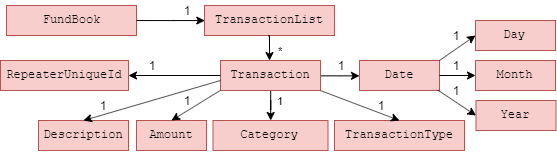
We differentiate income items from expenditure items using the TransactionType field, which accepts
two unique string values, "in" for income and "exp" for expenditure in the constructor.
|
In addition, the list of transactions is subject to a filter created by an immutable TransactionContext.
TransactionContext keeps track of the Month, Year, Category (optional) and TransactionType (optional) in the current filter.
Naturally, this implies that a filter for Month and Year is always applied to the list of transactions.
The TransactionContext is also used to fill in optional fields that are not specified by the user when adding transactions.
We summarise the role of the TransactionContext class in the following conceptual class diagram:
TransactionContextDesign Considerations
We encountered two major decisions when implementing our model for transactions. Here, we discuss the alternatives we considered, as well as the rationale for the current implementation.
Multiplicity of Category
Currently, each Transaction object can have only one Category object associated to it. In the problem domain, it is
also natural to think of transactions being associated with multiple categories. The table below summarizes the pros and cons of each choice.
| Description of Implementation | Pros and Cons |
|---|---|
Each |
Pros: Simple to implement. No overlaps in apportionment of expenditure to categories Cons: Less flexibility for the user to classify transactions |
Each |
Pros: More flexibility for the user to classify transactions Cons: Overlaps in apportionment of expenditure to categories |
While both implementations are visible, we chose to only have one Category associated to each
Transaction as the absence of overlaps in expenditure allows us to eventually implement a clean visual
breakdown of expenditure by category in the future.
Developers, however, are welcome to implement an additional Tags field for Transaction objects, to allow
for multiple associations.
Differentiating between Income and Expenditure
Currently, we differentiate income items from expenditure items using the TransactionType field in
Transaction. We considered the natural alternative of using inheritance as well.
| Description of Implementation | Pros and Cons |
|---|---|
Using the field |
Pros: Fits the parsing methods used in the current architecture well Cons: More tedious to code for different behaviours for income and expenditure items in the future |
Using inheritance |
Pros: Allows for polymorphism of methods from a Cons: Requires either the use of separate commands, or asymmetry in the parsing of command arguments |
While it was a tough decision, we eventually decided to use TransactionType for differentiation as we valued maintaining the
symmetry in the implementation of parsing in our current architecture, and we did not want to use separate commands for adding transactions.
Furthermore, we did not envision further use of polymorphism in future developments. Hence the benefit of using inheritance becomes
very limited.
4.2.2. Filtering Transactions
The filter transactions feature allows the user to change the filter for the list of transactions.
As described in Section 3.3, “Logic Component”, this feature is facilitated by TransactionFeatureParser, FilterTransactionCommandParser, and FilterTransactionCommand.
The arguments supported by this feature are: Month, Year, Category and TransactionType. All of these arguments are
optional, but the user has to input at least one argument for the command to be valid.
Implementation
We omit the details of parsing facilitated by IchiFundParser, TransactionFeatureParser and FilterTransactionCommandParser. Instead,
we immediately delve into the details of FilterTransactionCommand#execute.
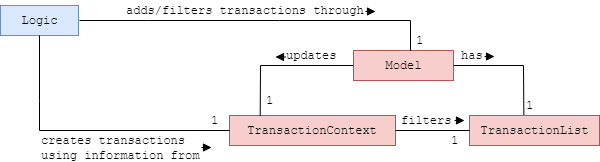
As prefaced in Section 4.2.1, “Overview of the Transactions Model”, the filter command interacts with TransactionContext to filter the list of
transactions exposed to the UI component.
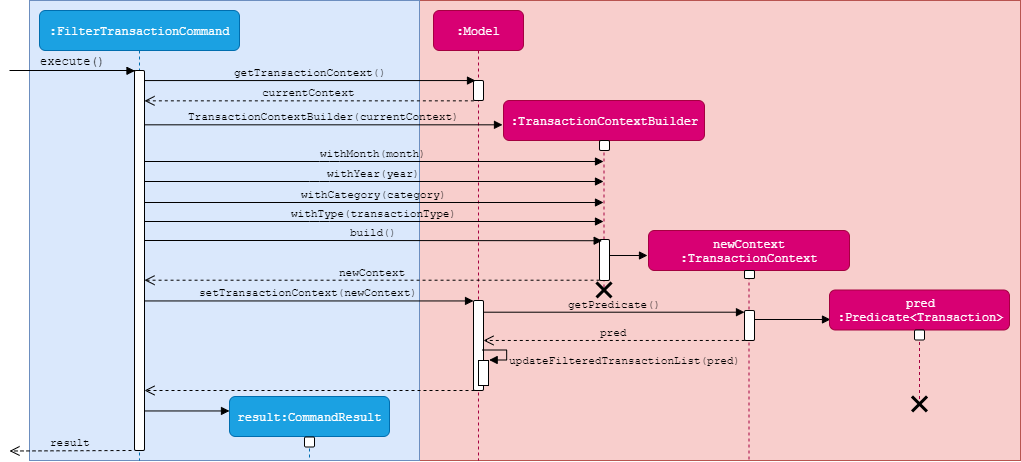
Following the creation of FilterTransactionCommand, the execution of the command results
in the following chain of events:
Step 1: FilterTransactionCommand retrieves the current TransactionContext from the model.
Step 2: FilterTransactionCommand creates a new TransactionContext, facilitated by TransactionContextBuilder
Step 3: FilterTransactionCommand sets the new context in model as the newly created TransactionContext.
Step 4: ModelManager retrieves a Predicate<Transaction> from the new TransactionContext.
Step 5: ModelManager filters the list of transactions using the Predicate<Transaction>.
The above sequence of events is shown in greater detail in the following sequence diagram:
FilterTransactionCommand4.2.3. Adding Transactions
The add transaction feature allows the user to add a transaction into IchiFund. It further ensures that the current
filter of the list of transactions is changed to allow the user to view the transaction.
As described in Section 3.3, “Logic Component”, this feature is facilitated by TransactionFeatureParser, AddTransactionCommandParser, and AddTransactionCommand.
The arguments supported by this feature are: Description, Amount, Category, Day, Month, Year and TransactionType.
Of these arguments, only Description and Amount are mandatory.
Implementation
We omit the details of parsing facilitated by IchiFundParser, TransactionFeatureParser and AddTransactionCommandParser. Instead,
we immediately delve into the details of the AddTransactionCommand#execute.
As prefaced in Section 4.2.1, “Overview of the Transactions Model”, AddTransactionCommand interacts with TransactionContext to generate
a Transaction to be added to the model.
The execution of an AddTransactionCommand results in the following sequence of events:
Step 1: AddTransactionCommand retrieves the current TransactionContext from the model.
Step 2: AddTransactionCommand generates a new Transaction based on the arguments and TransactionContext
Step 3: AddTransactionCommand adds the new Transaction to the model.
Step 4: ModelManager automatically sorts the list of transactions.
Step 5: AddTransactionCommand calls model to execute updateTransactionContext
Step 6: ModelManager updates TransactionContext such that the new Transaction is shown.
To create a new Transaction, AddTransactionCommand fills in the missing arguments using
values obtained from TransactionContext, or default values. This is illustrated in the activity diagram below:
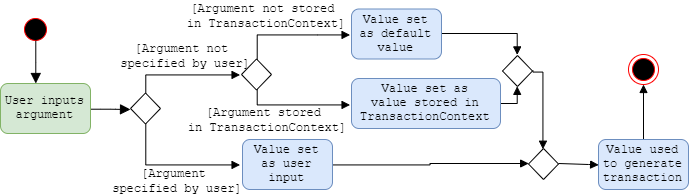
AddTransactionCommandThe above activity diagram shows the decision flow for a general optional argument. However, some optional
arguments are never stored in TransactionContext, and some are always stored. The
following table describes the particular details for each optional argument.
| Argument | Stored in TransactionContext? |
Default value |
|---|---|---|
|
Never |
Current day of month from system time |
|
Always |
Not applicable |
|
Always |
Not applicable |
|
Sometimes |
Uncategorised |
|
Sometimes |
Expenditure |
After adding the Transaction, a new TransactionContext is created such that the new Transaction is displayed
on the list of transactions. Specifically, the Month and Year filters are set to the Month and Year of the
new Transaction respectively, and the Category and TransactionType filters are removed if necessary.
Design Considerations
In implementing the add and filter commands, we had to decide on the underlying data structure for the list of
transactions. Currently, we store all transactions in a single iterable list. Given the use of a mandatory
month and year filter, a natural alternative would be to store each month’s worth of transactions in a
list, and stores these lists in another list, forming a multi-level list.
| Description of Implementation | Pros and Cons |
|---|---|
Storing all transactions in a single list (current choice) |
Pros: Suits existing architecture of software very well, easy to implement Cons: Slow performance anticipated with large number of transactions |
Storing transactions in multi-level list |
Pros: Faster performance, more scalable Cons: May disrupt abstractions in current architecture, more time needed to implement |
Ultimately, we decided to avoid disrupting the existing architecture, and instead focus our efforts on developing more features to better address the needs of the target user profile.
However, moving forward, we recognise that the current architecture severely lacks scalability, especially given the constantly growing number of transactions we expect users to create. Hence, we eventually intend to switch to a multi-level list.
| Developers who choose to change the underlying data structures should bear in mind that many other components (Repeaters, Budgets, Analytics) depend on the model of Transactions, and care must be taken to ensure that these components still work well. |
4.2.4. Editing Transactions
The edit transaction feature allows the user to edit a transaction into IchiFund. It further ensures that the current
filter of the list of transactions is changed to allow the user to view the transaction.
As described in Section 3.3, “Logic Component”, this feature is facilitated by TransactionFeatureParser, EditTransactionCommandParser, and EditTransactionCommand.
The arguments supported by this feature are Index, Description, Amount, Category, Day, Month,
Year and TransactionType. Of these arguments, only Index is mandatory, but at least one of the optional arguments
(which are fields to be edited) need to be present.
Implementation
The execution of the edit command is similar to the delete commands in other components. The following sequence of steps
describes the behaviour of EditTransactionCommand at each step:
Step 1: The user executes edit 2 de/Lunch to change the description of the Transaction in the 2nd index to "Lunch".
Step 2: LogicManager uses IchiFundParser#parserCommand() to parse the input from the user.
Step 3: IchiFundParser redirects the input to TransactionFeatureParser.
Step 4: TransactionFeatureParser determines which command is being used and creates the respective EditTransactionCommandParser parser with the user’s input as an argument.
Step 5: EditTransactionCommandParser does a validation check on the user’s input.
Step 6: EditTransactionCommandParser creates an EditTransactionDescriptor which contains the updated description information provided by the user.
Step 7: EditTransactionCommandParser creates and returns an EditTransactionCommand with the Index and EditTransactionDescriptor as arguments.
Step 8: LogicManager calls EditTransactionCommand#execute().
Step 9: EditTransactionCommand checks if the Index is too large, and retrieves the appropriate Transaction to be deleted from the Model.
Step 10: EditTransactionCommand checks that the Transaction is not created from a Repeater.
Step 11: EditTransactionCommand creates a new Transaction using the original Transaction and the EditTransactionDescriptor.
Step 12: EditTransactionCommand replaces the original Transaction in the Model with the newly created Transaction.
Step 13: EditTransactionCommand calls Model#updateTransactionContext with the newly created Transaction as an argument.
Step 14: EditTransactionCommand returns a CommandResult to the LogicManager which is returned back to the user.
4.2.5. Deleting Transactions
The delete transaction feature allows the user to delete a transaction into IchiFund using its index in the displayed list.
As described in Section 3.3, “Logic Component”, this feature is facilitated by TransactionFeatureParser, DeleteTransactionCommandParser, and DeleteTransactionCommand.
The delete command takes one argument, Index.
Implementation
The execution of the delete command is similar to the delete commands in other components. The following sequence of steps
describes the behaviour of DeleteTransactionCommand at each step:
Step 1: The user executes delete 2 to delete the Transaction in the 2nd index.
Step 2: LogicManager uses IchiFundParser#parserCommand() to parse the input from the user.
Step 3: IchiFundParser redirects the input to TransactionFeatureParser.
Step 3: TransactionFeatureParser determines which command is being used and creates the respective DeleteTransactionCommandParser parser with the user’s input as an argument.
Step 4: DeleteTransactionCommandParser does a validation check on the user’s input before creating and returning a DeleteRepeaterCommand with desired Index as an argument.
Step 5: LogicManager calls DeleteTransactionCommand#execute()
Step 6: DeleteTransactionCommand checks if the Index is too large, and retrieves the appropriate Transaction to be deleted from the Model.
Step 7: DeleteTransactionCommand checks that the Transaction is not created from a Repeater.
Step 8: DeleteTransactionCommand deletes the Transaction from the Model.
Step 9: DeleteTransactionCommand returns a CommandResult to the LogicManager which is returned back to the user.
4.3. Repeaters
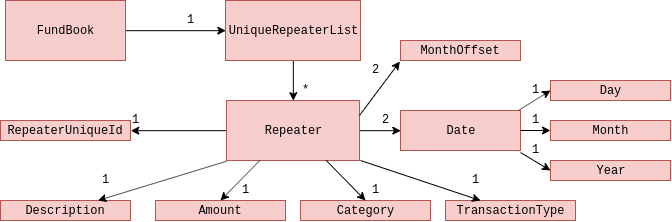
Repeaters allow for the convenient management of repeated transactions through a single Repeater entity. The list of associated transactions are automatically synchronized to updates in Repeaters. The following class diagram summarizes the details of the Repeater class:
4.3.1. Adding Repeater
This feature allows the user to add a repeater in IchiFund. Adding a repeater also creates the transactions associated with the added repeater.
Implementation
The add command is facilitated by the Logic and Model components of the application. The process of executing an add command is illustrated in the sequence diagram below:
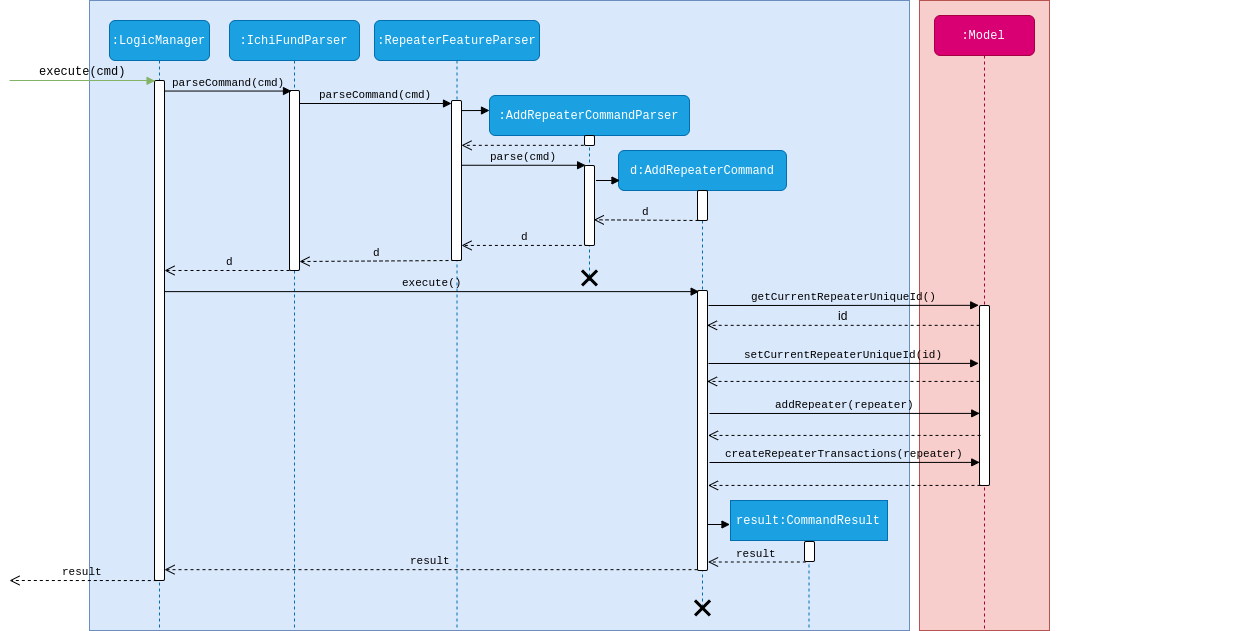
AddRepeaterCommandBelow is an example usage scenario of how add behaves at each step.
Step 1: In the repeaters tab, the user executes add de/Phone bills a/42.15 c/Utilities ty/exp so/3 eo/2 sd/1 sm/1 sy/2019 ed/31 em/12 ey/2019 to add a repeater for phone bills with an amount of $42.15 on the third and second last day of every month between 1st January 2019 and 31st December 2019.
Step 2: LogicManager uses IchiFundParser#parserCommand() to parse the input from the user.
Step 3: IchiFundParser determines which command is being used and creates the respective AddRepeaterCommandParser parser with the user’s input as an argument.
Step 4: AddRepeaterCommandParser does a validation check on the user’s input.
Step 5: AddRepeaterCommandParser creates and returns an AddRepeaterCommand with the desired Repeater as an arugment.
Step 6: LogicManager calls AddRepeaterCommand#execute().
Step 7: AddRepeaterCommand checks for the following constraints:
-
The
Repeaterto be added does not already exist in theModel. -
The end date of the
Repeaterto be added is no earlier than its start date. -
The start date and and end date of the
Repeaterto be added span no more than 60 months.
Step 8: AddRepeaterCommand fetches the running RepeaterUniqueId counter tracked by the Model.
Step 9: AddRepeaterCommand creates the Repeater and sets its unique id as the fetched RepeaterUniqueId.
Step 10: AddRepeaterCommand increments the current RepeaterUniqueId counter in the Model.
Step 11: AddRepeaterCommand adds the newly created Repeater to the Model.
Step 12: AddRepeaterCommand creates the associated Transactions in the Model.
Step 13: AddRepeaterCommand returns a CommandResult to the LogicManager which is returned back to the user.
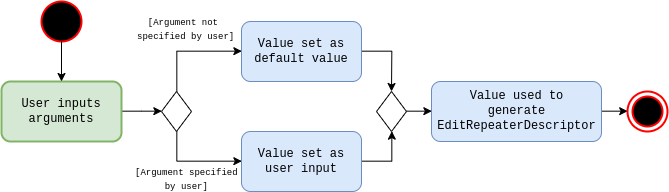
When creating a Repeater, AddRepeaterCommandParser fills in arguments unspecified by the user with default values, as shown in the activity diagram below:
AddRepeaterCommandParser4.3.2. Editing Repeater
This feature allows the user to edit a repeater in IchiFund. Editing a repeater also updates the transactions associated with the added repeater.
Implementation
The edit command is facilitated by the Logic and Model components of the application. Given below is an example usage scenario of how edit behaves at each step.
Step 1: In the repeaters tab, the user executes edit 1 a/37.24 so/-1 eo/4 to edit the repeater at the 2nd index for an amount of $37.25, occuring only at the fourth last day of every month.
Step 2: LogicManager uses IchiFundParser#parserCommand() to parse the input from the user.
Step 3: IchiFundParser determines which command is being used and creates the respective EditRepeaterCommandParser parser with the user’s input as an argument.
Step 4: EditRepeaterCommandParser does a validation check on the user’s input.
Step 5: EditRepeaterCommandParser creates an EditRepeaterDescriptor which contains the updated repeater information provided by the user.
Step 6: EditRepeaterCommandParser creates and returns an EditRepeaterCommand with the Index and EditRepeaterDescriptor as arguments.
Step 7: LogicManager executes EditRepeaterCommand#execute().
Step 8: EditRepeaterCommand checks for the following constraints:
-
The updated
Repeaterdoes not already exist in theModel. -
The end date of the updated
Repeateris no earlier than its start date. -
The start date and and end date of the updated
Repeaterspan no more than 60 months.
Step 9: EditRepeaterCommand creates a new Repeater using the original Repeater and the EditRepeaterDescriptor.
Step 10: EditRepeaterCommand replaces the original Repeater in the Model with the newly created Repeater.
Step 11: EditRepeaterCommand deletes all existing associated Transactions from the Model.
Step 12: EditRepeaterCommand creates the Transactions associated with the updated Repeater in the Model.
Step 13: EditRepeaterCommand returns a CommandResult to the LogicManager which is returned back to the user.
4.3.3. Deleting Repeater
This feature allows the user to delete repeater in IchiFund. Deleting a repeater also deletes the transactions associated with the deleted repeater.
Implementation
The delete command is facilitated by the Logic and Model components of the application. Given below is an example usage scenario of how delete behaves at each step.
Step 1: In the repeaters tab, the user executes delete 2 to delete the repeater at the 2nd index.
Step 2: LogicManager uses IchiFundParser#parserCommand() to parse the input from the user.
Step 3: IchiFundParser determines which command is being used and creates the respective DeleteRepeaterCommandParser parser with the user’s input as an argument.
Step 4: DeleteRepeaterCommandParser does a validation check on the user’s input.
Step 5: DeleteRepeaterCommandParser creates and returns a DeleteRepeaterCommand with the desired Index as an argument.
Step 6: LogicManager calls DeleteRepeaterCommand#execute().
Step 7: DeleteRepeaterCommand checks that a Repeater exists at the Index.
Step 8: DeleteRepeaterCommand retrieves the Repeater at the Index from the Model.
Step 9: DeleteRepeaterCommand deletes the Repeater from the Model.
Step 10: DeleteRepeaterCommand deletes all associated Transactions in the Model.
Step 11: DeleteRepeaterCommand returns a CommandResult to the LogicManager which is returned back to the user.
4.3.4. Finding Repeater
This feature allows the user to find repeaters in IchiFund. The search by matching provided keywords against repeater descriptions.
Implementation
The find command is facilitated by the Logic and Model components of the application. Given below is an example usage scenario of how find behaves at each step.
Step 1: In the repeaters tab, the user executes find phone husband to find all repeaters whose descriptions contain any of the keywords "phone" and "husband".
Step 2: LogicManager uses IchiFundParser#parserCommand() to parse the input from the user.
Step 3: IchiFundParser determines which command is being used and creates the respective FindRepeaterCommandParser parser with the user’s input as an argument.
Step 4: FindRepeaterCommandParser does a validation check on the user’s input.
Step 5: FindRepeaterCommandParser creates a RepeaterDescriptionPredicate which filters Repeaters based on whether a Repeater contains all the keywords provided by the user.
Step 6: FindRepeaterCommandParser creates and returns a FindRepeaterCommand with the RepeaterDescriptionPredicate as an arugment.
Step 7: LogicManager calls FindRepeaterCommand#execute().
Step 8: FindRepeaterCommand sets the RepeaterDescriptionPredicate as the filter for the repeater list in the Model.
Step 9: FindRepeaterCommand returns a CommandResult to the LogicManager which is returned back to the user.
4.4. Budget
4.4.1. Adding Budget
The add budget feature allows the user to add a budget into IchiFund.
This feature is facilitated by BudgetFeatureParser, AddBudgetCommandParser, and AddBudgetCommand.
The arguments supported by this feature includes:
-
Description -
Amount -
Category(optional) -
Month(optional) -
Year(optional)
Implementation
When the user input the add command in the Budget tab, the following chain of operations occurs:
-
The
IchiFundParserwill delegate the parsing of the command toBudgetFeatureParserif the current active tab is Budget. -
The
BudgetFeatureParserwill delegate the parsing of the arguments toAddBudgetCommandParser. -
AddBudgetCommandParser#parse()will take in aStringinput consisting of the arguments. -
This arguments will be tokenized and the respective models for each argument are created.
-
If the parsing of all arguments are successful, a new
Budgetobject is created using the arguments, and a newAddBudgetCommandis returned back toLogicManager. -
The
LogicManagerexecutesAddBudgetCommand#execute(). -
The newly created
Budgetis added to the model.
This process is further illustrated in the following sequence diagram:
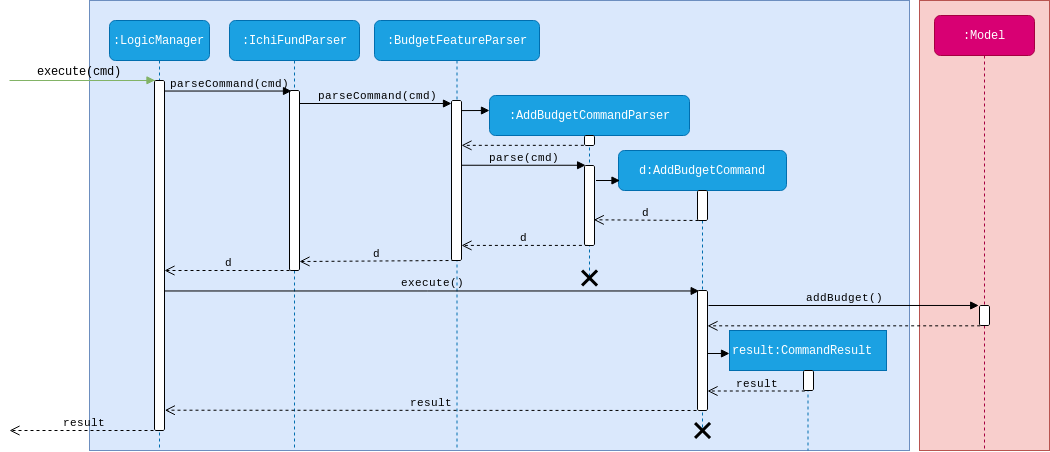
add Command under Budget Tab4.5. Analytics
4.5.1. Overview of the Analytics Model
Implementation
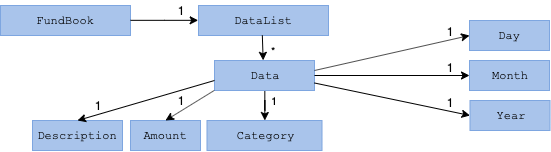
Analytical data in IchiFund is represented using the Data class. Objects of the Data class are immutable in the
internal structure. The following class diagram summarizes the details of the Data class:
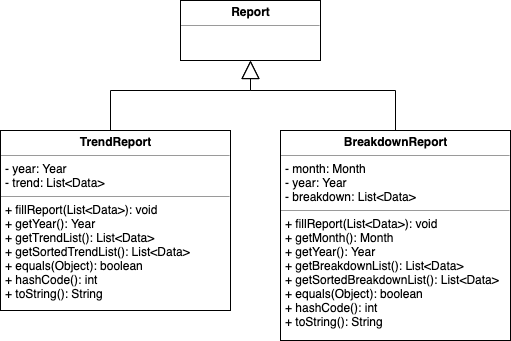
In addition, analytical data associated with a command is initially stored in a Report. Using polymorphism, this report
is initialised as either a TrendReport or a BreakdownReport depending on the command that was executed.
The following class diagram summarizes the details of the Report class:
4.5.2. View Expenditure Trend
The view expenditure trend feature allows the user to view monthly expenditure trend for a year.
This feature is facilitated by AnalyticsFeatureParser, ExpenditureTrendCommandParser, and ExpenditureTrendCommand.
The argument supported by this feature is:
-
Year(optional)
Implementation
After the user inputs the expenditure command in the Analytics tab, the following chain of operations occurs:
Step 1: The IchiFundParser will delegate the parsing of the command to AnalyticsFeatureParser if the current active tab is Analytics.
Step 2: The AnalyticsFeatureParser will delegate the parsing of the arguments to ExpenditureTrendCommandParser.
Step 3: ExpenditureTrendCommandParser#parse() will take in a String input consisting of the arguments.
Step 4: This arguments will be tokenized and the respective models for each argument are created.
Step 5: If the parsing of all arguments are successful, a new ExpenditureTrendCommand is returned back to LogicManager.
Step 6: The LogicManager executes ExpenditureTrendCommand#execute().
Step 7: The model is updated with the List of Data from the newly created TrendReport.
The above sequence of events is shown in greater detail in the following sequence diagram:
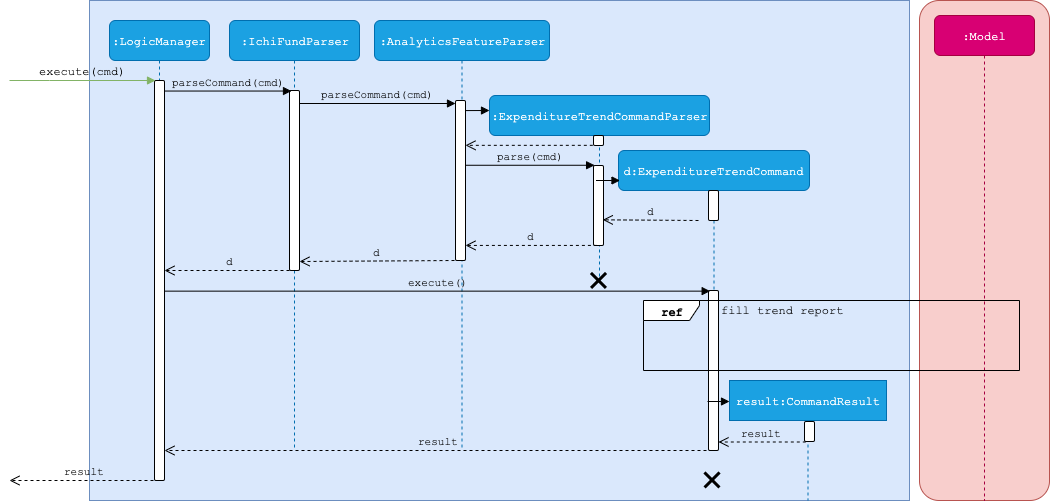
ExpenditureTrendCommandThe details of the fill trend report interactions have been omitted from the diagram above, and are shown in the following separate sequence diagram:
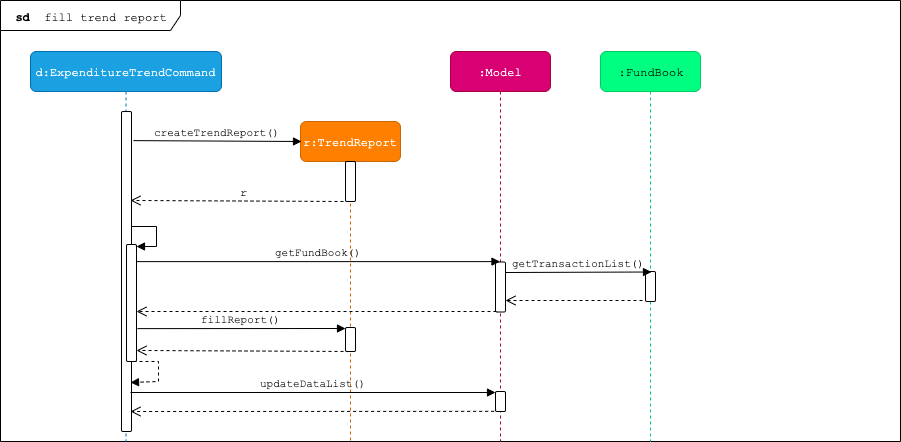
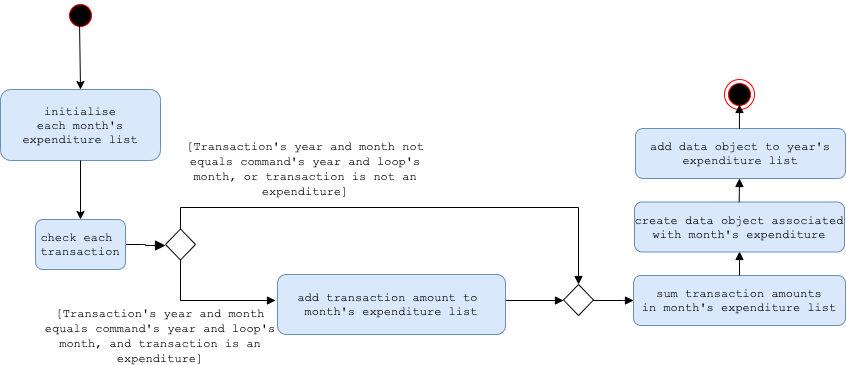
fill trend reportIn addition, this activity diagram shows the action sequence for one iteration of the internal for-loop for the
execution of the fillExpenditureTrendReport method of an ExpenditureTrendCommand.
fillExpenditureTrendReport method4.5.3. View Income Trend
The view income trend feature allows the user to view monthly income trend for a year.
This feature is facilitated by AnalyticsFeatureParser, IncomeTrendCommandParser, and IncomeTrendCommand.
The argument supported by this feature is:
-
Year(optional)
Implementation
When the user input the income command in the Analytics tab, the following chain of operations occurs:
Step 1. The IchiFundParser will delegate the parsing of the command to AnalyticsFeatureParser if the current active tab is Analytics.
Step 2. The AnalyticsFeatureParser will delegate the parsing of the arguments to IncomeTrendCommandParser.
Step 3. IncomeTrendCommandParser#parse() will take in a String input consisting of the arguments.
Step 4. This arguments will be tokenized and the respective models for each argument are created.
Step 5. If the parsing of all arguments are successful, a new IncomeTrendCommand is returned back to LogicManager.
Step 6. The LogicManager executes IncomeTrendCommand#execute().
Step 7. The model is updated with the List of Data from the newly created TrendReport.
Observe that the implementation of income is similar to that of expenditure, except that each transaction is tested
for whether it is an income item.
|
4.5.4. View Balance Trend
The view balance trend feature allows the user to view monthly balance trend for a year.
This feature is facilitated by AnalyticsFeatureParser, BalanceTrendCommandParser, and BalanceTrendCommand.
The argument supported by this feature is:
-
Year(optional)
Implementation
When the user input the balance command in the Analytics tab, the following chain of operations occurs:
-
The
IchiFundParserwill delegate the parsing of the command toAnalyticsFeatureParserif the current active tab is Analytics. -
The
AnalyticsFeatureParserwill delegate the parsing of the arguments toBalanceTrendCommandParser. -
BalanceTrendCommandParser#parse()will take in aStringinput consisting of the arguments. -
This arguments will be tokenized and the respective models for each argument are created.
-
If the parsing of all arguments are successful, a new
BalanceTrendCommandis returned back toLogicManager. -
The
LogicManagerexecutesBalanceTrendCommand#execute(). -
The model is updated with the
ListofDatafrom the newly createdTrendReport.
Observe that the implementation of balance differs slightly from that of expenditure and income.
|
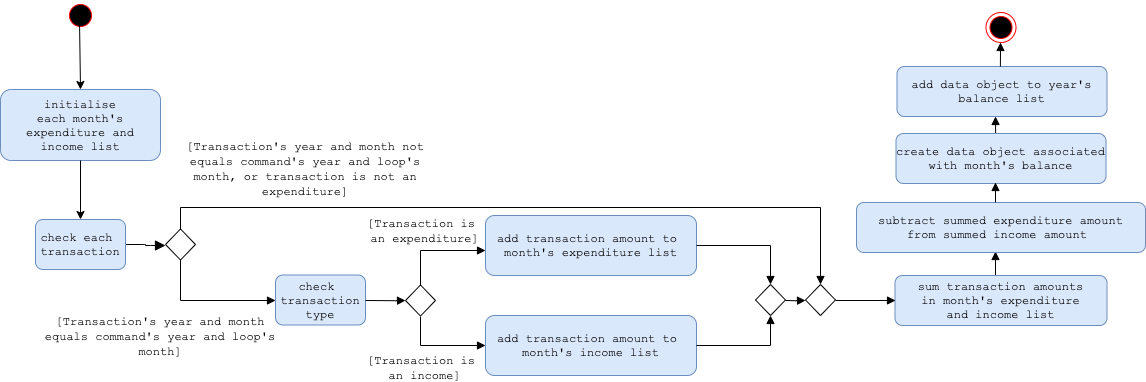
The following activity diagram shows the action sequence for one iteration of the internal for-loop for the
execution of the fillBalanceTrendReport method of an BalanceTrendCommand.
fillBalanceTrendReport method4.5.5. View Expenditure Breakdown By Category
The view expenditure breakdown by category feature allows the user to view breakdown of expenditure by category.
This feature is facilitated by AnalyticsFeatureParser, BreakdownCommandParser, and BreakdownCommand.
The arguments supported by this feature are:
-
Month(optional) -
Year(optional)
Implementation
When the user input the breakdown command in the Analytics tab, the following chain of operations occurs:
Step 1. The IchiFundParser will delegate the parsing of the command to AnalyticsFeatureParser if the current active tab is Analytics.
Step 2. The AnalyticsFeatureParser will delegate the parsing of the arguments to BreakdownCommandParser.
Step 3. BreakdownCommandParser#parse() will take in a String input consisting of the arguments.
Step 4. This arguments will be tokenized and the respective models for each argument are created.
Step 5. If the parsing of all arguments are successful, a new BreakdownCommand is returned back to LogicManager.
Step 6. The LogicManager executes BreakdownCommand#execute().
Step 7. The model is updated with the List of Data from the newly created BreakdownReport.
Observe that the implementation of breakdown, as well as the following command catrank,
involve the creation of a BreakdownReport instead of a TrendReport.
This is because the results of these commands are specific to a year and a month, as opposed to the results of the
other commands which are only specific to a year.
|
4.5.6. View Expenditure Category Ranking Chart
The view expenditure category ranking chart allows the user to view the ranked breakdown of expenditure by category.
This feature is facilitated by AnalyticsFeatureParser, CategoryRankingCommandParser, and CategoryRankingCommand.
The arguments supported by this feature are:
-
Month(optional) -
Year(optional)
Implementation
When the user input the catrank command in the Analytics tab, the following chain of operations occurs:
Step 1. The IchiFundParser will delegate the parsing of the command to AnalyticsFeatureParser if the current active tab is Analytics.
Step 2. The AnalyticsFeatureParser will delegate the parsing of the arguments to CategoryRankingCommandParser.
Step 3. CategoryRankingCommandParser#parse() will take in a String input consisting of the arguments.
Step 4. This arguments will be tokenized and the respective models for each argument are created.
Step 5. If the parsing of all arguments are successful, a new CategoryRankingCommand is returned back to LogicManager.
Step 6. The LogicManager executes CategoryRankingCommand#execute().
Step 7. The model is updated with the List of Data from the newly created BreakdownReport.
4.5.7. View Expenditure Ranking Chart By Month
The view expenditure ranking chart by month allows the user to view the ranked monthly expenditure trends.
This feature is facilitated by AnalyticsFeatureParser, MonthlyExpenditureRankingCommandParser, and MonthlyExpenditureRankingCommand.
The argument supported by this feature is:
-
Year(optional)
Implementation
When the user input the mthrank command in the Analytics tab, the following chain of operations occurs:
Step 1. The IchiFundParser will delegate the parsing of the command to AnalyticsFeatureParser if the current active tab is Analytics.
Step 2. The AnalyticsFeatureParser will delegate the parsing of the arguments to MonthlyExpenditureRankingCommandParser.
Step 3. MonthlyExpenditureRankingCommandParser#parse() will take in a String input consisting of the arguments.
Step 4. This arguments will be tokenized and the respective models for each argument are created.
Step 5. If the parsing of all arguments are successful, a new MonthlyExpenditureRankingCommand is returned back to LogicManager.
Step 6. The LogicManager executes MonthlyExpenditureRankingCommand#execute().
Step 7. The model is updated with the List of Data from the newly created TrendReport.
Observe that the implementation of mthrank involves the creation of a TrendReport.
Not only are the results of this command only specific to a year, the mthrank command is strikingly similar to the
expenditure command, except that the sorted results are used to update the DataList in the Model.
|
4.5.8. View Expenditure Ranking Chart
The view expenditure ranking chart allows the user to view the ranked expenditure trends.
This feature is facilitated by AnalyticsFeatureParser, ExpenditureRankingCommandParser, and ExpenditureRankingCommand.
The arguments supported by this feature are:
-
Month(optional) -
Year(optional)
This command is unique in the sense that if month is not specified, the report is only specific to a year. However, if
month is specified, the report is specific to both a month and a year. This is different from the other commands that
are only specific to a year, or a month and a year. Hence, there is an extra if-condition in the execution loop of the
ExpenditureRankingCommand to account for this discrepancy.
|
Implementation
When the user input the exprank command in the Analytics tab, the following chain of operations occurs:
Step 1. The IchiFundParser will delegate the parsing of the command to AnalyticsFeatureParser if the current active tab is Analytics.
Step 2. The AnalyticsFeatureParser will delegate the parsing of the arguments to ExpenditureRankingCommandParser.
Step 3. ExpenditureRankingCommandParser#parse() will take in a String input consisting of the arguments.
Step 4. This arguments will be tokenized and the respective models for each argument are created.
Step 5. If the parsing of all arguments are successful, a new ExpenditureRankingCommand is returned back to LogicManager.
Step 6. The LogicManager executes ExpenditureRankingCommand#execute().
Step 7. The model is updated with the List of Data from the newly created TrendReport.
4.6. Loans
4.6.1. Adding Loan : add
Overview
This feature allows the user to add a loan in IchiFund. Adding a loan also creates the default values associated with the added loan.
Implementation
The add command is facilitated by the Logic and Model components of the application. Given below is an example usage scenario of how add behaves at each step.
Step 1: The user executes add a/42.15 d/Utilities sd/1 sm/1 sy/2019 ed/31 em/12 ey/2019 to add a loan for utilities with an amount of $42.15 taken on 1st January 2019 and to be returned on 31st December 2019.
Step 2: LogicManager uses IchiFundParser#parserCommand() to parse the input from the user.
Step 3: IchiFundParser determines which command is being used and creates the respective AddLoanCommandParser parser with the user’s input as an argument.
Step 4: AddLoanCommandParser does a validation check on the user’s input before creating and returning an AddLoanCommand with desired Loan as an argument.
Step 5: LogicManager uses AddLoanCommand#execute() to add the Loan and the associated Loans into the Model which is handled by ModelManager. In doing so, it also fetches the LoanId counter tracked by the Model, sets it as the created Repeater's unique id, and increments the counter in the Model by 1.
Step 6: AddRepeaterCommand returns a CommandResult to the LogicManager which is returned back to the user.
4.6.2. Paying Loan : pay
Overview
This feature allows the user to pay off a marked loan in IchiFund by index.
Implementation
The pay command is facilitated by the Logic and Model components of the application. Given below is an example usage scenario of how pay behaves at each step.
Step 1: The user executes pay 2 to pay off the loan in the 2nd index.
Step 2: LogicManager uses IchiFundParser#parserCommand() to parse the input from the user.
Step 3: IchiFundParser determines which command is being used and creates the respective PayLoanCommandParser parser with the user’s input as an argument.
Step 4: PayLoanCommandParser does a validation check on the user’s input before creating and returning an PayLoanCommand with desired Index as an argument.
Step 5: LogicManager uses PayLoanCommand#execute() to delete the Loan from the Model which is handled by ModelManager.
Step 6: PayLoanCommand returns a CommandResult to the LogicManager which is returned back to the user.
4.7. Logging
We are using java.util.logging package for logging. The LogsCenter class is used to manage the logging levels and logging destinations.
-
The logging level can be controlled using the
logLevelsetting in the configuration file (See Section 4.8, “Configuration”) -
The
Loggerfor a class can be obtained usingLogsCenter.getLogger(Class)which will log messages according to the specified logging level -
Currently log messages are output through:
Consoleand to a.logfile.
Logging Levels
-
SEVERE: Critical problem detected which may possibly cause the termination of the application -
WARNING: Can continue, but with caution -
INFO: Information showing the noteworthy actions by the App -
FINE: Details that is not usually noteworthy but may be useful in debugging e.g. print the actual list instead of just its size
4.8. Configuration
Certain properties of the application can be controlled (e.g user prefs file location, logging level) through the configuration file (default: config.json).
5. Documentation
Refer to the guide here.
6. Testing
Refer to the guide here.
7. Dev Ops
Refer to the guide here.
Appendix A: Product Scope
Target user profile:
-
a financially conscious CS undergraduate
-
has a need to track expenditure and income items
-
has a need to limit expenditure to a budget
-
has a need to quickly analyse how to reduce expenditure
-
has a need to track net worth
-
has a need to track loans and money owed
-
prefers desktop apps over other types
-
can type fast
-
prefers typing over mouse input
-
is reasonably comfortable using CLI apps
-
Value proposition:
-
manage financial transactions faster than a typical mouse/GUI driven app
-
analyse past expenditure, income and balance trends
Appendix B: User Stories
Priorities: High (must have) - * * *, Medium (nice to have) - * *, Low (unlikely to have) - *
| Priority | As a … | I want to … | So that I can… |
|---|---|---|---|
|
new user |
see usage instructions |
refer to instructions when I forget how to use the App |
|
user who is keeping track of transactions |
record transactions |
|
|
user who is keeping track of transactions |
edit transactions |
update any errors made when adding transactions |
|
user who is keeping track of transactions |
view transactions |
|
|
user who is keeping track of transactions |
organize transactions by category |
|
|
user who is keeping track of transactions |
delete transactions |
delete wrongly added or refunded transactions |
|
user who is keeping track of transaction recurrence |
create transaction repeaters |
insert new transaction repeater. |
|
user who is keeping track of transaction recurrence |
edit transaction repeaters |
update any changes or errors in existing transaction repeaters. |
|
user who is keeping track of transaction recurrence |
delete transaction repeaters |
delete no longer relevant transaction repeaters. |
|
user who is keeping track of transaction recurrence |
filter transaction repeaters |
quickly find transaction repeaters relevant to a search query. |
|
user who is keeping track of net worth |
set my current wealth |
keep track of how much money I have |
|
user who is keeping track of budget |
set my monthly expenditure budget |
keep track of how much I can spend for the month |
|
user who is keeping track of budget |
exclude transaction from budget |
|
|
user who is keeping track of budget |
include transaction to budget |
|
|
user who is keeping track of budget |
see an overview of my budget |
|
|
user who is trying to reduce expenditure |
view my monthly expenditure trends |
keep track of how much I spend per month |
|
user who is trying to reduce expenditure |
view my expenditure breakdown by category |
keep track of how much I spend by category |
|
user who is trying to reduce expenditure |
view my expenditure category ranking chart |
keep track of my top expenditure categories |
|
user who is trying to reduce expenditure |
view my expenditure ranking chart by month |
keep track of my top expenditure months |
|
user who is trying to reduce expenditure |
view my expenditure ranking chart |
keep track of my top expenditures |
|
user who is keeping track of net worth |
view my monthly income trends |
keep track of how much I earn per month |
|
user who is keeping track of net worth |
view my monthly balance trends |
keep track of how much I save per month |
|
long-term user who is keeping track of transactions |
find transactions by keyword |
conveniently search for transactions to edit or review |
|
user who wants to keep track of money owed |
view all loans |
see all money i am owed or currently owe others |
|
user who wants to keep track of money owed |
view all positive loans |
see all money people owe me |
|
user who wants to keep track of money owed |
view all negative loans |
see all money i owe people |
|
user who wants to keep track of money owed |
select loans by names/keywords |
see all loans by a particular person |
|
user who wants to keep track of money owed |
new loan in the list |
add a new loan to keep track of |
|
user who wants to keep track of money owed |
mark loan as loan paid |
remove one of the loans |
|
user who wants to keep track of money owed |
paid/add by part |
some amont of loan is paid off |
|
user who wants to keep track of money owed |
reminders to pay loans with dates |
I can see updates and reminders for urgent loans |
{More to be added}
Appendix C: Use Cases
(For all use cases below, the System is the IchiFund and the Actor is the user, unless specified otherwise)
Use case: Set current wealth
MSS
-
User requests to set current wealth.
-
System sets current wealth.
-
System reflects newly set current wealth.
Use case ends.
Use case: Add transaction item
MSS
-
User enters information about transaction.
-
System creates transaction item.
-
System shows newly updated list of transaction items.
Use case ends.
Use case: Edit transaction item
MSS
-
User finds transaction item.
-
User specifies transaction to be edited and information to edit.
-
System updates the transaction item.
-
System shows newly updated list of transaction items.
Use case ends.
Use case: Delete transaction item
MSS
-
User finds transaction item.
-
User specifies transaction to be deleted.
-
System removes the transaction item.
-
System shows newly updated list of transaction items.
Use case ends.
Use case: Change filter of transaction list
MSS
-
User specifies month, year, category and/or type of the transaction
-
System updates filter of list of transaction items.
Use case ends.
Use case: Find transaction item
MSS
-
User specifies keywords of the transactions to be found.
-
System updates list of transaction items to show applicable transactions.
Use case ends.
Use case: Archive transaction item
MSS
-
User specifies index of transaction to be archived
-
System moves transaction to archive.
-
System shows newly updated list of transaction items.
Use case ends.
Use case: Create transaction repeater
MSS
-
User requests to create a transaction repeater with specified arguments.
-
System creates the transaction repeater.
Use case ends
Use case: Edit transaction repeater
MSS
-
User requests to edit a transaction repeated with specified arguments.
-
System updates the transaction repeater.
Use case ends
Use case: Delete transaction repeaters including all produced transactions
MSS
-
User requests to delete a transaction repeater together with all its produced transactions.
-
System removes existing transactions produced from transaction repeater.
-
System removes transaction repeater.
Use case ends
Use case: Filter transaction repeaters
MSS
-
User requests to find transaction repeaters by specified fields.
-
System filters existing transaction repeaters against specified fields.
-
System shows filtered transaction repeaters.
Use case ends
Use case: Set monthly expenditure budget
MSS
-
User requests to set the monthly expenditure budget.
-
System set the monthly expenditure budget.
Use case ends.
Use case: Add loan
MSS
-
User requests to add a new loan with name, amount and date by.
-
System parses request to retrive details.
-
System adds new loan to list.
-
System updates list and displays what was added.
Use case ends
Use case: View loans with search
MSS
-
User requests to search for all loans, with search keywords.
-
System parses and decides the request search constrains.
-
System displays seelected search results.
Use case ends
Use case: Mark loans as part done
MSS
-
User requests to mark a lone as paid off.
-
System removes existing loan from the list.
-
System updates the total loan value.
-
System shows the new total loan value, with the new paid off loan.
Use case ends
Extensions
-
1a. System detect an invalid budget amount.
-
1a1. System shows an error message.
Use case ends.
-
Use case: View expenditure trend
MSS
-
User requests to view expenditure trend over a period.
-
System retrieves expenditure entries for each month in the indicated period.
-
System totals up expenditure for each month in the indicated period.
-
System shows the expenditure totals for each month in the indicated period.
Use case ends.
Use case: View expenditure breakdown by category
MSS
-
User requests to view expenditure breakdown by category over a period.
-
System retrieves expenditure entries for each category in the indicated period.
-
System totals up expenditure for each category in the indicated period.
-
System shows the expenditure totals for each category in the indicated period.
Use case ends.
Use case: View expenditure ranking chart
MSS
-
User requests to view expenditure ranking chart over a period.
-
System retrieves all expenditure entries in the indicated period.
-
System sorts expenditure entries in the indicated period.
-
System shows the sorted expenditure entries in the indicated period.
Use case ends.
Appendix D: Non Functional Requirements
-
Should work on any mainstream OS as long as it has Java
11or above installed. -
Should be able to hold up to 1000 transactions without a noticeable sluggishness in performance for typical usage.
-
A user with above average typing speed for regular English text (i.e. not code, not system admin commands) should be able to accomplish most of the tasks faster using commands than using the mouse. {More to be added}
Appendix F: Product Survey
DBS digibank SG
Author: DBS Bank Ltd
Pros:
-
Links to bank account and PayLah!
-
Shows visual summary of cashflow
-
Automatically categorizes items
Cons:
-
Does not use CLI
-
Does not allow for customisation of transactions beyond categories
-
Does not have a budgeting feature
Appendix G: Instructions for Manual Testing
Given below are instructions to test the app manually.
| These instructions only provide a starting point for testers to work on; testers are expected to do more exploratory testing. |
G.1. Launch and Shutdown
-
Initial launch
-
Download the jar file and copy into an empty folder
-
Double-click the jar file
Expected: GUI shows set of sample transactions. Filter title set to current month and year of system time. Window size is fixed at 960x720px. -
Click on repeater tab Expected: Shows the GUI
-
-
Launch with corrupted config.json and/or preferences.json
-
Manually edit config.json and/or preferences.json by adding "aaa" to start of file.
-
Perform same steps as above test case.
-
G.2. Tab switching
-
Tab switching by shortcut key
-
Press
Ctrl+2.
Expected: GUI shows repeaters tab. -
Press
Ctrl+3.
Expected: GUI shows budgets tab. -
Press
Ctrl+4.
Expected: GUI shows loan tab. -
Press
Ctrl+5.
Expected: GUI shows analytics tab. -
Press
Ctrl+1.
Expected: GUI shows transaction tab.
-
-
Tab switching by command
-
Enter command
rep.
Expected: GUI shows repeaters tab. -
Enter command
budget.
Expected: GUI shows budgets tab. -
Enter command
loan.
Expected: GUI shows loan tab. -
Enter command
analytics.
Expected: GUI shows analytics tab. -
Enter command
tx.
Expected: GUI shows transaction tab.
-
-
Tab switching by mouse click
-
Click on repeater tab.
Expected: GUI shows repeaters tab. -
Click on budget tab.
Expected: GUI shows budgets tab. -
Click on loan tab.
Expected: GUI shows loan tab. -
Click on analytics tab.
Expected: GUI shows analytics tab. -
Click on transaction tab.
Expected: GUI shows transaction tab.
-
-
Separate parsing for different tabs
-
Enter
addin transaction tab.
Expected: Console shows error message forAddTransactionCommand. -
Go to repeaters tab and enter
add.
Expected: Console shows error message forAddRepeaterCommand. -
Go to budgets tab and enter
add.
Expected: Console shows error message forAddBudgetCommand. -
Go to loan tab and enter
add.
Expected: Console shows error message forAddLoanCommand. -
Go to analytics tab and enter
add.
Expected: Console shows error message for unrecognised command.
-
G.3. Filtering transactions
-
Filter title changes correctly
-
Enter a
filtercommand with all arguments (e.g.filter m/1 y/2008 c/food ty/exp)
Expected: Filter title contains information of all arguments (e.g. January 2008 Expenditure - Food) -
Enter a
filtercommand with only month and year arguments (e.g.filter m/2 y/2009)
Expected: Filter title retains information on category and transaction type, and updates to show correct month and year. -
Enter
filter c/!all ty/!all
Expected: Filter title now only contains information about month and year.
-
-
Filters transactions correctly
-
Prerequisites: No transactions from January 2001 and 2002
-
Enter
add de/a a/1 c/a d/1 m/1 y/2001 ty/exp -
Enter
add de/b a/1 c/b d/1 m/1 y/2001 ty/exp -
Enter
add de/c a/1 c/a d/1 m/1 y/2001 ty/in -
Enter
filter m/1 y/2002
Expected: No transactions shown -
Enter
filter y/2001
Expected: All 3 transactions added shown -
Enter
filter ty/exp
Expected: Transactions with descriptions "a", "b" shown -
Enter
filter c/a
Expected: Transaction with description "a" shown -
Enter
filter ty/!all
Expected: Transactions with descriptions "a", "c" shown
-
-
Invalid
Month-
Enter
filter m/13
Expected: Console shows error message. -
Enter
filter m/aaa
Expected: Console shows error message.
-
-
Invalid
Year-
Enter
filter y/1999
Expected: Console shows error message. -
Enter
filter y/10000
Expected: Console shows error message.
-
-
Invalid
TransactionType-
Enter
filter ty/xxx
Expected: Console shows error message.
-
-
Invalid
Category-
Enter
filter c/abcdefghijklmnopqrstuvwxyzabcdefghijklmnopqrstuvwxyz
Expected: Console shows error message. -
Enter
filter c/!!!
Expected: Console shows error message.
-
G.4. Adding a transaction
-
Transaction correctly created
-
Add any valid transaction using
addwith all fields specified
Expected: GUI changes context if necessary, and transaction added is shown with correct fields
-
-
Optional arguments correctly filled
-
Enter
filter m/3 y/2005 c/food ty/in -
Enter
add a/1 de/z
Expected: New transaction("z") appears in the same list, marked as income item with category as "FOOD". Date of transaction is X March 2005, where X is the current day of the month. -
Enter
filter ty/!all -
Enter
add a/1 de/y
Expected: New transaction("y") appears in the same list. Similar to "z", but marked as expenditure. -
Enter
filter c/!all -
Enter
add a/1 de/x
Expected: New transaction("x") appears in the same list. Similar to "y", but under category "UNCATEGORISED".
-
-
Automatic sorting of transaction
-
Prerequisite: Current list of transactions show no transactions.
-
Enter
add de/a a/1 d/3 -
Enter
add de/b a/1 d/2
Expected: New transaction("b") appears at the bottom of the transaction list. -
Enter
add de/c a/1 d/4
Expected: New transaction("c") appears at the top of the transaction list. -
Enter
add de/d a/1 d/4 c/z
Expected: New transaction("d") appears at the second index. -
Enter
add de/e a/1 d/4 c/a
Expected: New transaction("e") appears at the top of the transaction list. Resulting list: "e", "c", "d", "a", "b".
-
-
Filter switch when adding transaction
-
Prerequisites: Current filter is "November 2019 Expenditure - Food"
-
Enter
add de/a a/1 y/2018
Expected: Filter changes to "November 2018 Expenditure - Food" -
Enter
add de/a a/1 m/10
Expected: Filter changes to "October 2018 Expenditure - Food" -
Enter
add de/a a/1 c/a
Expected: Filter changes to "October 2018 Expenditure" -
Enter
add de/a a/1 ty/in
Expected: Filter changes to "October 2018"
-
-
Invalid
Description-
Enter
add a/1 de/abcdefghijklmnopqrstuvwxyzabcdefghijklmnopqrstuvwxyz
Expected: Console shows error message. -
Enter
add a/1 de/!!!
Expected: Console shows error message.
-
-
Invalid
Amount-
Enter
de/a a/a
Expected: Console shows error message. -
Enter
de/a a/999999
Expected: Console shows error message. -
Enter
de/a a/-1
Expected: Console shows error message.
-
-
Invalid
DayorDate-
Enter
add a/1 de/a d/32
Expected: Console shows error message. -
Enter
add a/1 de/a d/31 m/11
Expected: Console shows error message. -
Enter
add a/1 de/a d/30 m/2
Expected: Console shows error message. -
Enter
add a/1 de/a d/29 m/2 y/2003
Expected: Console shows error message.
-
G.5. Editing a transaction
-
Transaction correctly edited
-
Add any valid transaction using
editwith any fields specified
Expected: GUI changes context if necessary, and transaction edited is shown with correct fields
-
-
Filter switch when editing transaction
-
Prerequisites: Current filter is "November 2019 Expenditure - Food". There is at least 1 transaction shown.
-
Enter
edit 1 y/2018
Expected: Filter changes to "November 2018 Expenditure - Food" -
Enter
edit 1 m/10
Expected: Filter changes to "October 2018 Expenditure - Food" -
Enter
edit 1 c/a
Expected: Filter changes to "October 2018 Expenditure" -
Enter
edit 1 ty/in
Expected: Filter changes to "October 2018"
-
-
Invalid
Index-
Enter
edit 0 de/a
Expected: Console shows error message. -
Prerequisite: less than 20 items shown in list of transactions.
-
Enter
edit 20 de/a
Expected: Console shows error message.
-
G.6. Deleting a transaction
-
Valid deletion of transaction
-
Prerequisite: at least 2 people shown in list of transactions
-
Enter
delete 2
Expected: Second transaction in list of items deleted.
-
-
Invalid
Index-
Enter
delete 0
Expected: Console shows error message. -
Enter
delete x
Expected: Console shows error message. -
Prerequisite: less than 20 items shown in list of transactions.
-
Enter
delete 20
Expected: Console shows error message.
-
G.7. Adding a repeater
-
Adding repeaters creates associated transactions
-
Go to the repeaters tab.
-
Add a repeater using any valid
addcommand.
Expected: Shows newly created repeater with correct fields. -
Go to the transaction tab and use
filtercommand to find newly added transactions.
Expected: Shows newly created transactions with correct fields for appropriate filters.
-
-
Boundary value arguments
-
Add a repeater with end date later than start date by exactly 60 months.
Expected: Repeater successfully added.
-
-
Invalid command arguments
-
Go to the repeaters tab.
-
Add a repeater with end date earlier than start date.
Expected: Error message displayed on console. -
Add a repeater with end date later than start date by >60 months.
Expected: Error message displayed on console. -
Add a repeater with both month offsets ignored.
Expected: Error message displayed on console.
-
-
Duplicate repeaters
-
Add any valid repeater.
-
Add a repeater with the exact same field.
Expected: Error message displayed on console.
-
G.8. Editing a repeater
-
Editing repeaters edits associated transactions
-
Go to the repeaters tab.
-
If required, add a repeater.
-
Edit a repeater using a valid
editcommand (e.g.edit 1 a/0.41).
Expected: Shows newly created repeater with correct fields. -
Go to the transaction tab and use
filtercommand to find newly edited transactions.
Expected: Shows newly edited transactions with correct fields for appropriate filters.
-
G.9. Deleting a repeater
-
Deleting repeaters delete associated transactions
-
Go to the repeaters tab.
-
If required, add a repeater.
-
Delete a repeater using a valid
deletecommand (e.g.delete 1).
Expected: GUI no longer shows deleted repeater. -
Go to the transaction tab and use
filtercommand to find associated transactions.
Expected: Associated transactions cannot be found.
-
G.10. Adding and modifying a Loan
-
Adding a Loan while other loans are present
-
Prerequisites: List all loans. Multiple loans in the list.
-
Enter `add a/420.42 n/Felix Kjellberg sd/12 sm/12 sy/2019 ed/23 em/2 ey/2020 de/Borrowed for apple earpods `
Expected: Loan is added to the list. Details of the added loan shown in the status message. -
Enter
add a/220
Expected: Loan is added with default values. Loan Details shown in the status message. Status bar remains the same. -
Enter
add n/FelixExpected: No amount given error is shown. No Loan is added to the list. The status shows correct format to enter. -
Other incorrect delete commands to try:
add,add a/24 n/123
Expected: Similar to previous.
-
-
Editing Existing loans
-
Prerequisites: List all loans. Multiple loans in the list.
-
Enter 'edit 2 a/220 n/NewName sd/12 ey/2012'
Expected: First loan on the list is changed to new assigned values. No other loans or entries are changed. -
Enter 'edit 1 n/NewName sd/12 ey/2012 d/New Description for the Loan'
Expected: First loan on the list is changed to new assigned values including description. No other loans or entries are changed. Other values are derived from existing entry. -
Enter 'edit a/220 n/NewName sd/12 ey/2012'
Expected: Wrong format for edit command is shown in status. No Loan is edited. -
Other incorrect delete commands to try:
edit,edit 5
Expected: Similar to previous.
-
-
Paying off Existing loans
-
Prerequisites: List all loans. Multiple loans in the list.
-
Enter 'pay 1'
Expected: First loan on the list is removed from list. No other loans or entries are changed. Status bar indicates deletion. -
Enter 'pay a/220'
Expected: Wrong format for pay command is shown in status. No Loan is removed. Status shows correct format of command. -
Other incorrect delete commands to try:
pay,pay a
Expected: Similar to previous.
-
G.11. Saving data
-
Launch with corrupted fundbook.json
-
Manually edit and save data/fundbook.json, corrupting data by entering "aaaaa" at start of file.
-
Double-click the jar file.
Expected: Shows the GUI with no data items. Window size is fixed at 960x720px.
-
-
Relaunch after changing list of transactions
-
Go to the transaction tab.
-
Add a transaction using the
addcommand and exit IchiFund. -
Double-click the jar file.
-
If necessary, use
filtercommand to find newly added transaction.
Expected: Shows the GUI with newly added transaction. -
Edit the transaction using the
editcommand and exit IchiFund. -
Double-click the jar file.
-
If necessary, use
filtercommand to find newly added transaction.
Expected: Shows the GUI with newly edited transaction. -
Delete the transaction using the
deletecommand and exit IchiFund. -
Double-click the jar file.
-
If necessary, use
filtercommand to find deleted transaction.
Expected: Shows the GUI without the deleted transaction.
-
-
Relaunch after changing list of repeaters
-
Go to the repeaters tab.
-
Add a repeater using the
addcommand. -
Exit IchiFund.
-
Double-click the jar file.
-
Go to repeaters tab.
Expected: GUI shows newly added repeater. -
Go to the repeaters tab.
-
Edit a repeater using the
editcommand. -
Go to the transaction tab and use
filtercommand to find newly edited transactions.
Expected: Shows newly edited transactions for appropriate filters. -
Exit IchiFund.
-
Double-click the jar file.
-
Go to repeaters tab, or search for newly edited transactions in transaction tab.
Expected: In repeaters tab, shows newly edited repeater; in transaction tab, shows newly edited transactions for appropriate filters. -
Go to the repeaters tab.
-
Add a repeater using the
deletecommand. -
Exit IchiFund.
-
Double-click the jar file.
-
Go to repeaters tab.
Expected: In repeaters tab, deleted repeater is not shown.
-
-
Relaunch after changing list of budgets
-
Go to the budget tab.
-
Add a budget using the
addcommand and exit IchiFund. -
Double-click the jar file.
-
Go to the budget tab.
Expected: Shows the GUI with newly added budget. Budget progress is the same. -
Delete a budget using the
deletecommand and exit IchiFund. -
Double-click the jar file.
-
Go to the budget tab.
Expected: GUI does not show deleted budget.
-
-
Relaunch after changing list of loans
-
Go to the loan tab.
-
Add a loan using the
addcommand and exit IchiFund. -
Double-click the jar file.
-
Go to the loan tab.
Expected: Shows the GUI with newly added loan.
-