By: Team AY1920S1-CS2103T-W12-4 Since: Sep 2019 Licence: MIT
1. Introduction
IchiFund is for those who prefer to use a desktop app for managing finance. More importantly, IchiFund is optimized for those who prefer to work with a Command Line Interface (CLI) while still having the benefits of a Graphical User Interface (GUI). If you can type fast, IchiFund can get your finance management tasks done faster than traditional GUI apps. Interested? Jump to the Section 2, “Quick Start” to get started. Enjoy!
2. Quick Start
-
Ensure you have Java
11or above installed in your Computer. -
Download the latest
ichifund.jarhere. -
Copy the file to the folder you want to use as the home folder for your IchiFund.
-
Double-click the file to start IchiFund. The GUI should appear in a few seconds.
-
Alternatively, open a command window and run
java -jar ichifund.jarin the appropriate directory.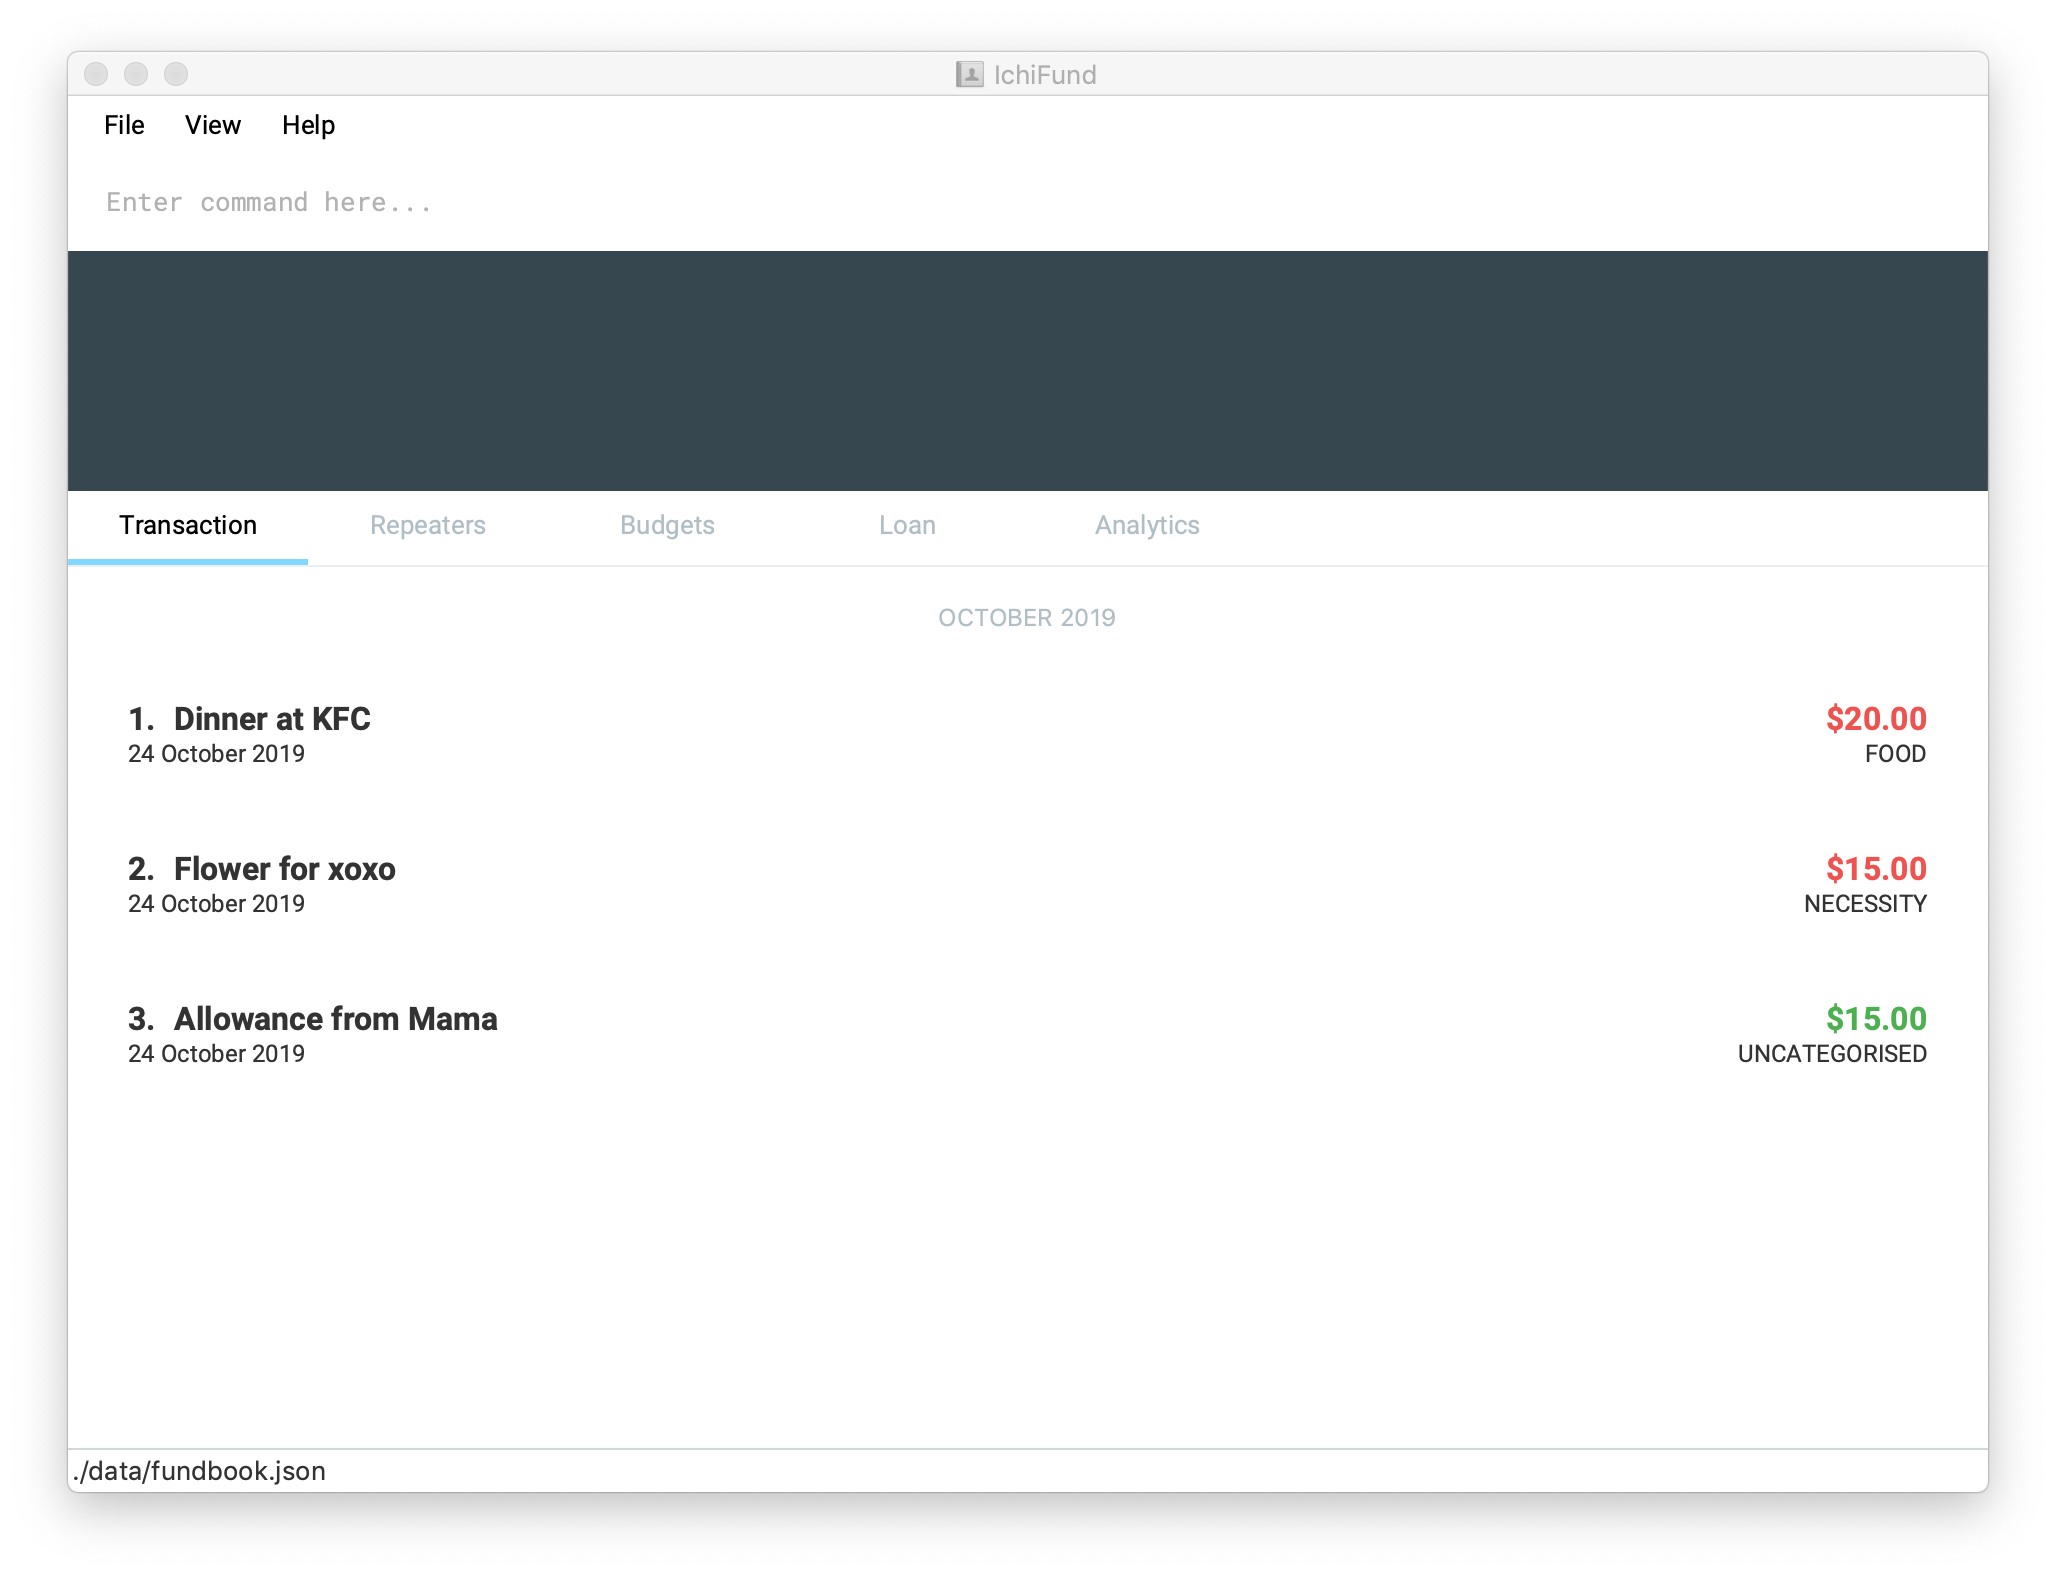
-
-
Type the command in the command box and press Enter to execute it.
E.g., typinghelpand pressing Enter will open the help window.
Here are some example commands you can try in the transaction tab:-
add de/Lunch a/12.30: adds an expenditure item for "Lunch" to IchiFund. -
filter m/10 y/2019 c/!all ty/exp: finds all expenditure items from October 2019. -
exit: exits IchiFund
-
-
Refer to Section 3, “Navigation” for details on how to navigate through IchiFund.
-
Refer to Section 4, “Features” for details of each command.
3. Navigation
IchiFund has five features: Transactions, Repeaters, Budgets, Loans and Analytics. Each feature is allocated to its own tab, and the commands for each feature only work when you are using the tab associated to the feature.
When you enter a command that is not used by the feature, the following message is shown:
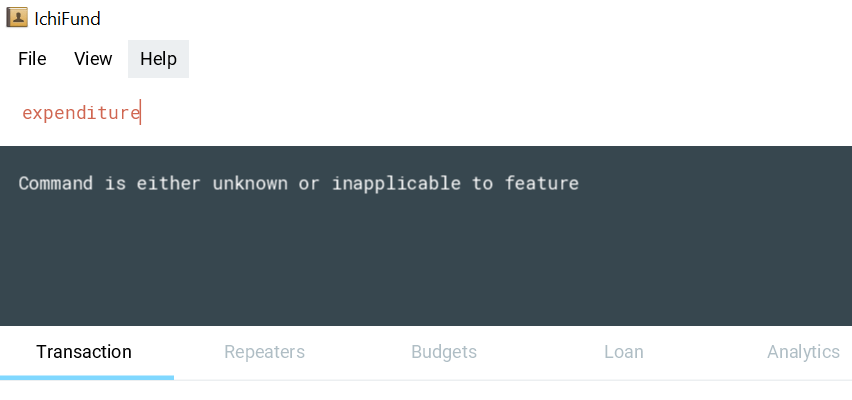
In this case, expenditure, a command for "Analytics", is not recognised as the application is currently
in the "Transactions" tab.
3.1. Switching tabs
We offer three modes for you to switch tabs:
-
Clicking on the tab
-
Using a shortcut key
-
Entering a global command
The global commands and shortcut keys are summarized in the table below:
| Feature | Command | Shortcut Key |
|---|---|---|
Transactions |
|
|
Repeaters |
|
|
Budgets |
|
|
Loans |
|
|
Analytics |
|
|
To use the global command, simply enter the command as you would for any other command, and the application automatically switches to the appropriate tab. These commands are recognised regardless of which tab you are currently using.
4. Features
Command Format
-
Words in
UPPER_CASEare the parameters to be supplied by you.
E.g.,add de/DESCRIPTION a/AMOUNT,DESCRIPTIONandAMOUNTare parameters which can be used asadd de/AirPods a/299.00. -
Items in square brackets are optional.
E.g.add de/DESCRIPTION a/AMOUNT [c/CATEGORY]can be used as-
add de/Saving for iPhone 11 Pro Max a/271.80 c/Gadgets -
add de/Saving for iPhone 11 Pro Max a/271.80.
-
-
You can use items with
…after them multiple times, including zero times.
E.g.,[s/KEYWORD]…can be used as-
` ` (i.e. 0 times)
-
s/Macbook -
s/Macbook s/iPad -
etc.
-
-
You can enter parameters in any order.
E.g., if the command specifiesadd de/DESCRIPTION a/AMOUNT,add a/AMOUNT de/DESCRIPTIONis also acceptable.
4.1. IchiFund Basics
4.1.1. Viewing help : help
Format: help
If you ever need to quickly refer to this user guide, entering the help command causes the
following popup to appear:

You can simply click on the button "Copy URL" to copy the URL to your clipboard. Then, paste and enter the URL into any browser to access this user guide.
4.1.2. Exiting IchiFund : exit
Format: exit
If you want to exit from IchiFund, entering the exit command allows you to exit the program through
our CLI.
4.1.3. Saving IchiFund data
IchiFund data is saved in the hard disk automatically after you enter any command that changes the data.
There is no need for you to save manually.
4.2. Transactions
Do you ever feel overwhelmed by the ever-growing number of transactions you have to keep track of? With our transactions feature, you can organise your transactions in a fuss-free manner!
4.2.1. Overview
In the transactions tab, you can maintain a list of your transactions - adding, editing, deleting and filtering items as you like. The image below gives an overview of the GUI of the feature:
Before we introduce the commands you can use, let us briefly run through the labelled components of our GUI.
Transaction list / cell
The transaction list comprises several transaction cells. Each transaction cell represents a single transaction. We give a further breakdown of the information each transaction cell displays in the following image:

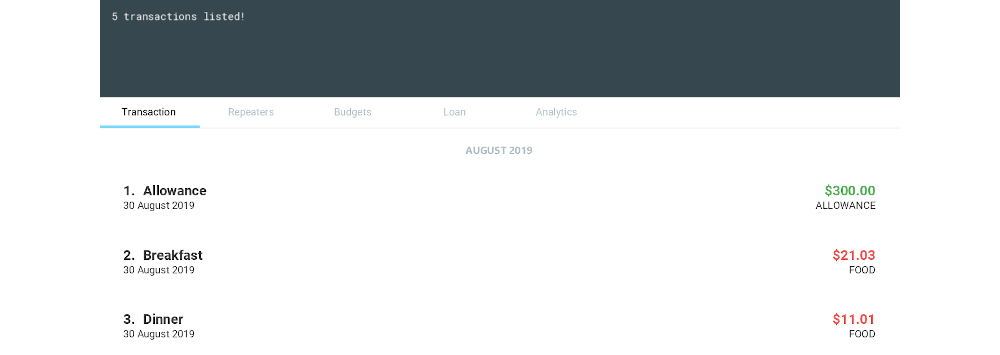
| We differentiate income items from expenditure items using the color of the text for the "Amount" field. A green amount indicates that the transaction is an income item; a red amount indicates that the transaction is an expenditure item. For example, the first transaction cell in Figure 1, “Transaction tab” represents an income item, whereas the second cell represents an expenditure item. |
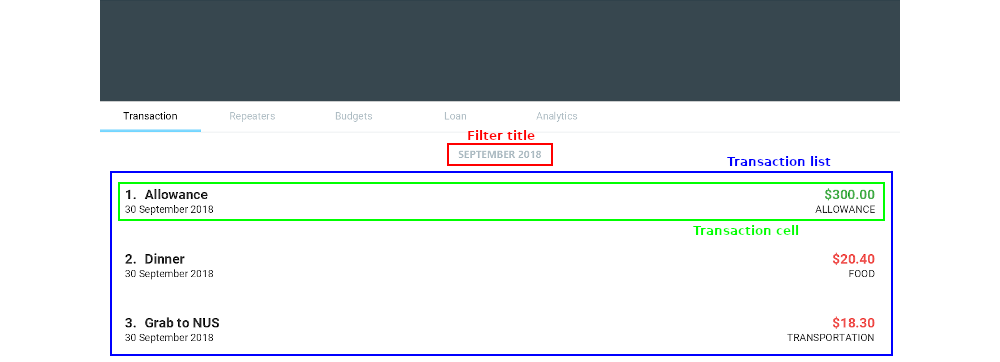
Filter title
The filter title indicates which transactions are being shown. In Figure 1, “Transaction tab”, the list shows only transactions that occur on October 2019, under the category "Food".
Minimally, the filter title contains the month and year of the filter applied. It can also display the category shown, as well as whether only expenditure/income items are shown.
The filter title changes along with the filter that is applied to the list. You can change the filter using
the filter command in Section 4.2.2, “Filtering transaction: filter”
| On startup, the filter is generated based on the latest transaction you have recorded, up to the current date. The filter follows the month and year of this transaction, and does not filter for category or type. If there are no transactions recorded, the current date in the system is used to generate the the filter. This makes it easier for you to access the transactions in the current month! |
4.2.2. Filtering transaction: filter
Format: filter [m/MONTH] [y/YEAR] [c/CATEGORY] [ty/TYPE]
To better understand how your money goes down the drain, it is critical to organise and filter your
transactions. filter does the job for you.
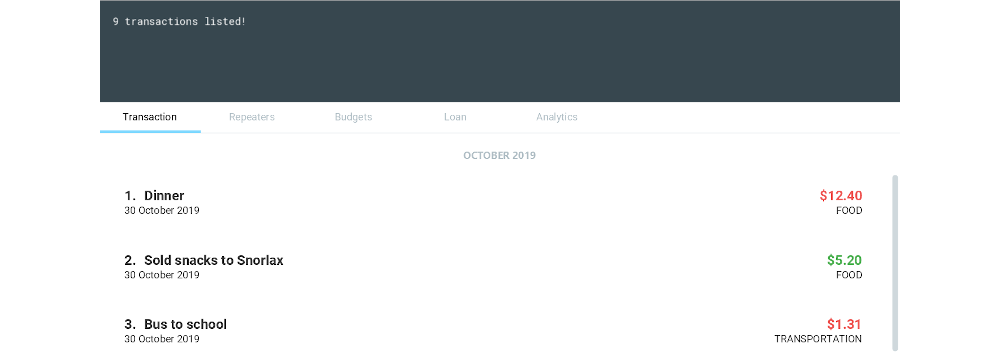
Let’s say you are currently viewing transactions from September 2018. The GUI of Ichifund may look like this:
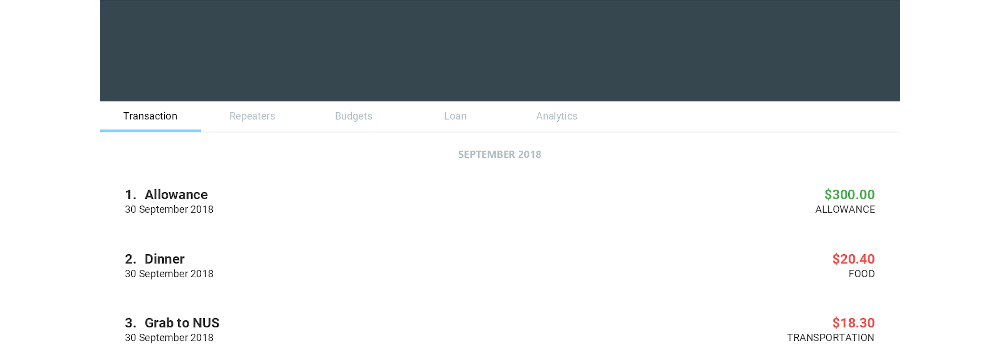
Suppose you want to view transactions from a different month, say, September 2018.
You can simply enter the command filter m/9 y/2018, which results in the following view:
Now, if you want to only see expenditure items, simply enter the command filter ty/exp.
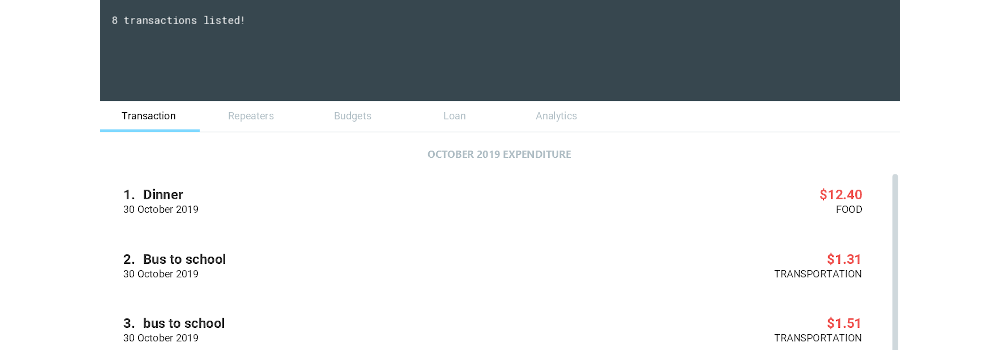
You may find that this view of the list is still too cluttered for you. In that case,
you can further limit the transactions in the list to contain only items from the category "FOOD" using
the command filter c/food
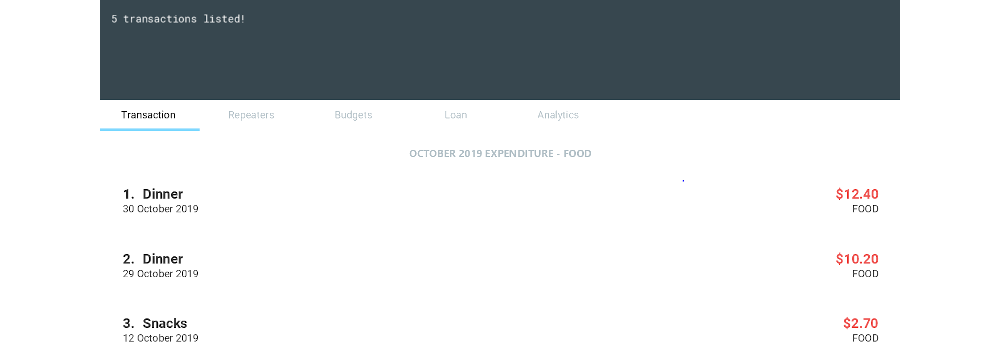
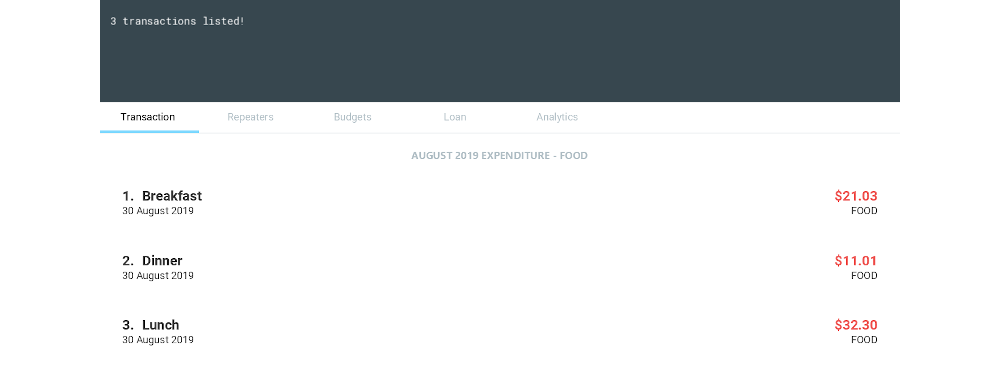
If you want to see expenditure items of the same time, but in a different month, say, August 2019, enter
the command filter m/8. Note that you do not need to enter the year, category, or transaction type again.
The GUI will update accordingly, as follows:
| Categories are case-insensitive, and can contain up to 50 alphanumerical characters, including spaces. |
To see only expenditure items, enter filter ty/exp; to see only income items, enter filter ty/in. This
also applies when you are adding transactions in Section 4.2.3, “Creating transaction: add”
|
Removing category and transaction type filter
Now, if you want to remove both the category filter and the transaction type, you can enter the command
filter c/!all ty/!all.
You can only remove the category and transaction type filter using the !all argument. We do not support
the removal of the month and year filter.
|
Like the other commands in IchiFund, you can enter the arguments in any order, as long as
the command word filter is keyed in at the start.
|
4.2.3. Creating transaction: add
Format: add de/DESCRIPTION a/AMOUNT [c/CATEGORY] [d/DAY] [m/MONTH] [y/YEAR] [ty/TRANSACTION_TYPE]
As painful as it is to remind yourself each time you part with your money, it is essential to meticulously
record your transactions. add eases this process.
Imagine you are browsing your transactions under the category of "Transportation" in November. Your GUI may look like this:

Let’s say you remember that spent $12.31 on lunch on 31 October 2019.
If you want to record this transaction under the category "FOOD", you can enter the full
command add de/Lunch a/12.31 c/food d/31 m/10 y/2019 ty/exp. The application now looks like this:
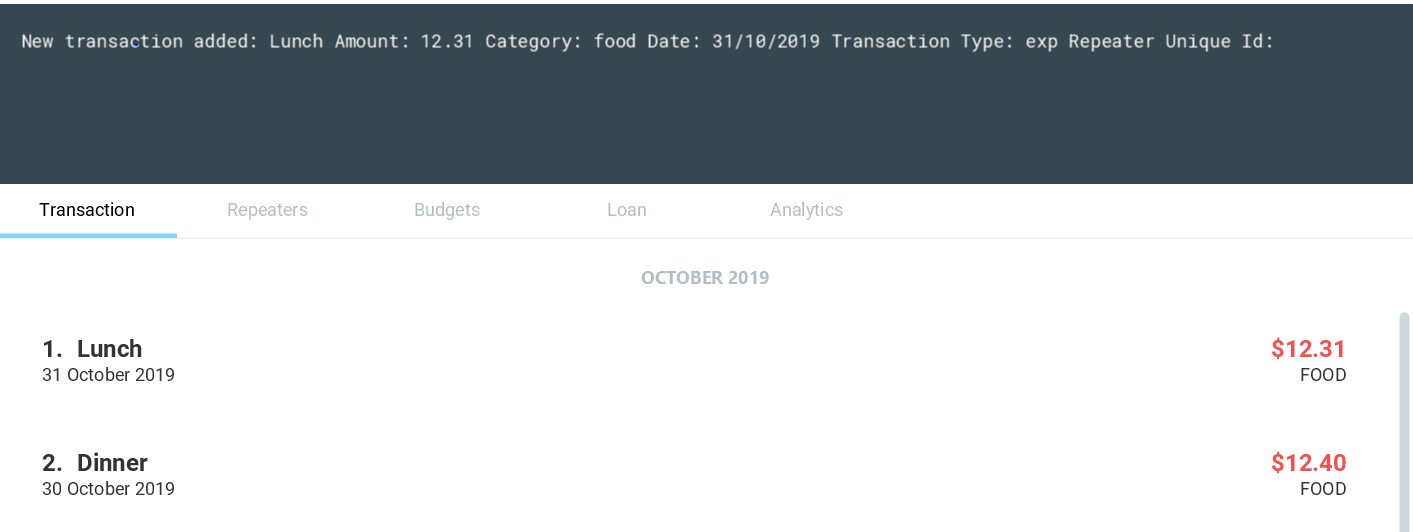
Here, IchiFund automatically changes the filter for you, so that you can review the addition
you made. This makes it convenient if you want to edit your transactions, as detailed in Section 4.2.4, “Editing transaction: edit”
Also, note that the transaction appears at the top of the list. This is because we automatically sort your transactions by date, followed by category, so that you can systematically look through your transactions.
When specifying whether a transaction is an expenditure item or an income item, use the arguments
ty/exp or ty/in respectively, similar to how would do so in Section 4.2.2, “Filtering transaction: filter”
|
Optional arguments
You may find the command used earlier too cumbersome to type. If so, you can leave out some of the optional arguments. To illustrate this, let’s return to the earlier scenario:
Let’s say it is 1 November 2019 today. You have just spent another $10.00 hiring a cab to go to the hospital,
and want to record this transaction under the category of "Transportation". You can simply enter
the command add a/10 de/Cab to hospital, and obtain the following result:
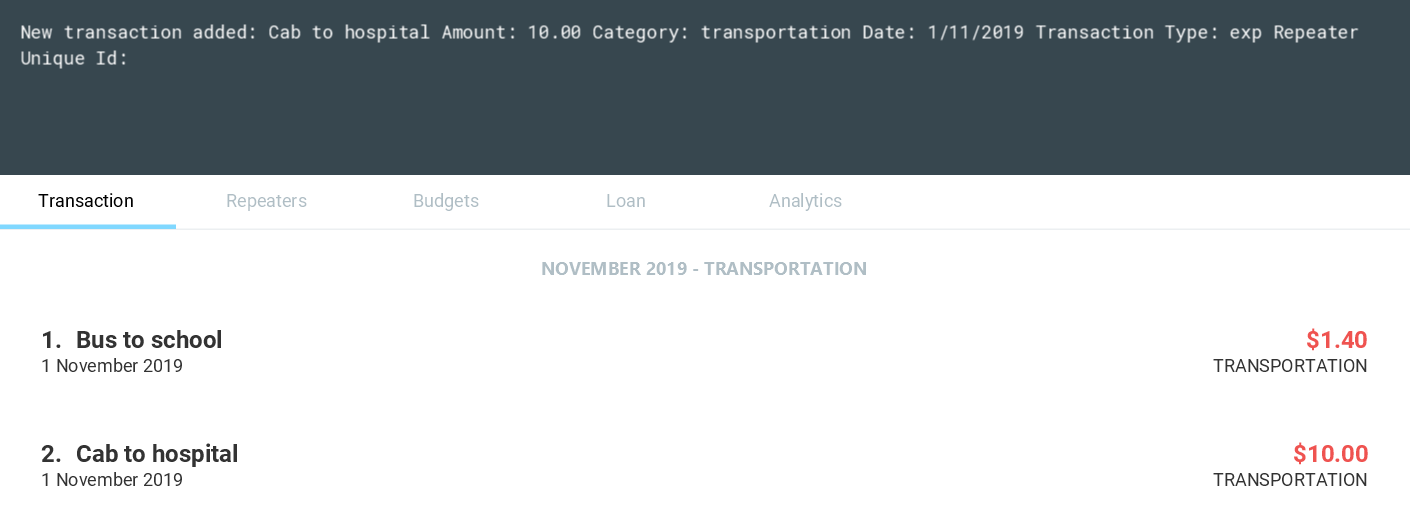
Here, as the month, year, and category arguments are left empty, IchiFund fills it in according to the filter title. The day argument is taken to be the current day of the month, according to the system date. IchiFund also assumes that most transactions are expenditure items, and uses that as a default value.
The following table summarizes the default values that optional arguments take if left unspecified.
| Argument | Default values |
|---|---|
Day |
According to system time and date. |
Month |
According to the filter |
Year |
According to the filter |
Category |
According to the filter, if applicable, or "Uncategorised" otherwise. |
Type |
According to the filter, if applicable, or "exp" otherwise. |
| The default value of the day argument is the current day of month in the system time. Hence, to utilise this feature to its fullest, you are recommended to add transactions on the day it occurs. |
Constraints
The feature for adding transactions is built to work best under these constraints:
| Argument | Constraints |
|---|---|
Description |
Up to 50 alphanumeric characters with spaces; case-sensitive |
Amount |
Positive number with up to 2 decimal places; maximum value of $99999.99 for each transaction |
Category |
Up to 50 alphanumeric characters with spaces; case-insensitive |
Day |
Whole number from 1-31 |
Month |
Whole number from 1-12 |
Year |
Whole number from 2000-9999 |
Type |
Either "in" or "exp" |
Additionally, the transaction feature works best when the system time functions normally, with no change in time zone.
4.2.4. Editing transaction: edit
Format: edit INDEX [de/DESCRIPTION] [a/AMOUNT] [c/CATEGORY] [d/DAY] [m/MONTH] [y/YEAR] [ty/TRANSACTION_TYPE]
Occasionally, you may make a mistake entering your transactions. Perhaps you keyed in the wrong amount, or made
a heinous spelling error in your description. Fret not! You can correct these mistakes using edit, and it would
be as if it never happened.
Suppose you wanted to record your cab fare to the hospital, and you mistakenly record the amount you spent as $10.00 instead of $20.00:
You can rectify this error simply by entering the command edit 2 a/20.00:
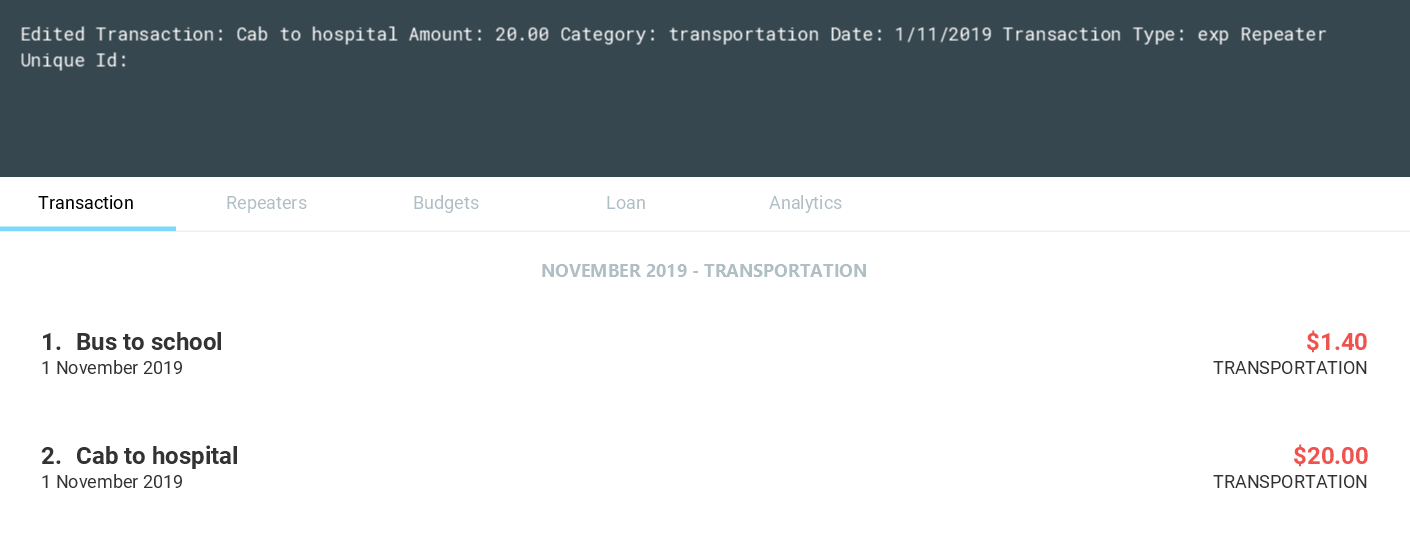
Here, the number "2" specified near the start of the command corresponds to the index of the transaction you want to edit, as shown in the current transaction list. Apart from that, you need to specify only the information you want to edit.
In addition, to make it easier for you to review your edits, the filter of the transaction list changes accordingly such that the edited transaction is shown.
| Unfortunately, transactions created from repeaters cannot be edited or deleted directly. For a more detailed guide on how to modify these transactions, refer to Section 4.3, “Repeaters” |
The constraints in Section 4.2.3, “Creating transaction: add” apply to this command as well.
|
4.2.5. Deleting transaction: delete
Format: delete INDEX
By a stroke of luck, you may sometimes get a reimbursement for your expenditure! While you celebrate the
influx of precious money, do take a moment to update IchiFund using delete.
Let’s say you have just recorded and edited your cab ride to the hospital:
Suppose you now find out that the expenditure is somehow covered by your insurance plan.
Simply enter the command delete 2:
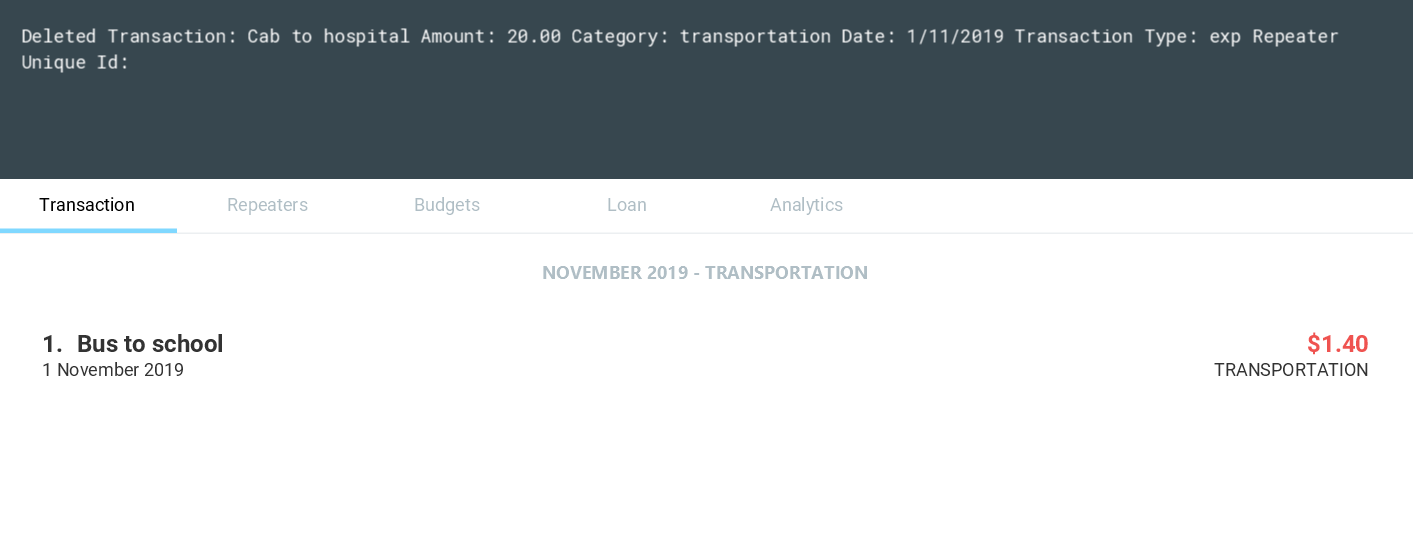
Voila! The transaction is now deleted.
Again, you only have to specify the index of the transaction you want to delete, as shown in the current transaction list.
| Unfortunately, transactions created from repeaters cannot be edited or deleted directly. For a more detailed guide on how to modify these transactions, refer to Section 4.3, “Repeaters” |
4.2.6. Reducing clutter (coming in v2.0)
Naturally, you may find your transaction list to be flooded with transactions. Beyond the
filtering introduced in Section 4.2.2, “Filtering transaction: filter”, we have in store several features to be released in the
next major version of IchiFund.
Archiving transactions: archive
Format: archive [INDEX]
If you want to hide transactions from your view, but do not wish to delete it entirely, you can simply
use the upcoming archive command!
Suppose you want to archive the second transaction in the current list. Simply use the command archive 2
to send that transaction into the archive.
You can switch between the main and archived transaction lists using the command archive.
From the archive, you can unarchive transactions with the same command. To unarchive the third transaction
in the archive list, simply use archive 3, and the transaction is transferred to the main transaction list.
Finding transactions: find
Format: find [KEYWORDS]…
If you want to quickly search for a transaction in your transaction list, you can further refine your search
using the upcoming find command!
The find command takes in keywords as parameters, allowing you to search for transactions containing
specific keywords in their respective descriptions.
For example, find dinner steak updates the list to show transactions from the current filter that have the words
"dinner" and "steak" in their descriptions.
4.2.7. Setting wealth (coming in v2.0)
Format: wealth a/AMOUNT
If you want a quick simple summary of how much money you have left to spend, you can use our upcoming wealth setting feature, where you can set the amount of money you have. The wealth value is automatically updated with every change to your transactions list, so you do not have to worry about manually resetting wealth with every transaction made!
4.3. Repeaters
There is sometimes a need to add the same transaction over and over again. Such is the case for recurring transactions such as phone bills and salaries. With our repeater feature, you can add these recurring transactions in a hassle free manner.
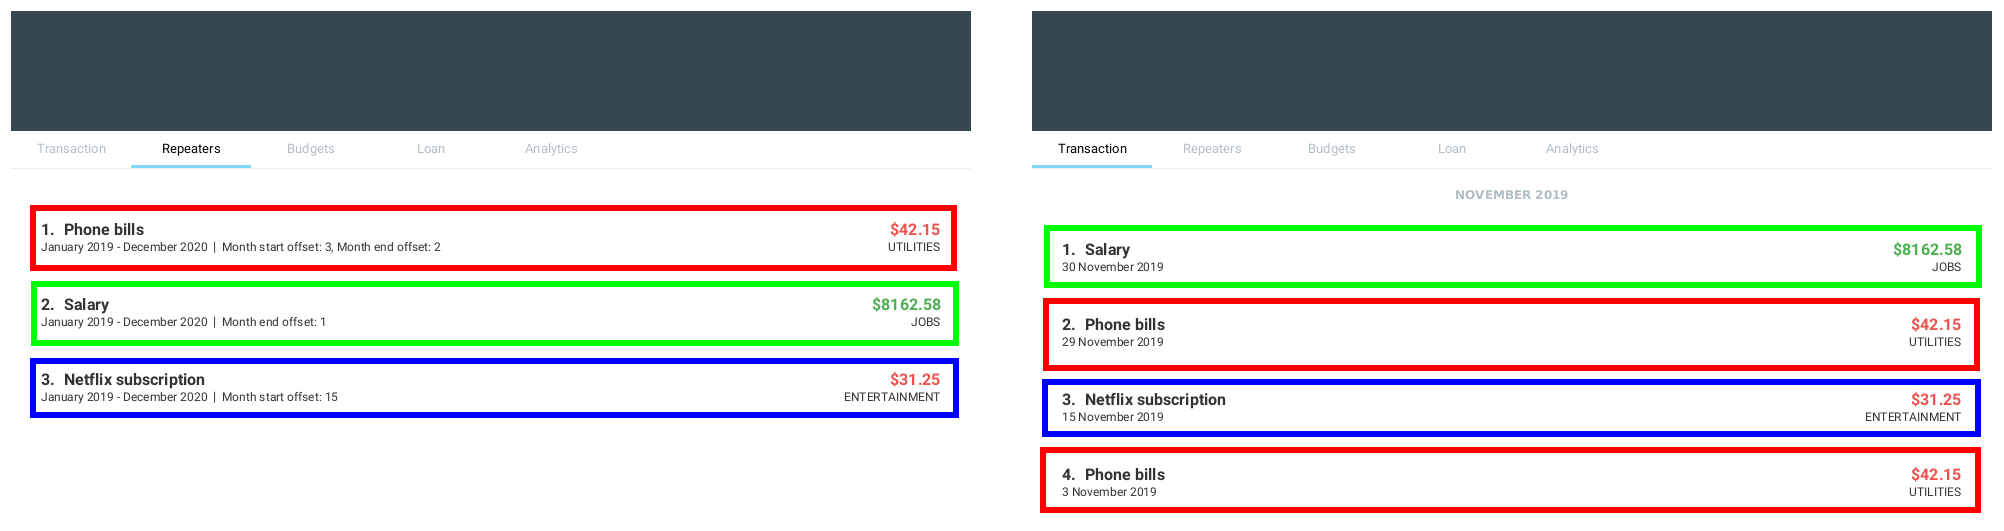
In the repeater tab, you can maintain a list of your repeaters. Each repeater is associated with a list of transactions, which are managed by the repeater. The image below gives an overview of the GUI of the feature. The associated transactions managed by each repeater are highlighted with the respective colored box.
4.3.1. Creating repeater: add
Format: add de/DESCRIPTION a/AMOUNT [c/CATEGORY] [ty/TRANSACTION_TYPE] [so/MONTH_START_OFFSET] [eo/MONTH_END_OFFSET] sm/START_MONTH sy/START_YEAR em/END_MONTH ey/END_YEAR
You can use the add command to create a repeater. This also creates the transactions associated with the created repeater.
| Duplicate repeaters, where both repeaters have exactly the same fields, are not allowed in IchiFund. |
The optional arguments take the following default values if left unspecified.
| Argument | Default values |
|---|---|
Category |
"Uncategorised" |
Type |
"exp" |
Month Start Offset |
"-1" (Offset ignored) |
Month End Offset |
"-1" (Offset ignored) |
Constraints:
-
No duplicate repeater currently exists.
-
Repeater end must not occur before repeater start.
-
Repeater start and end can span at most 60 months (5 years).
-
At least one of month start offset or month end offset must not be ignored.
Examples:
-
add de/Phone bills a/42.15 c/Utilities ty/exp so/3 eo/2 sm/1 sy/2019 em/12 ey/2020
This creates a repeater titled "Phone bills" as an expenditure for utilities of $42.15 for every third day and second last day of the month, between January 2019 to December 2020. This also creates the transactions associated with the created repeater.
4.3.2. Editing repeater edit
Format: edit INDEX [de/DESCRIPTION] [a/AMOUNT] [c/CATEGORY] [ty/TRANSACTION_TYPE] [so/MONTH_START_OFFSET] [eo/MONTH_END_OFFSET] [sm/START_MONTH] [sy/START_YEAR] [em/END_MONTH] [ey/END_YEAR]
You can use the edit command to edit a repeater. This also edits the transactions associated with the edited repeater.
| The repeater fields will only be updated where the arguments are specified. |
Constraints:
-
No duplicate repeater currently exists.
-
Repeater end must not occur before repeater start.
-
Repeater start and end can span at most 60 months (5 years).
-
At least one of month start offset or month end offset must not be ignored.
Examples:
-
edit 1 a/31.34 c/Food ty/in so/1 eo/-1 sm/1 sy/2019 em/12 ey/2020
This edits the first repeater in the current list into a $31.34 expenditure for every first day of the month, between January 2019 and December 2020. This also updates the transactions associated with the edited repeater.
4.3.3. Deleting repeater: delete
Format: delete INDEX
You can use the delete command to delete a repeater. This also deletes all transactions associated with the deleted repeater.
Examples:
-
delete 12
Deletes the 12th repeater in the current list. This also deletes the transactions associated with the deleted repeater.
4.3.4. Finding repeater: find
Format: find [KEYWORDS]…
You can use the find command to find repeaters whose description matches any of the (case-insensitive) given keyword(s). If no keyword is specified, then the search filter is cleared.
Examples:
-
find phone john
This finds all repeaters whose description contains any of the keywords "phone" and "john".
4.4. Budgets
After taking the effort to record your expenditures, you want to ensure that you are spending within your limit. This is made simple with the budgeting features in IchiFund.
Each budget that you create will have a description and a maximum expenditure limit. If you are an advanced user who wants finer control in your budgeting, you can also restrict which expenditures to include in your budget computation.
Once you are in the budget tab, you will see a list of your budgets. Here, you can add, delete, and find budgets. The image below gives an overview of the budget interface
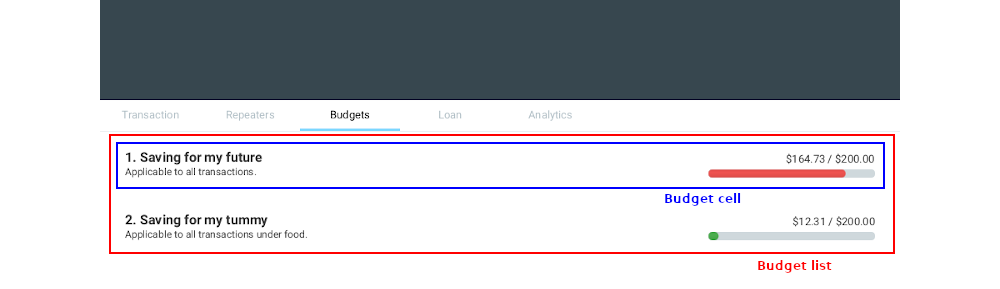
The budget list comprises several budget cells. Each cell represents a single budget. We give a further breakdown of the information each budget cell displays in the following image:

On the left, you will see the index, description, and criteria. The index is used to reference a particular budget in the commands, the description is a phrase you set to identify your budget, and the criteria tell you which expenditure the budget takes into account.
4.4.1. Creating monthly budget: add
Format: add de/DESCRIPTION a/AMOUNT [c/CATEGORY] [m/MONTH y/YEAR]
You can use the add command to create a budget.
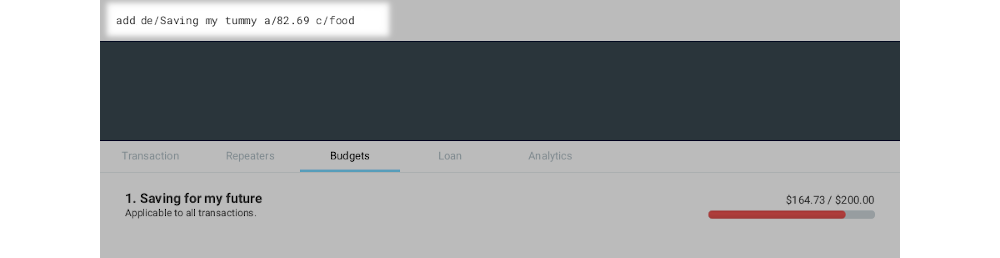
Let us first walk through the process of creating a budget for tracking your spending on food.
-
Check to make sure you are in the budgets tab. If not, switch to it.
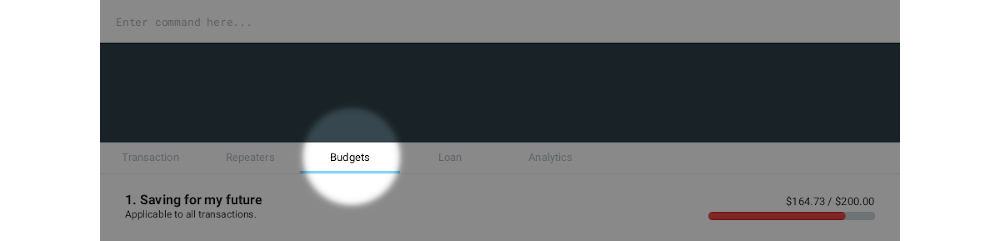
-
Type
add de/Saving my tummy a/82.69 c/foodinto the command bar. This will create an $82.69 budget named Saving my tummy that tracks this month’s expenditures tagged with the food category.
If the optional arguments m/MONTH and y/YEAR are not provided, the budget will track all transactions.
|
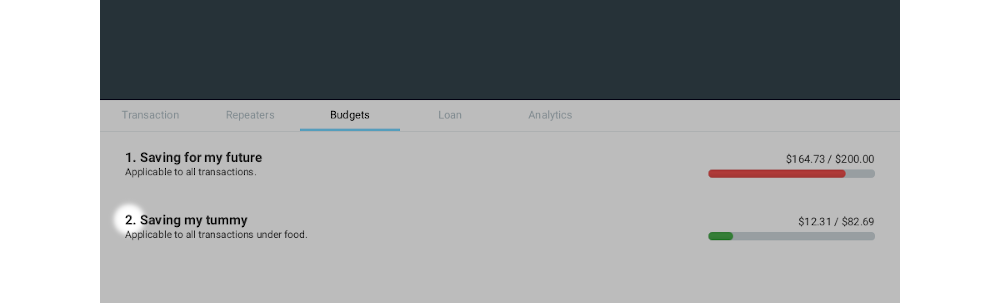
-
Press enter to run the command. You should see the newly created budget on the budget list.

If you want to track all monthly expenditures, simply leave out the c/CATEGORY argument.
For instance, the following command creates a $500.00 budget that applies to all expenditures:
add de/General budgeting a/500.
4.4.2. Deleting monthly budget: delete
Format: delete INDEX
You can use delete to delete a budget with a given index.
Let us walk through the process of deleting the Saving my tummy budget we created previously.
-
Identify the index of the budget you are deleting. Here, the index is 2.
-
Type
delete 2into the command bar and press enter. You should see the Saving my tummy budget disappear from the list.
4.4.3. Finding monthly budget by keywords: find
Format: find [KEYWORDS]…
You can use find to find budgets with description that matches all the given keywords.
To illustrate this, let us suppose you want to find all budgets with saving in its description.
To do so, type find saving into the command bar and press enter.
You should see the search result on the budget list.
| If you are unsure about which keywords the budget you are looking for contains, you can enter multiple keywords separated by space. IchiFund will return to you all results that match with at least one keyword. |
You can also revert the budget list to show all budgets by executing find without any argument.
To revert the budget list so that all budgets are listed, simply execute find without any argument.
4.5. Loans
In a social setting, finances aren’t limited to just one persons own spending, one is bound to have to borrow/lend money.
This borrowing and lending can make it hard to keep track of how much money you actually have.
With the loans feature you can keep track of the amount you owe, the name of the person you owe it to and the date by which you have to return it.
4.5.1. Adding loan: add
Format: add a/AMOUNT [c/NAME] [sm/START_MONTH] [sy/START_YEAR] [em/END_MONTH] [ey/END_YEAR] [de/DESCRIPTION]
You can use the add command to create a loan. This also creates the other objects associated with the created repeater.
The optional arguments take the following default values if left unspecified:
| Argument | Default values |
|---|---|
Description |
"No Description" |
Name |
"No Name" |
Start Day |
"12" |
Start Month |
"12" |
Start Year |
"2019" |
End Day |
"1" |
End Month |
"2" |
End Year |
"2020" |
Constraints:
-
Loan end must not occur before it’s start.
-
Description, Name and Dates are Alphanumeric.
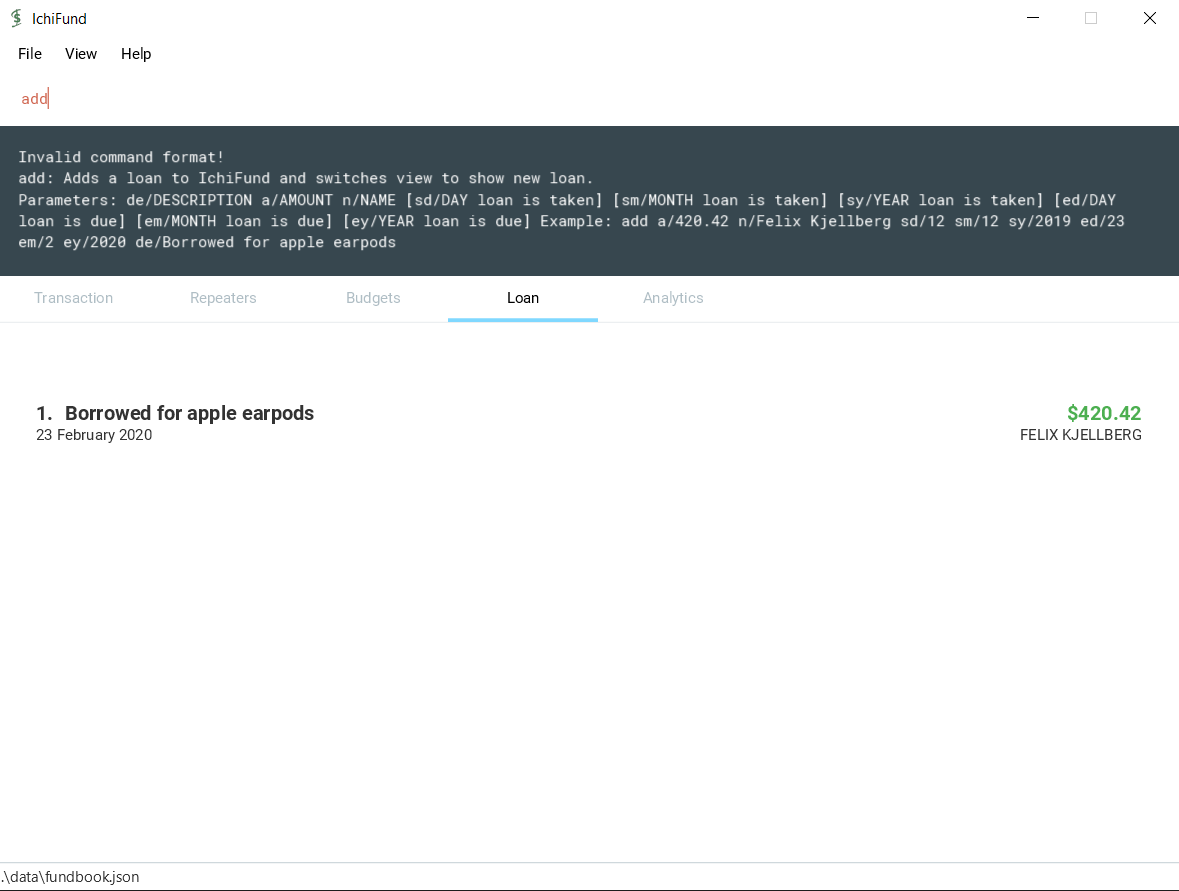
Example:
-
`add a/420.42 n/Felix Kjellberg sd/12 sm/12 sy/2019 ed/23 em/2 ey/2020 de/Borrowed for apple earpods `
This creates a loan of 420.42 for "Buying airpods" taken on 12 December 2019 to 02 February 2020.
4.5.2. Editing new loan: edit
Format: edit INDEX [a/AMOUNT] [de/DESCRIPTION] [n/NAME] [sm/START_MONTH] [sy/START_YEAR] [em/END_MONTH] [ey/END_YEAR]
You can use the edit command to edit a loan. This can change any attribute(s) of the loan.
| The loan fields will only be updated where the arguments are specified. |
Constraints:
-
Loan end date must not occur before loan start date.
-
Index must be specified, no change occurs otherwise.
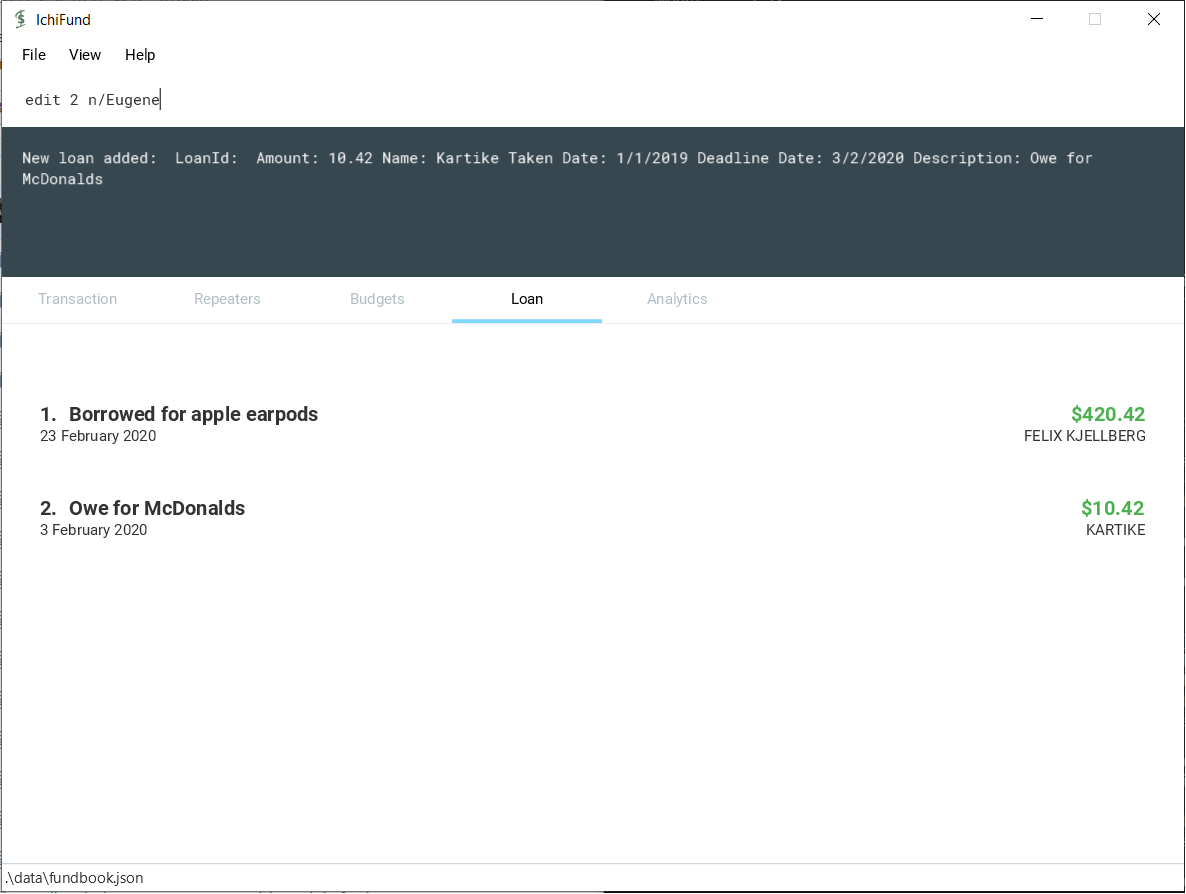
Example:
-
edit 1 de/Current Student Loan a/99999.99 n/DBS SG Bank sd/1 sm/1 sy/2020 ed/30 em/12 ey/2021
This edits the first loanr in the current list to - $99999.99 loan taken on 1st January 2020 and to be paid back by 30th December 2021.
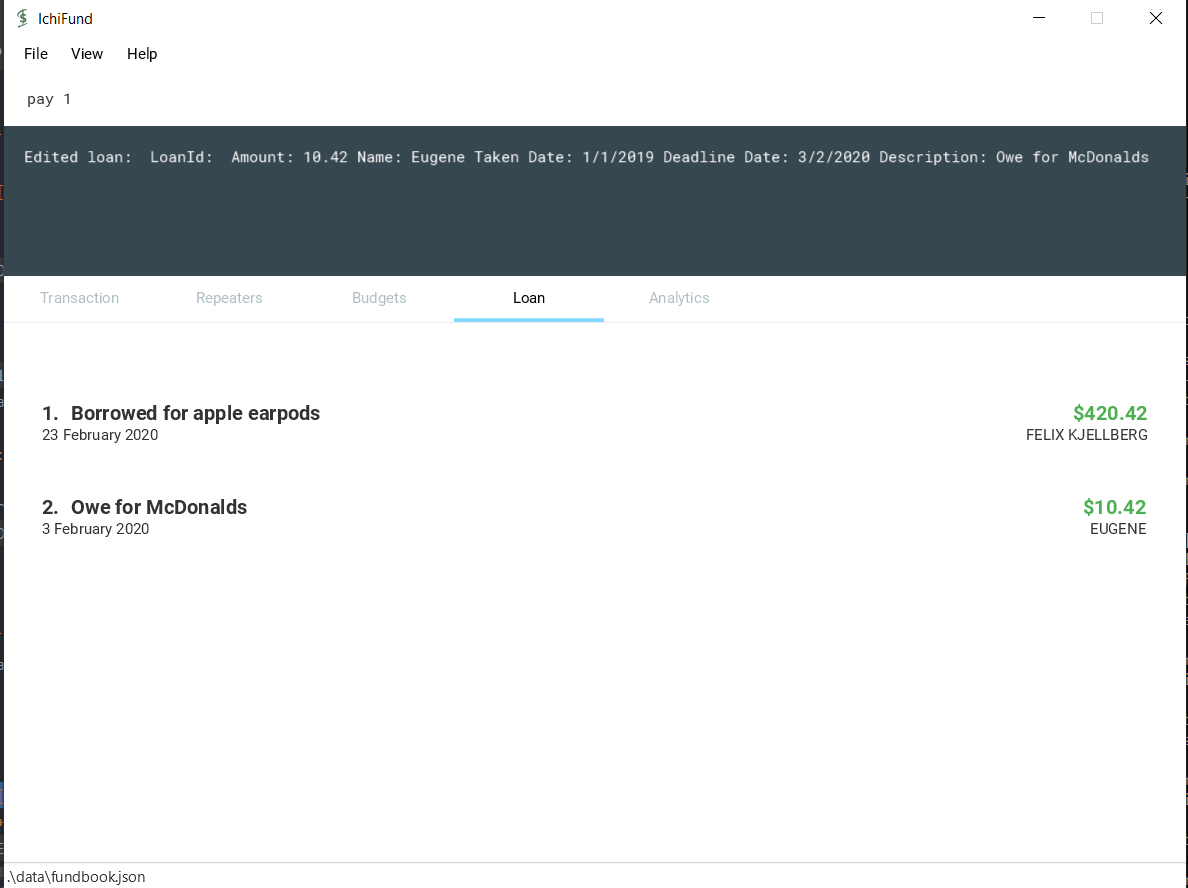
4.5.3. Marking Loan Paid: paid
Mark loan as paid and remove it from the list.
Take any loan, with an outstanding loan amount, and when it is paid off, it can referenced by it’s index to be removed.
Format: pay i/INDEX
4.6. Analytics
Have you ever wondered where all your money is going? Our analytics feature provides deeper insights into your incomes and expenditures, so that you can take control of your personal finances.
On startup, the analytics tab is empty.
With each analytics command entered, the analytics tab is updated with the list of command results. The image below gives an overview of the GUI of the feature:
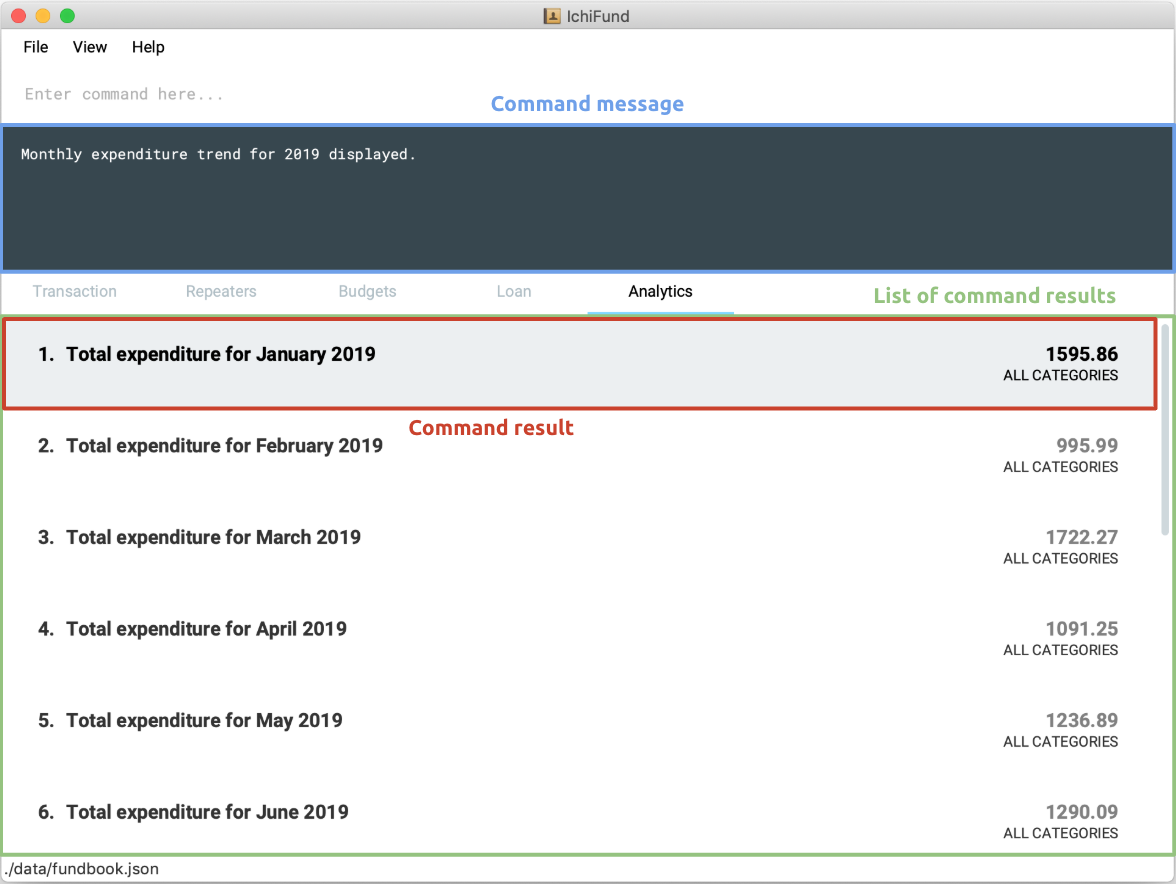
The list of command results comprises several result cells. We give a further breakdown of the information each cell displays in the following image:

For all commands in the analytics feature, if the optional arguments m/MONTH and/or y/YEAR are not provided,
results for the current month and/or year in the system time will be displayed.
|
4.6.1. Viewing expenditure trend: expenditure
Format: expenditure [y/YEAR]
You may have committed to reducing your expenditure, but you are unsure if you are on the right track.
With the expenditure command, you can take a quick look at your monthly expenditure trends to measure your success in
cutting your expenditure.
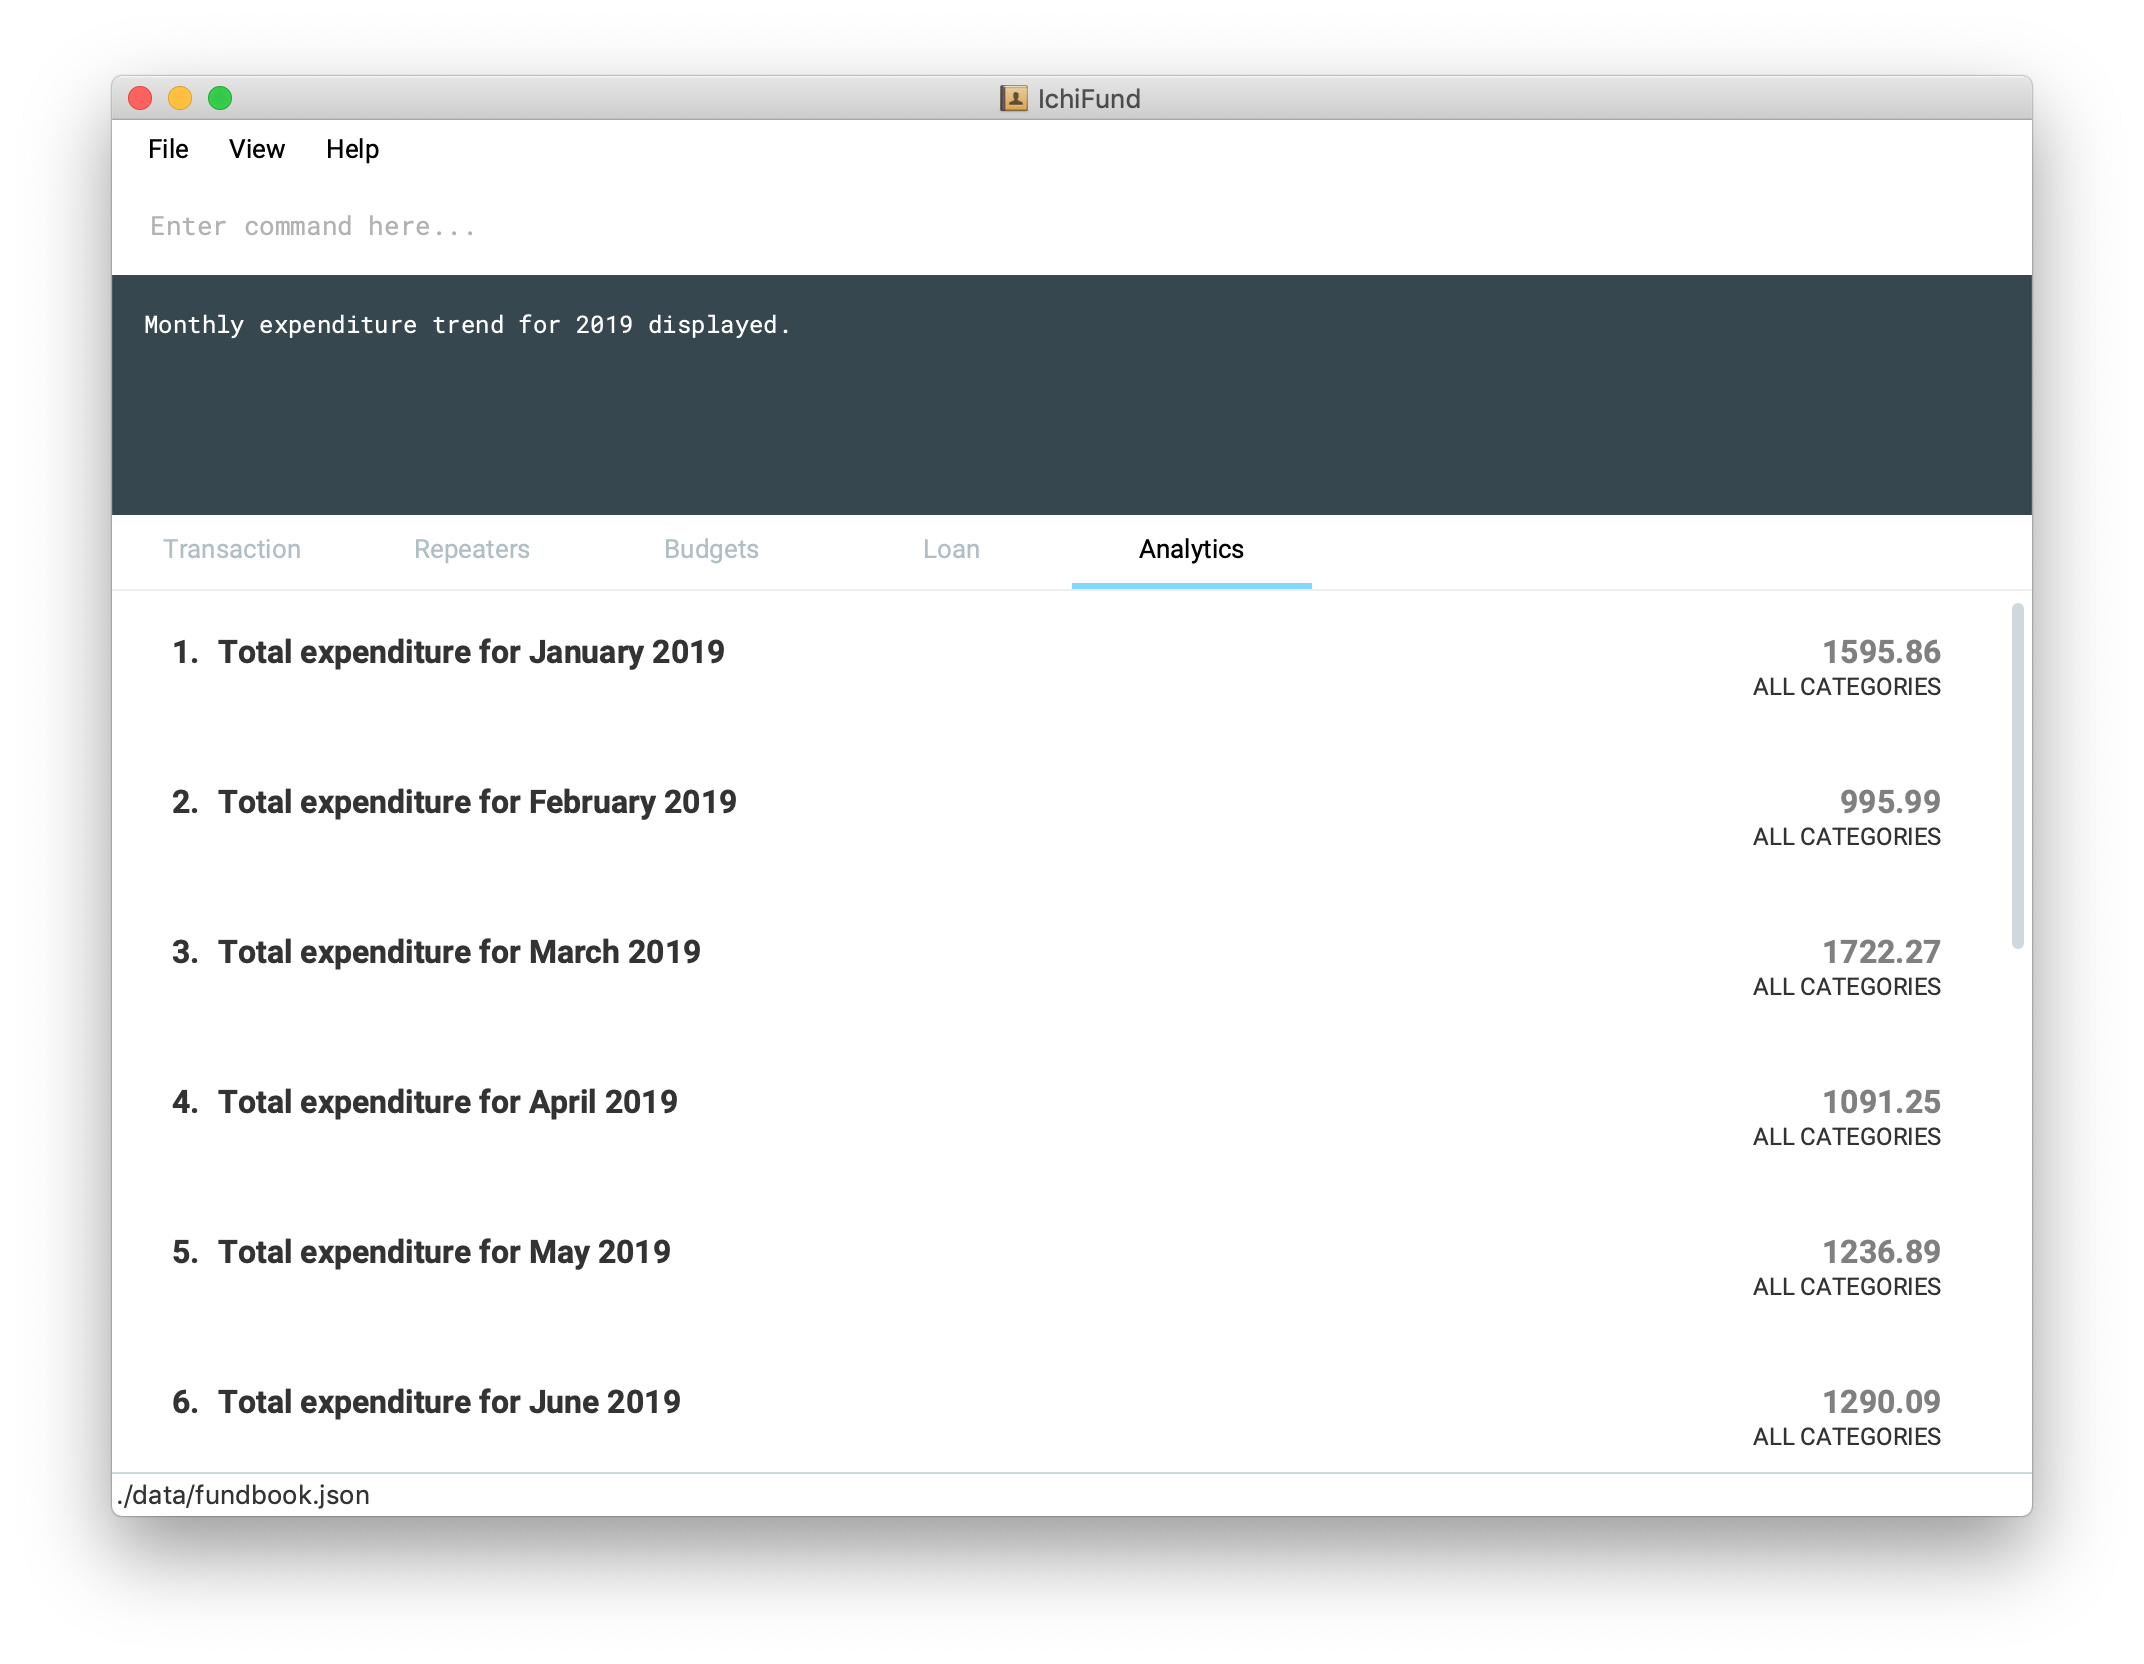
Suppose you made a New Year’s resolution to track your personal finances using IchiFund, and you have been diligently
adding transactions since the start of 2019. After entering the expenditure command, the GUI of IchiFund may look like this:
Examples:
-
expenditure
Displays monthly expenditure trend for current year. -
expenditure y/2019
Displays monthly expenditure trend for 2019.
4.6.2. Viewing income trend: income
Format: income [y/YEAR]
Perhaps you are contemplating asking for a promotion at your part-time job or seeking a better-paying place of employment.
The income command gives you a clear overview of your monthly income trends, allowing you to make more informed decisions
regarding your source of income (or the lack thereof).
Suppose you work part-time at a restaurant, but business has been slow for the past few months, and your boss decides to
give you a pay cut. After entering the income command, the GUI of IchiFund may look like this:

Examples:
-
income
Displays monthly income trend for current year. -
income y/2019
Displays monthly income trend for 2019.
4.6.3. Viewing balance trend: balance
Format: balance [y/YEAR]
Maybe you have set a target for yourself to accumulate a certain amount of money in your savings account by the end of the year.
With the balance command, you will be able to take a look at your monthly balance (income - expenditure) trends,
and determine if more needs to be done to hit your target.
Let’s say you have been saving up for a new laptop as your old one is due for a repair. With the recent pay cut, you are
unsure if you will be able to save up enough money to purchase the laptop in time for the start of the next school semester.
After entering the balance command, the GUI of IchiFund may look like this:
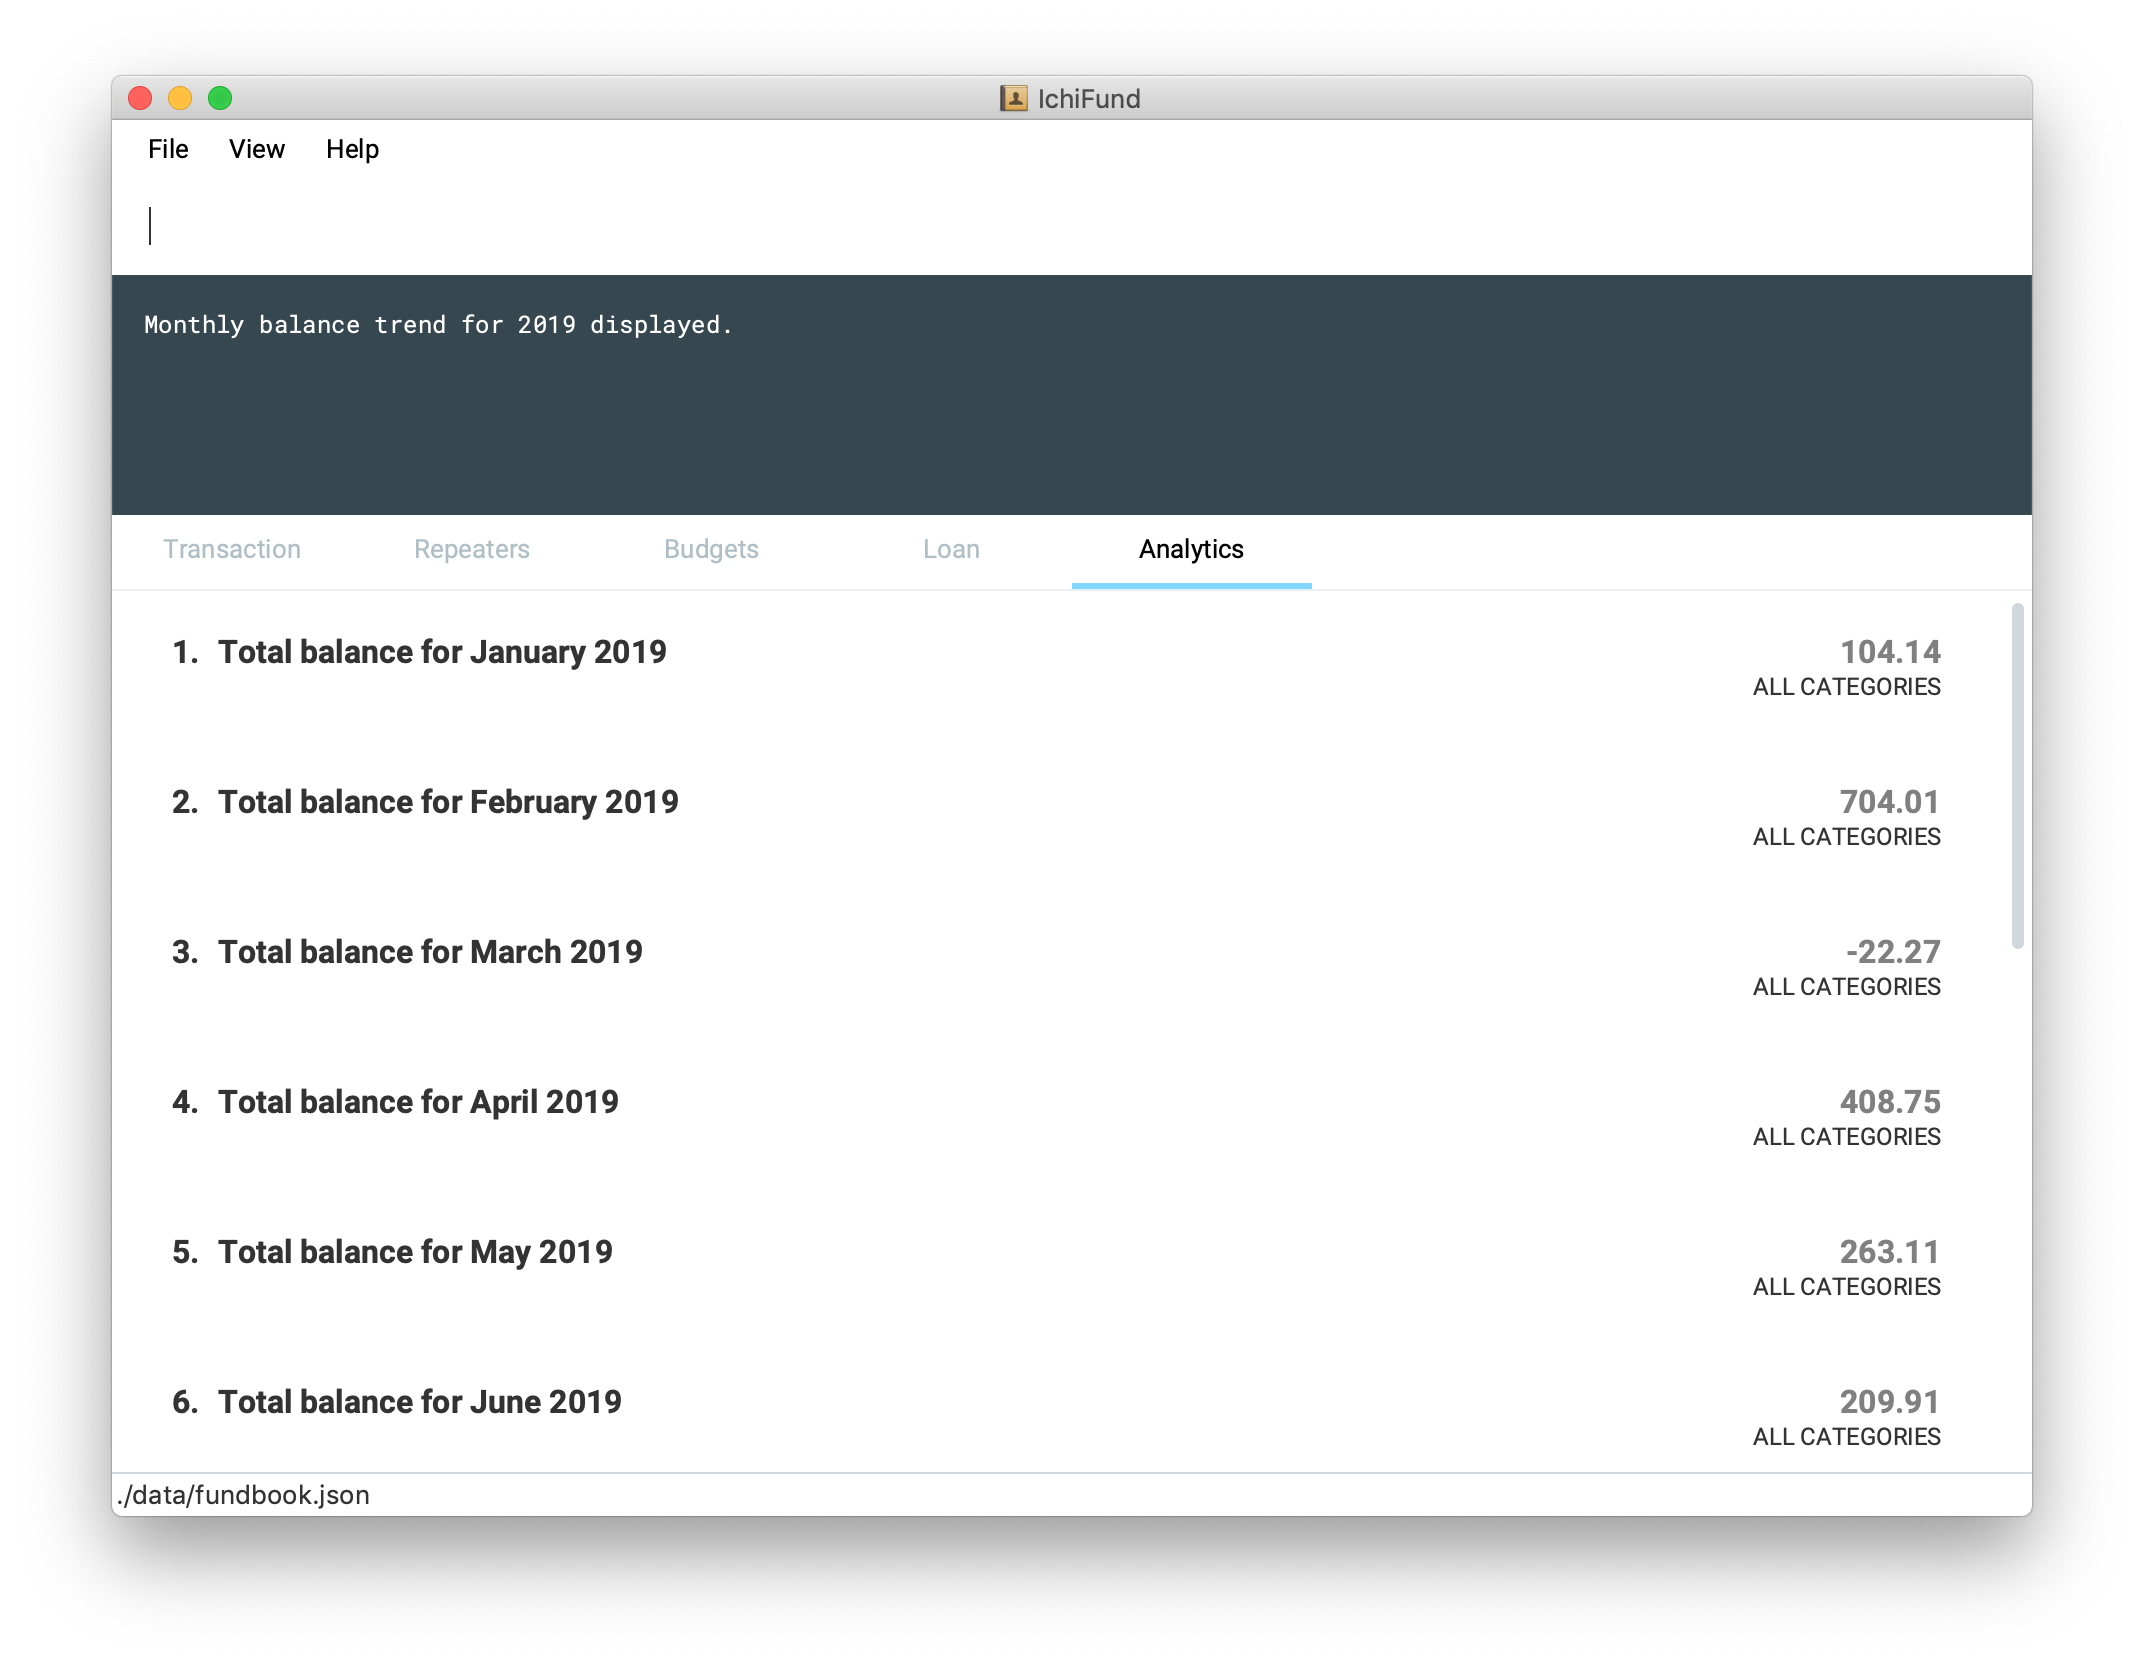
You now know that you are on track to getting your laptop in spite of the pay cut.
Examples:
-
balance
Displays monthly balance trend for current year. -
balance y/2019
Displays monthly balance trend for 2019.
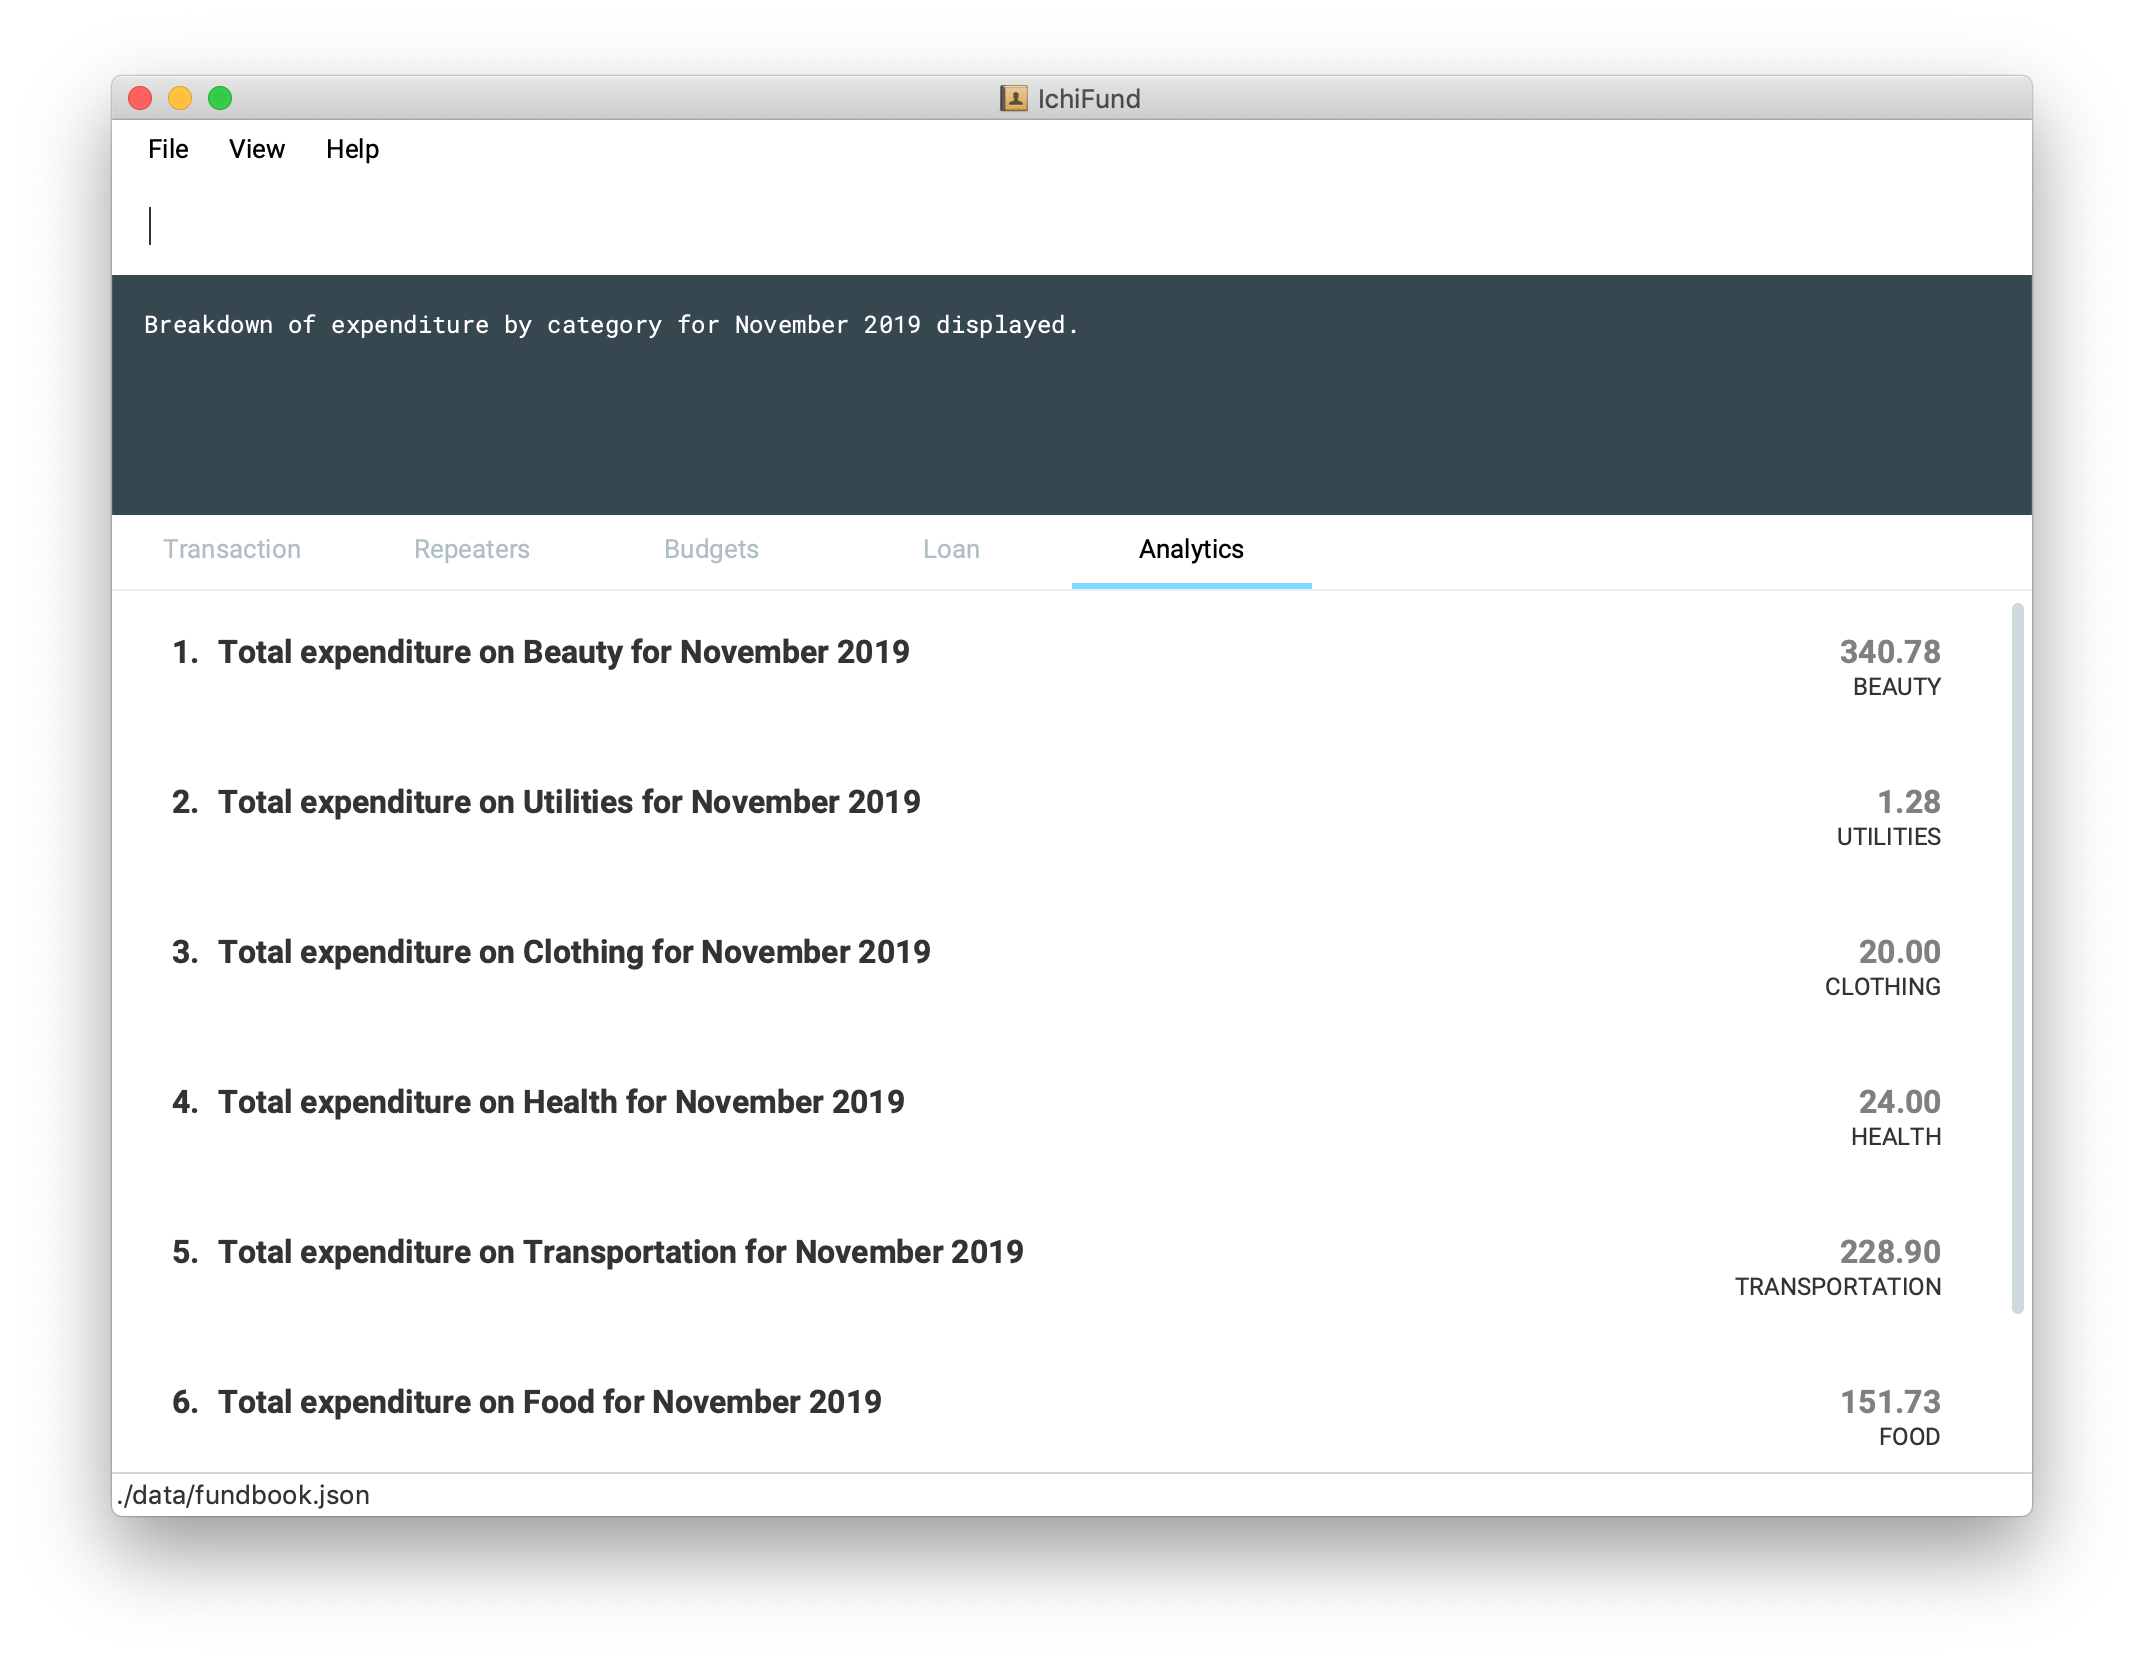
4.6.4. Viewing expenditure breakdown by category: breakdown
Format: breakdown [m/MONTH] [y/YEAR]
Perhaps you have entered the expenditure command, and you are now aware that you are spending more than you would like to, but you are still
unsure what is it exactly that you are spending the bulk of your money on.
With the breakdown command, you will be given a clear breakdown of your expenditure by category, and hence
be able to pinpoint the categories that have larger contributions to your expenditure.
It is now mid-November, and your expenditure has exceeded half of your monthly budget. Clueless as to what you could have spent on,
you enter the breakdown command, and the GUI of IchiFund may look like this:
Examples:
-
breakdown
Displays expenditure breakdown by category for current month. -
breakdown m/7 y/2019
Displays expenditure breakdown by category for July 2019.
4.6.5. Viewing expenditure category ranking chart: catrank
Format: catrank [m/MONTH] [y/YEAR]
What if, instead of the breakdown of your expenditure by category, i.e., breakdown, you wanted to zoom in on the top 2
largest contributing categories to your expenditure so as to cut down on your expenditure more effectively?
With the catrank command, you can take a look at your expenditure category ranking chart, and hence
be able to zoom in on and cut down on expenditure for categories that have the largest contributions to your expenditure.
| The expenditure category ranking chart is in decreasing order, i.e., the categories with higher expenditure will be at the top of the list, and the categories with lower expenditure will be at the bottom of the list. |
As the month comes to a close, you realise that you have transactions from many categories, and running the breakdown command
returns you a view that is too cluttered for your liking.
After you enter the catrank command, and the GUI of IchiFund may look like this:
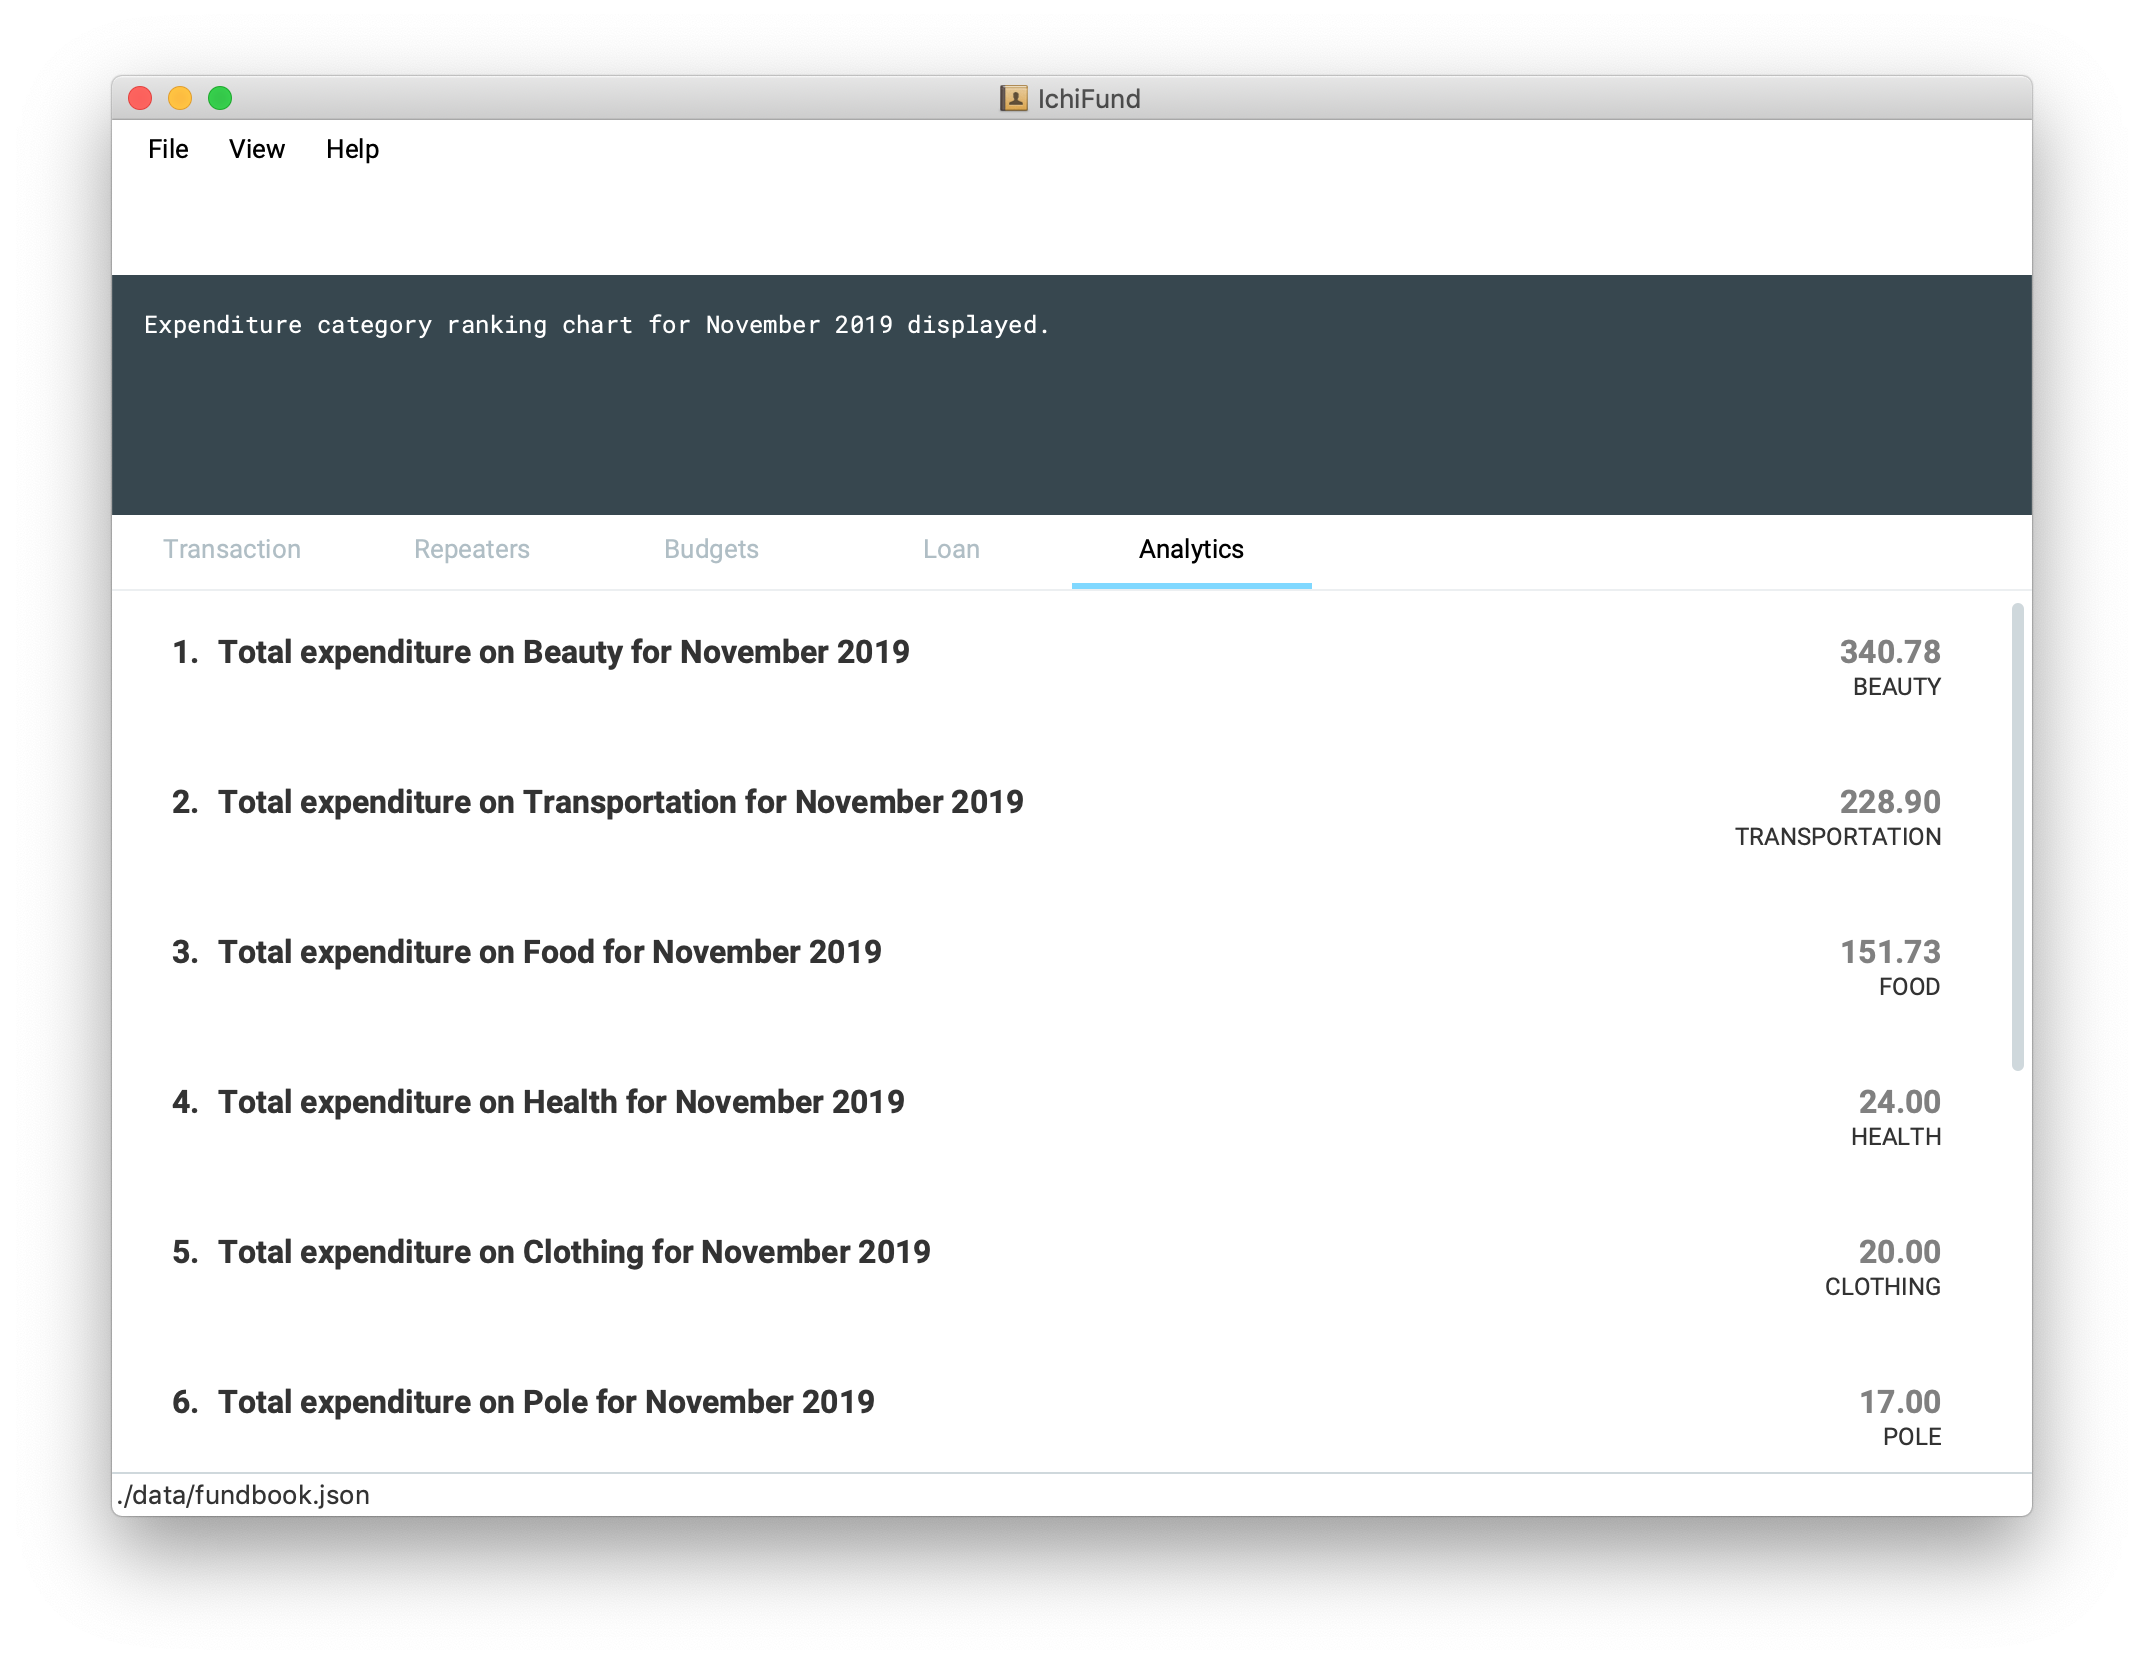
With the catrank command, you are now able to identify that it must have been the trips to the beauty salon
and the Grab rides you take on a daily basis that have contributed to your overspending, and that perhaps you should
consider painting your own nails and taking public transport to school instead.
Examples:
-
catrank
Displays expenditure category ranking chart for current month. -
catrank m/7 y/2019
Displays expenditure category ranking chart for July 2019.
4.6.6. Viewing expenditure ranking chart by month: mthrank
Format: mthrank [y/YEAR]
If you have a tendency to overspend in certain seasons or on certain occasions, with the mthrank command, you can look
at your expenditure ranking chart by month, swiftly identify the months that you spend most in and take steps
to reduce your expenditure in the same few months in the years to come.
| The expenditure ranking chart by month is in decreasing order, i.e., the months with higher expenditure will be at the top of the list, and the months with lower expenditure will be at the bottom of the list. |
Let’s say you have always planned overseas trips over the summer break. After entering the mthrank command,
the GUI of IchiFund may look like this:
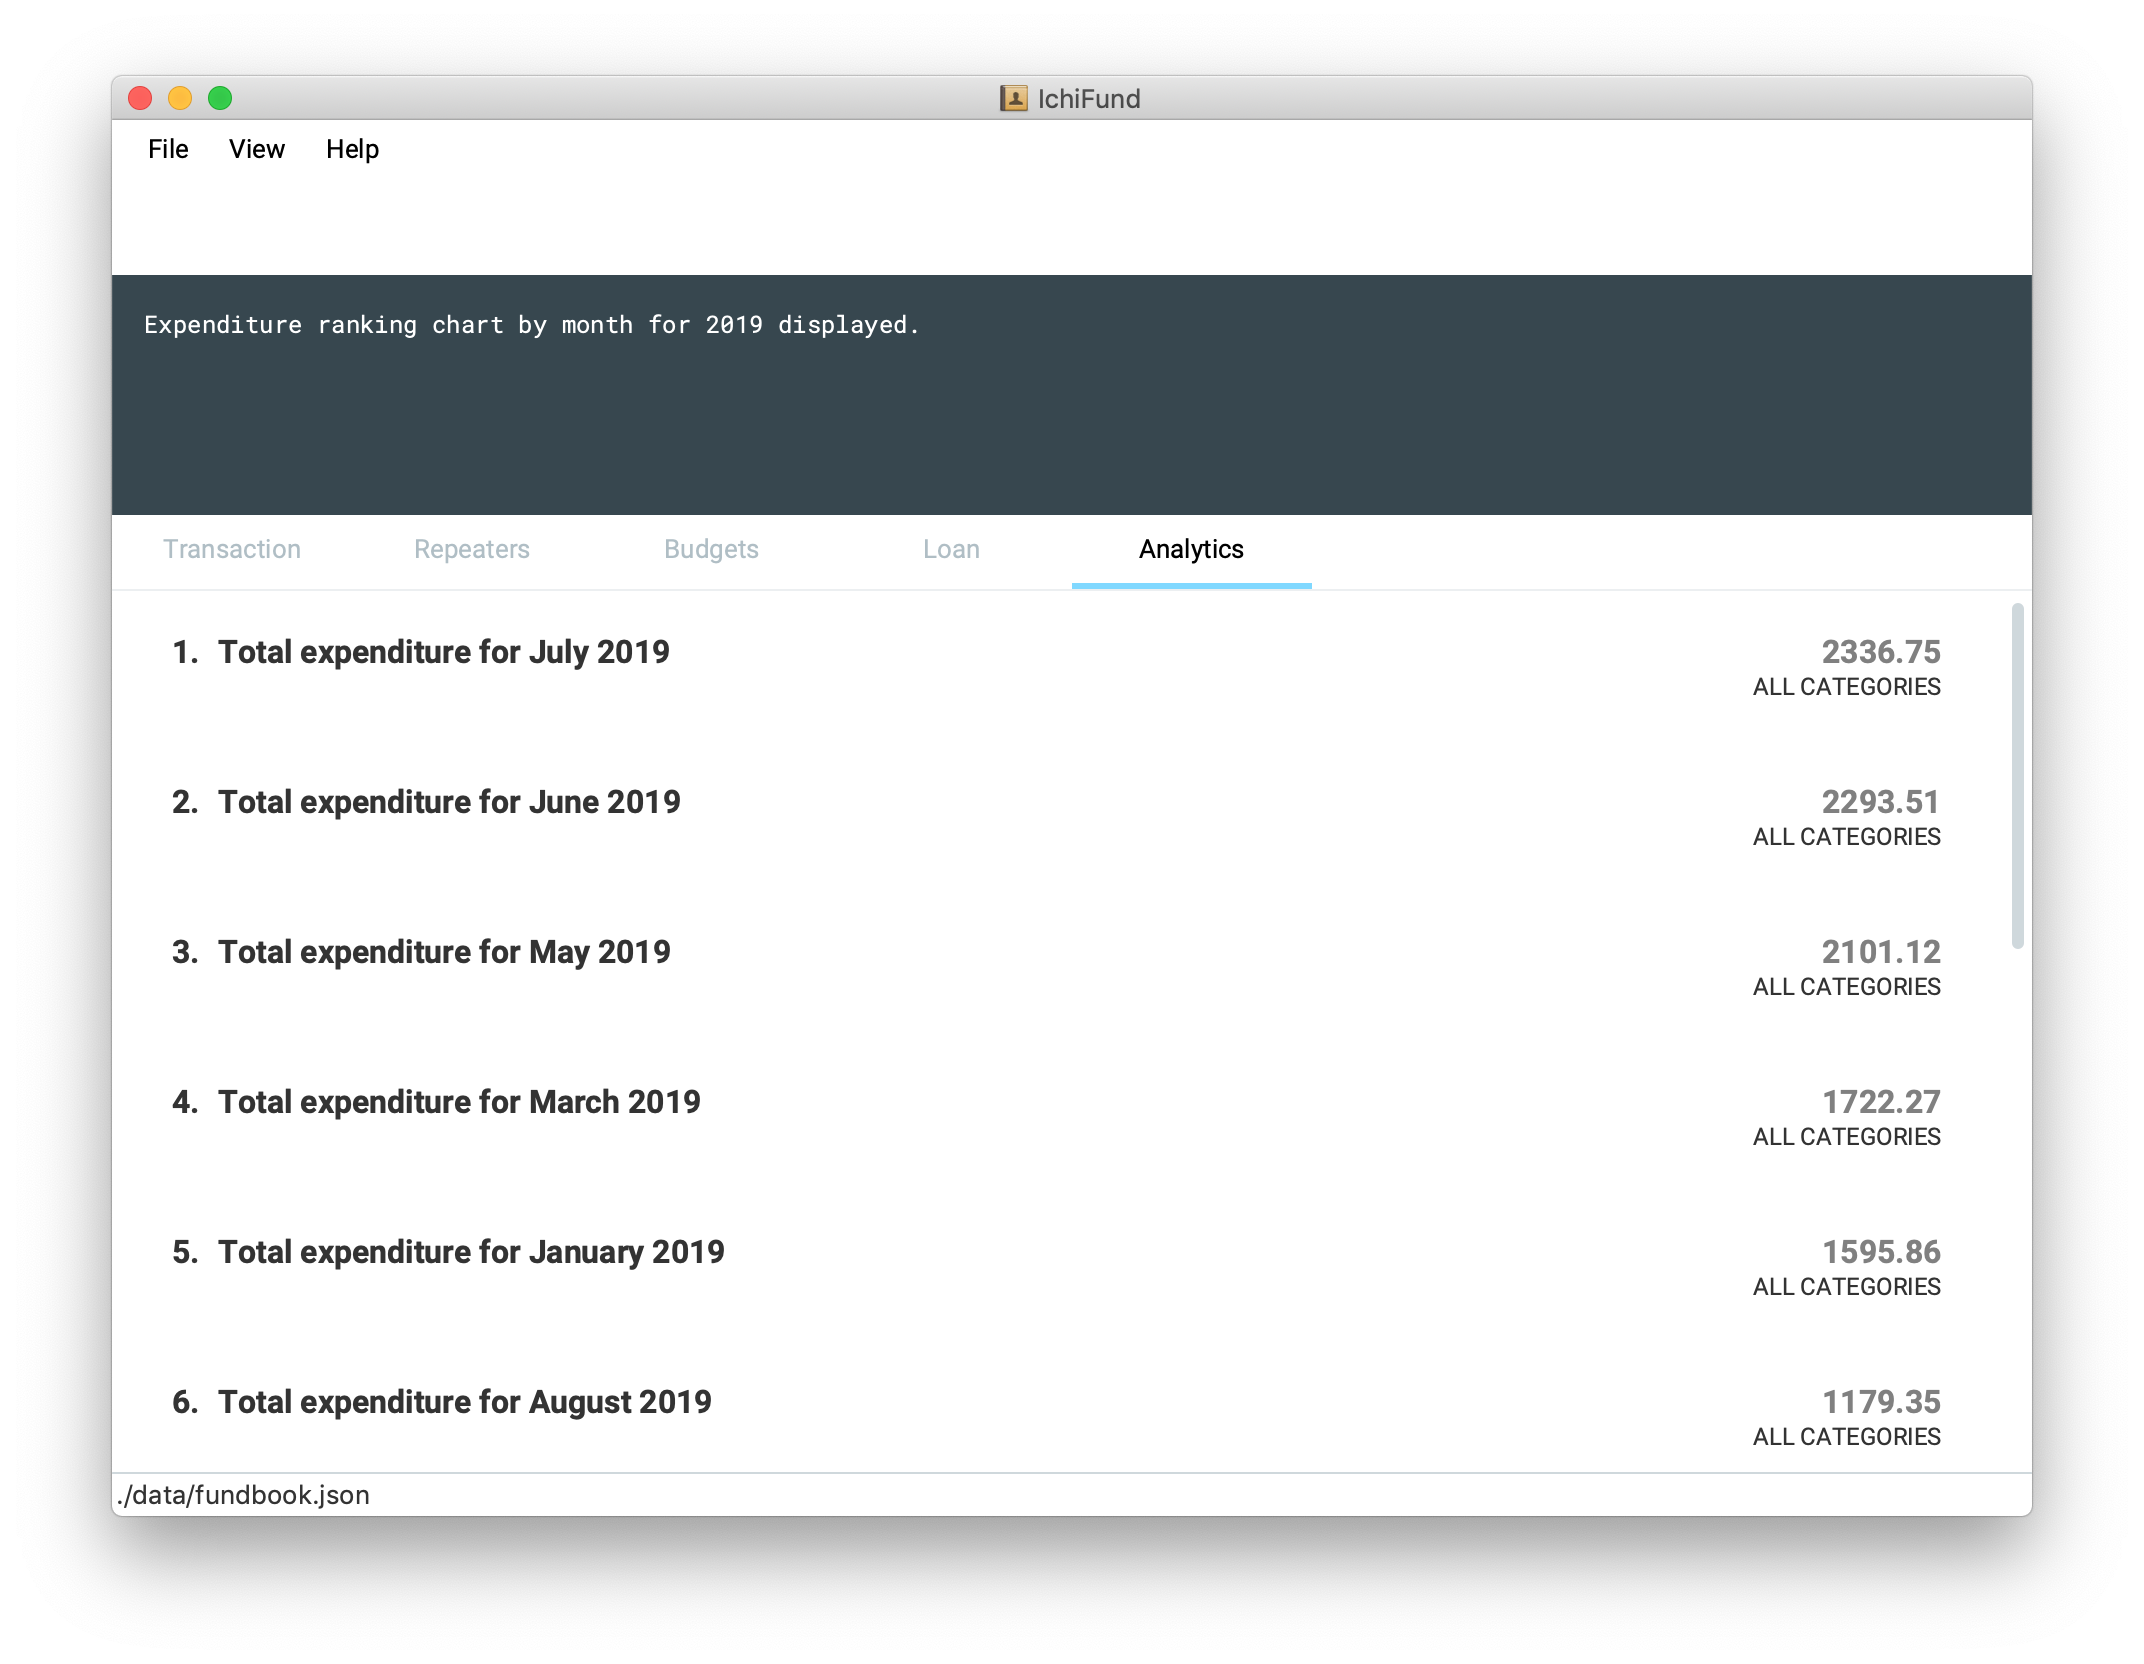
You are now aware that the expenditure on and during these overseas trips are burning a hole in your pocket, and can take measures to set a budget before going on these trips or reduce the frequency of such trips.
Examples:
-
mthrank
Displays expenditure ranking chart by month for current year. -
mthrank y/2019
Displays expenditure ranking chart by month for 2019.
4.6.7. Viewing expenditure ranking chart: exprank
Format: exprank [m/MONTH] [y/YEAR]
If you are keen to identify the biggest purchases you make so that you can cut your expenditure swiftly,
the command exprank is what you are looking for. exprank allows you to look at your expenditure ranking chart.
| The expenditure ranking chart is in decreasing order, i.e., the bigger purchases will be at the top of the list, and the smaller purchases will be at the bottom of the list. |
Let’s say you have made a couple of big purchases over the course of the year. After entering the exprank command,
the GUI of IchiFund may look like this:

You are now aware that cutting expenditure on luxury items and gadgets would probably do wonders for the health of your wallet.
Examples:
-
exprank
Displays expenditure ranking chart for current year. -
exprank y/2019
Displays expenditure ranking chart for 2019. -
exprank m/7 y/2019
Displays expenditure ranking chart for July 2019.
5. FAQ
Q: How do I transfer my data to another Computer?
A: Install the app in the other computer and overwrite the empty data file it creates with the file that contains the data of your previous IchiFund folder.
6. Command Summary (v1.4)
-
Help :
help -
Exit :
exit -
Transaction Add :
add de/DESCRIPTION a/AMOUNT [c/CATEGORY] [d/DAY] [m/MONTH] [y/YEAR] [ty/TRANSACTION_TYPE] -
Transaction Edit :
edit INDEX [de/DESCRIPTION] [a/AMOUNT] [c/CATEGORY] [d/DAY] [m/MONTH] [y/YEAR] [ty/TRANSACTION_TYPE] -
Transaction Delete :
delete INDEX -
Transaction Filter :
filter [m/MONTH] [y/YEAR] [c/CATEGORY] [ty/TRANSACTION_TYPE] -
Repeater Add :
add de/DESCRIPTION a/AMOUNT [c/CATEGORY] [ty/TRANSACTION_TYPE] [so/MONTH_START_OFFSET] [eo/MONTH_END_OFFSET] sm/START_MONTH sy/START_YEAR em/END_MONTH ey/END_YEAR -
Repeater Edit :
edit INDEX [de/DESCRIPTION] [a/AMOUNT] [c/CATEGORY] [ty/TRANSACTION_TYPE] [so/MONTH_START_OFFSET] [eo/MONTH_END_OFFSET] [sm/START_MONTH] [sy/START_YEAR] [em/END_MONTH] [ey/END_YEAR] -
Repeater Delete :
delete INDEX -
Repeater Filter :
find KEYWORD [MORE_KEYWORDS] -
Loan Add new :
add a/Amount [d/DATE] [n/NAME] [d/DESCRIPTION] [sd/DAY] [sm/MONTH] [sy/YEAR] [ed/DAY] [em/MONTH] [ey/YEAR] -
Loan Edit :
add i/Index a/Amount [d/DATE] [n/NAME] [d/DESCRIPTION] [sd/DAY] [sm/MONTH] [sy/YEAR] [ed/DAY] [em/MONTH] [ey/YEAR] -
Loan Pay :
pay i/Index -
Budget Add :
add de/DESCRIPTION a/AMOUNT [c/CATEGORY] [d/day m/MONTH y/YEAR] -
Budget Delete :
delete i/INDEX a/Amount [n/Name] -
Budget Find :
find [KEYWORDS]… -
Expenditure Trend :
expenditure [y/YEAR] -
Income Trend :
income [y/YEAR] -
Balance Trend :
balance [y/YEAR] -
Categorical Breakdown :
breakdown [m/MONTH] [y/YEAR] -
Categorical Ranking Chart :
catrank [m/MONTH] [y/YEAR] -
Month-Based Ranking Chart :
mthrank [y/YEAR] -
Ranking Chart :
exprank [m/MONTH] [y/YEAR]